Stop Posing Twice: How PoseMyArt's "Attach to Joint" Feature Saves Your Workflow
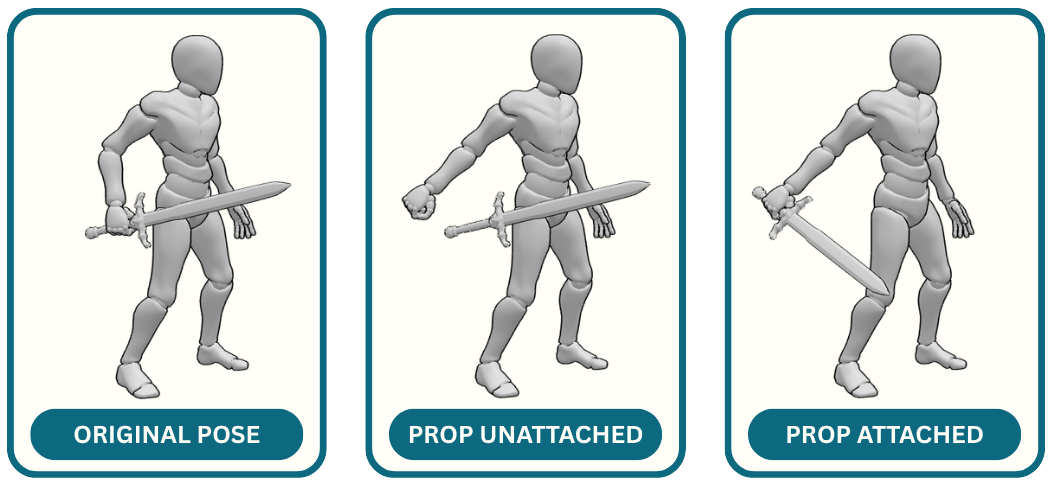
You get your model’s pose just right on PoseMyArt. A fierce swordsman leaping through the air, rearing for a killing blow. The camera angle looks just right. The silhouette works.
You decide to bend the arms just a little more.
Oops. The sword gets left somewhere behind your character’s grip because you adjusted the arms and forgot that the sword wasn’t coming along for the ride.
So now you move the sword, rotate it, line it up with the hands, adjust the fingers again…
And if you decide the arms need just a little more adjustment?
Yep, you’re doing it all over again.
If you use 3d pose reference apps like PoseMyArt to help with drawing your characters, you’ve probably run into this exact situation before- “double-posing.”
It’s this kind of interruption that can seriously interrupt what should have been a quick pose reference setup.
Attach to Joint with PoseMyArt
The PoseMyArt app now has a feature that helps you avoid “double-posing.” Attach to Joint lets you choose any prop in your app workspace and attach it to a specific joint on any model.
Once attached, props follow that joint, no matter how much you move a limb. This saves you from manually repositioning a prop when you have to adjust a pose or move a model.
Sword in hand? It stays in the hand.
Hat on a character? It stays on the head.
Shield strapped to an arm? You can bend and swing that arm without worrying that the shield will get left behind.
You can spend less time “double-posing” and perfecting your reference, and more time drawing from it.
How to Attach a Prop to a Joint in PoseMyArt
If you’re new to the feature, here are the steps to attaching your prop to a joint.
1. Select your prop
Click the prop you want to attach. This opens its sub-menu at the bottom left of the PoseMyArt screen.
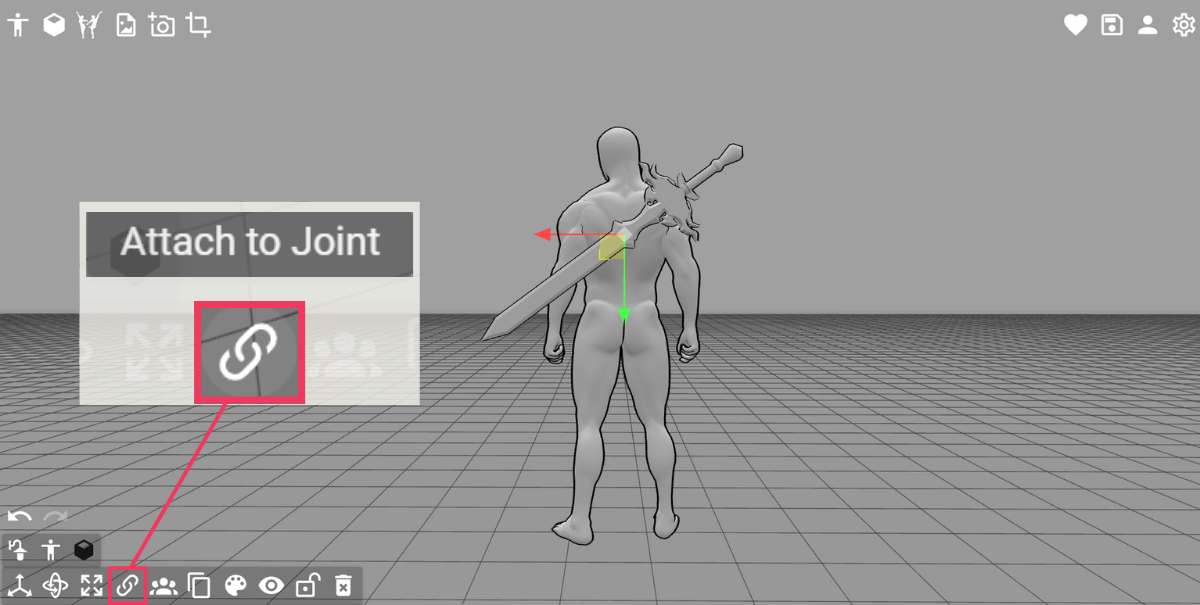
2. Click “Attach to Joint”
Select the Attach to Joint icon from the sub-menu.
Your available character models will start blinking and glowing cyan, showing you which models you can attach the prop to.
3. Choose your character
Click the model you want the prop attached to. The model’s eligible joint points will then glow pink.
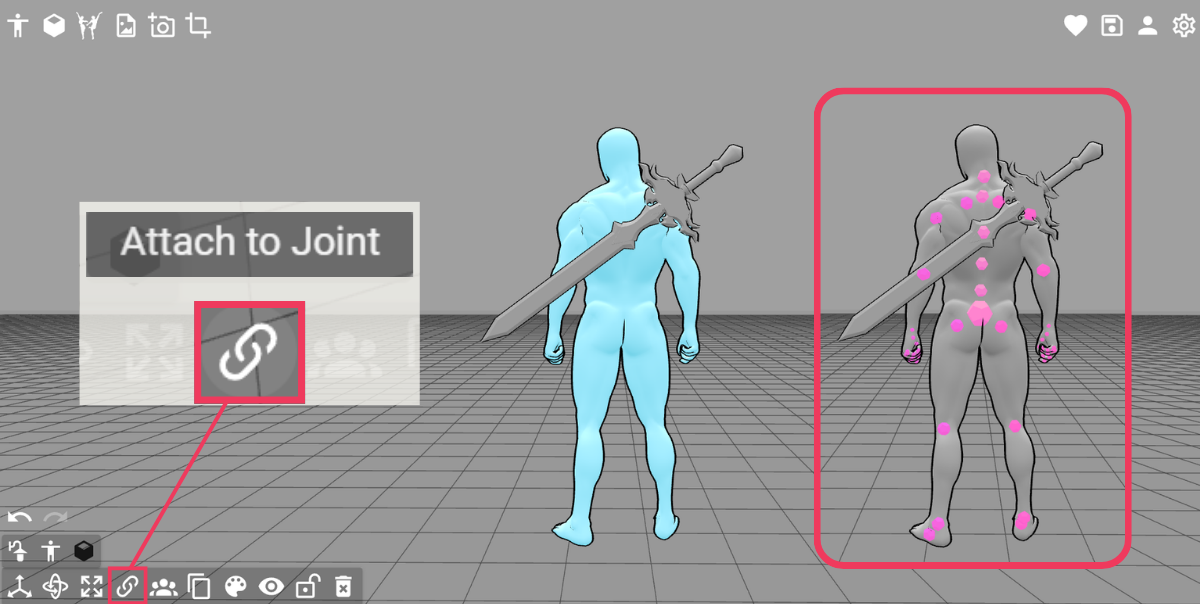
4. Choose the joint
Click the pink joint point where you want the prop to stay attached to, such as the hand, head, or ankle.
And that’s it.
The prop is now attached to that joint and will follow it as you adjust your character’s pose.
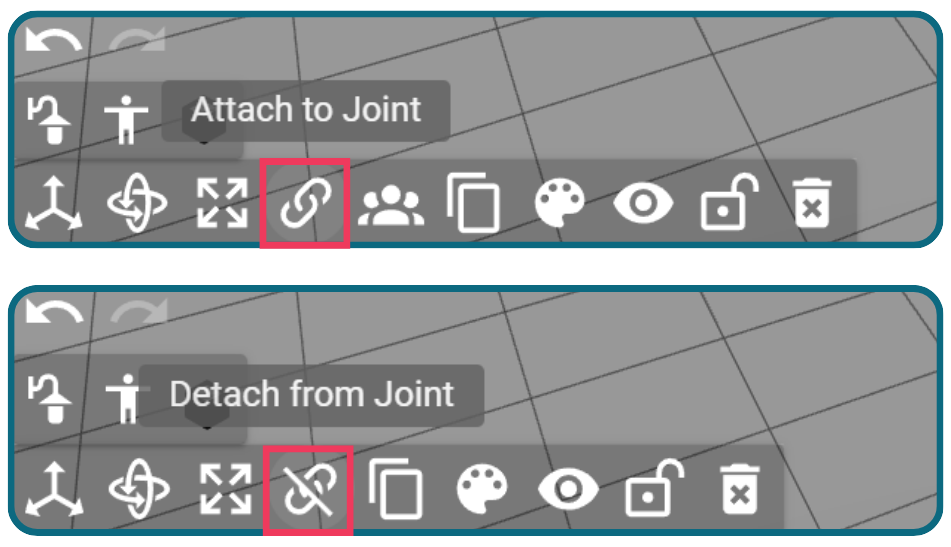
You’ll also notice that Attach to Joint changes to Detach from Joint in the sub-menu. Whenever you want the prop to move independently again, click it to detach the prop.
When this Gets Super Useful
Being able to attach a prop sounds like a small feature until you start building more complicated references on PoseMyArt.
Any time a character needs to hold, carry, or wear something, keeping that object attached can save you from fixing its position over and over.
Here are a few ways I’d use it when creating drawing references.
Make Complicated Scenes Easier to Manage
Similar to groups, when you attach a prop to a joint, you’ll be able to move a character and its props together instead of one at a time.
This is useful when setting up references for comics, illustrations, and storyboards.
What’s even greater about the Attach to Joint feature is that you can also adjust the pose, and the attached prop stays with them.
Here’s a sample. Let’s upload three (3) different props and place them on a model- a sword, a backpack, and a shield. Without attaching the props to joints yet, I change the pose dramatically to a pre-made running pose.
Immediately, we see how the props have stayed in their original places while the model’s pose totally changed.
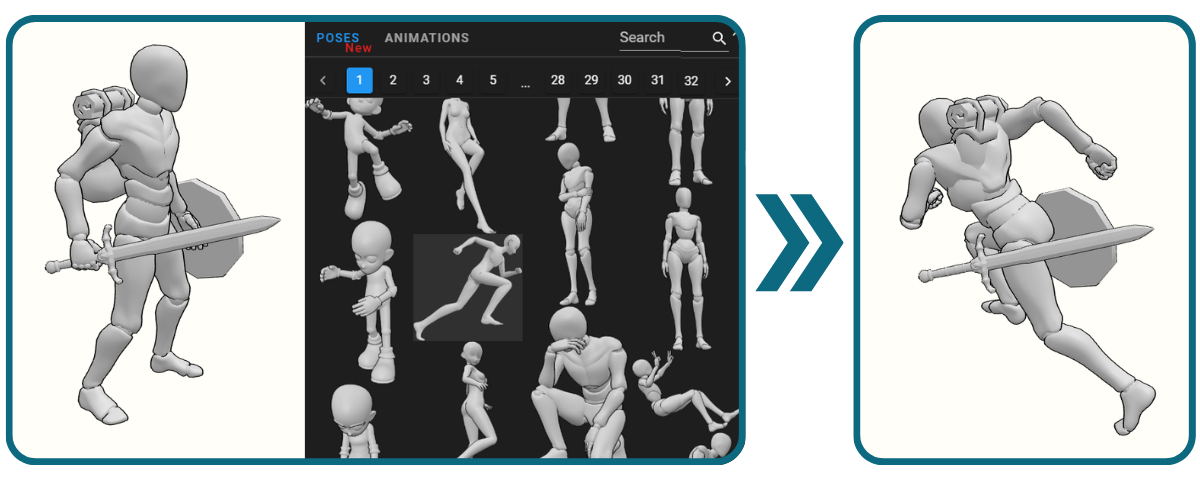
Let’s try that again.
In the model’s original standing pose, I now attach each prop to different model joints. The sword and shield to the right and left wrists, and the backpack to the abdomen. Once safely attached, let’s see what happens when we try changing again to the pre-made running pose.
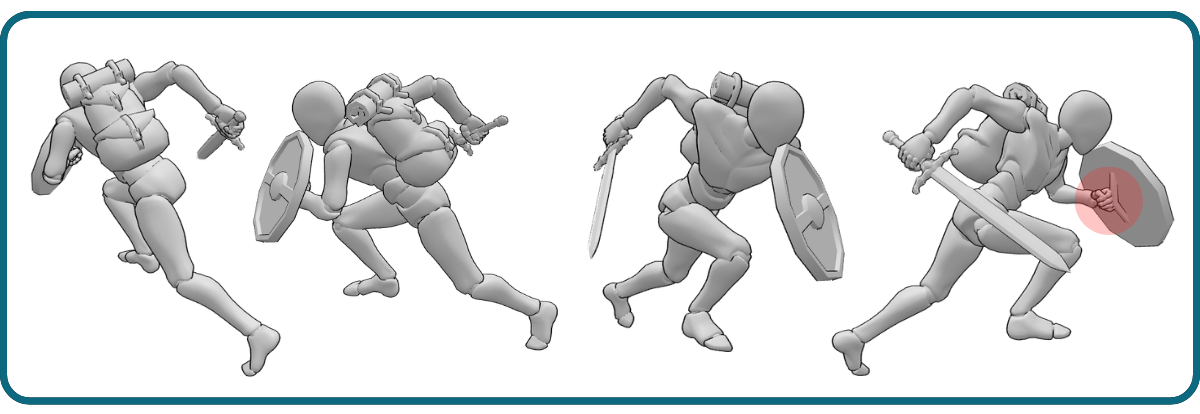
See the difference? These shots were taken without any tweaks or adjustments made to the props or the finer details of the pose. The props adjusted to the pose beautifully and look good from different angles. Only a closeup at a certain angle reveals where the hand grip doesn’t correctly hold the shield.
Pro Workflow Tip: Using Groups and Attach to Joint Together
When you attach props to individual models, you can use the Attach to Joint feature to keep them grouped together.
Use the Group feature to further organize your accessorized models together with other models, props, or objects that are in one setting. You can put multiple models and their accessories in one group.
This way, you can move the whole group and individual accessorized models as needed.
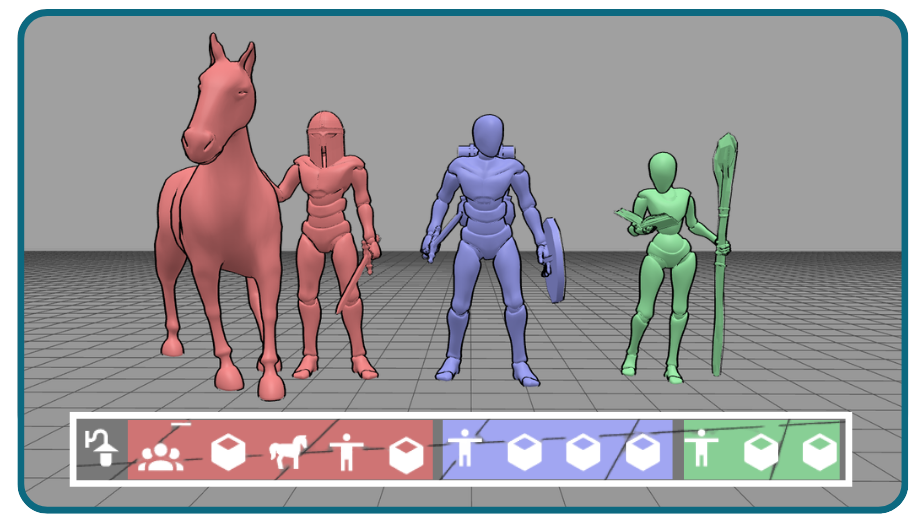
Note: When you attach props to a model, are immediately “grouped” with the model. You’ll notice that when you click on a model, either on the workspace or the icon in the model menu, all attached props are automatically selected too.
Pro Workflow Tip: Using Animations while Attaching Props
The Attach to Joint feature makes posing with weapons easier, but you can take it even further. There are over 2400 pre-made Animations on the PoseMyArt app.
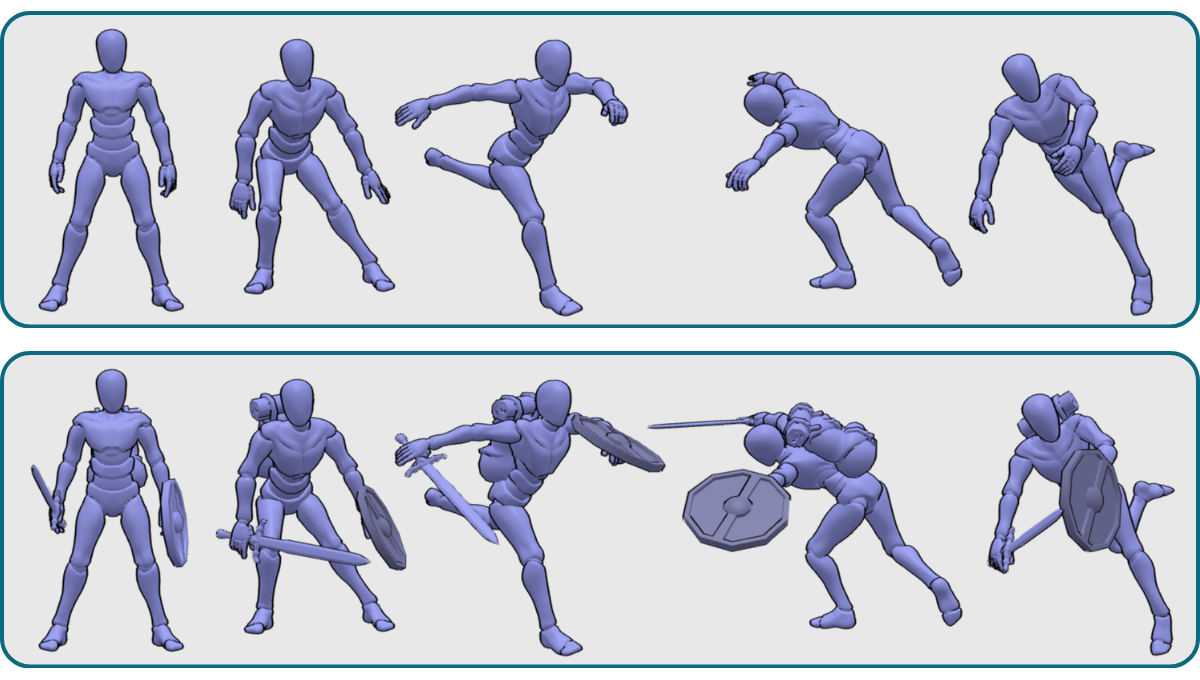
When you’re building a dynamic action pose, you can start with a kick or jump animation, pause it, then figure out where a weapon would fit into the pose instead of building an entire pose from scratch.
You can also attach the sword or weapon to a character model’s hand first before choosing an animation, so you can have some idea how a weapon moves with the flow of an action.
Note: Small Adjustments can still be Needed
Though the attach to joint feature takes a lot of the work out of readjusting or repositioning a pose and a prop from scratch, some little adjustments may still need to be made.
Props follow a joint, but there is also a slight tendency that the alignment may need a little tweaking. Always check that your prop doesn’t sink into other parts of your model, your model’s grip looks correct, and the pose looks how it should.
Test how a prop moves with certain joints and try comparing how it looks when you switch between joints close to each other. For example, choosing between hand joints or abdomen joints.
Final Thoughts
Finding the right pose reference is already a process. You shouldn’t have to keep fixing the same sword, shield, hat, or other props and accessories every time you have to make an adjustment to your character’s pose.
With Attach to Joint, you can connect a prop to your model, keep posing, and let the accessory move with the character.
It’s simple, but when you’re testing out different poses and making adjustments here and there, each second you save when making those adjustments add up.
So open PoseMyArt, add a model and a prop, attach it to a joint, and start building your next drawing reference.
And if you want to keep improving the way you build and use references, there’s plenty more to explore on the PoseMyArt blog:
-
Unlock the Full Potential of PoseMyArt: Features You Might Be Overlooking to discover more tools you can work into your reference-building process.
-
Drawing Hands Holding Objects: A Practical Guide for Artists for more help tackling one of the trickier parts of prop-based poses.
-
Drawing Gun Holding Poses: How to Draw Realistic Hand Grip and Full Body Weapon Stances if you’re specifically working on characters holding weapons.
Try Attach to Joint in your next PoseMyArt scene, then keep exploring the blog for more ways to make pose references work harder for your art.