How to Draw Shadows: Understanding Light Direction
Shadows can make a drawing feel three-dimensional almost immediately, but they can also make a perfectly good drawing look strange when they fall in the wrong place.
The tricky part is that shadows are not something you can simply memorize. Their shape and direction depend on the position of the light source, the shape of the object, and the surface receiving the shadow. Move the light, and the shadow moves too.
This becomes much easier to understand when you stop thinking of a shadow as a dark shape that needs to be added to the drawing and start thinking about why it is there in the first place.
In this guide, I’ll share what helped me understand shadows better, from figuring out where the light is coming from to knowing where the shadow should actually fall. I use 3D references a lot for this, because being able to move the light around beats guessing every time.
What Creates a Shadow?
A shadow appears when an object blocks a light source.
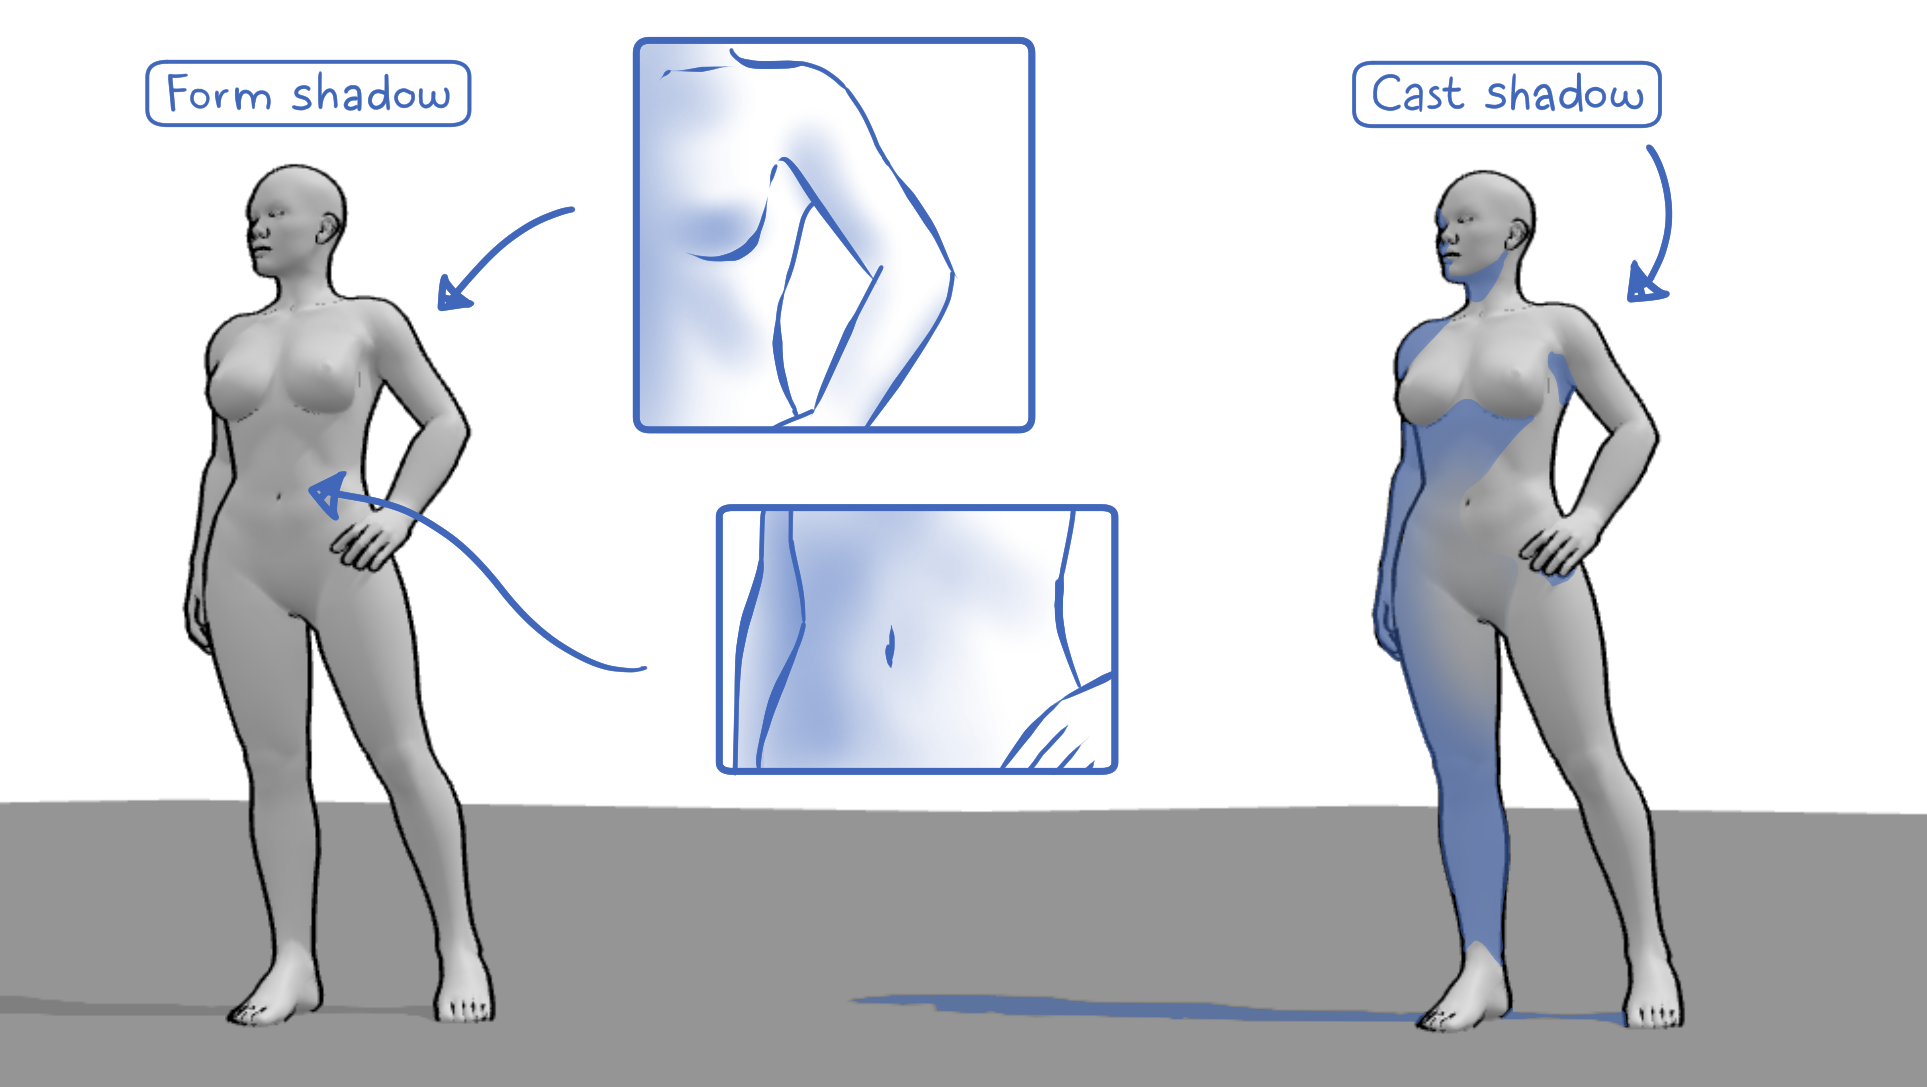
It sounds obvious, but keeping this simple idea in mind can solve many problems when drawing. Imagine a sphere sitting on a table with a lamp above it. The side of the sphere facing the lamp receives direct light, while the opposite side receives less or no direct light. The darker area on the sphere itself is called a form shadow. The sphere also blocks some of the light from reaching the table, creating a cast shadow.
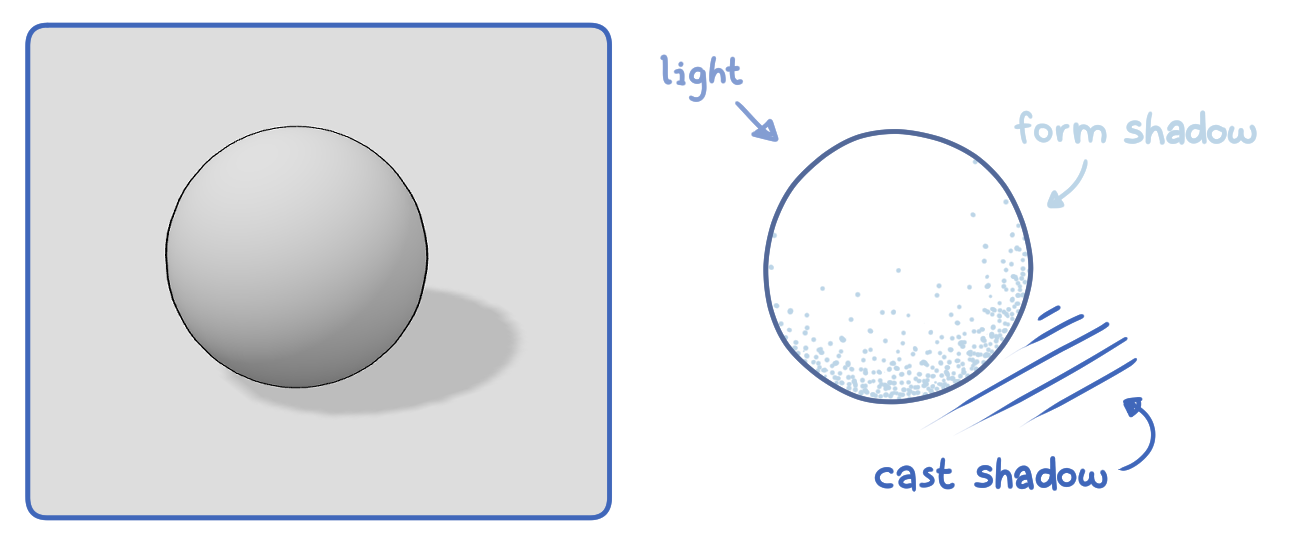
The important part is that both types of shadow are caused by the same light source, but they describe different things: a form shadow is the shadow on the object itself, while a cast shadow is the shadow the object projects onto another surface.
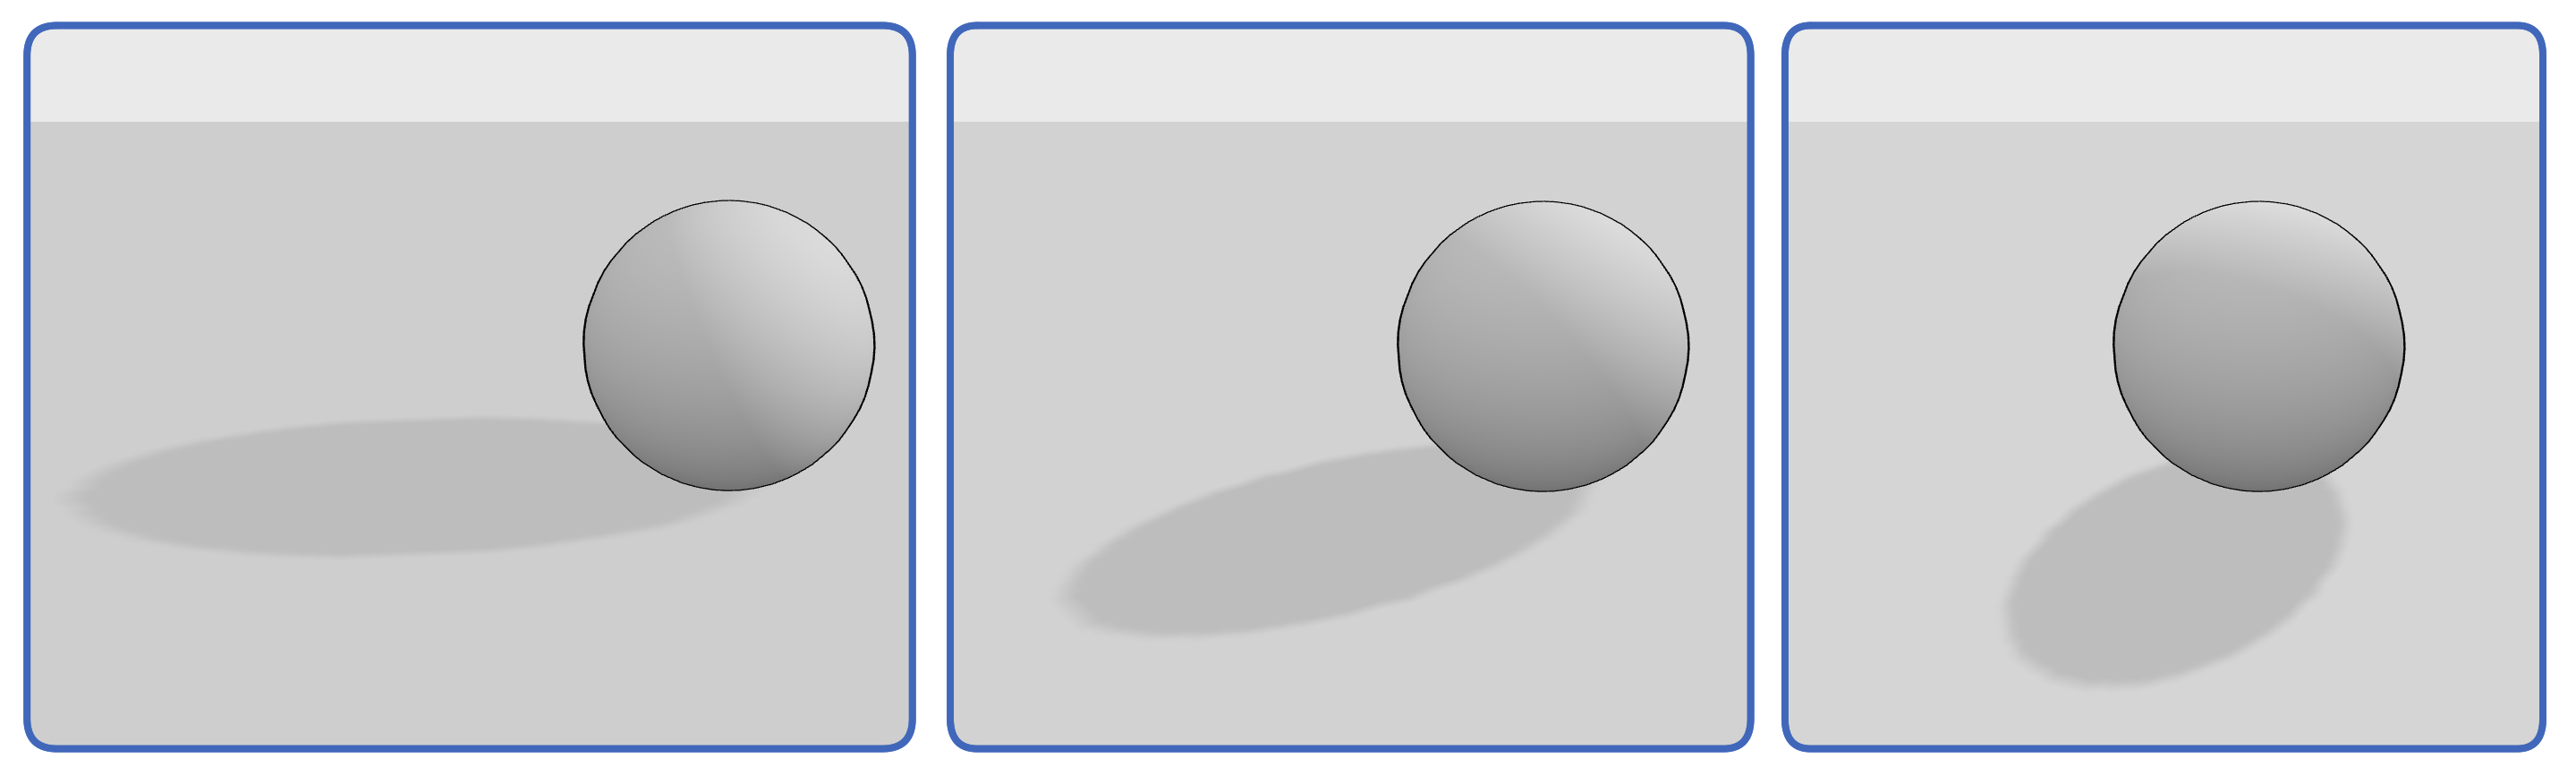
If you move the lamp, the shadows change.
This is the basic principle behind drawing shadows on everything from simple objects to complex figures.
Instead of asking “Where should I put a dark area?”, try asking:
“Could the light actually reach this surface?”
That question is much more useful.
Start With the Light Source
Before you draw a shadow, look at the light first.
Where is it coming from? Is it above the figure, from the side, in front, or behind? The answer immediately tells you which parts of the figure are more exposed to the light and which parts are likely to fall into shadow.
The easiest way to see this is to keep the pose and camera angle exactly the same and change only the light position.
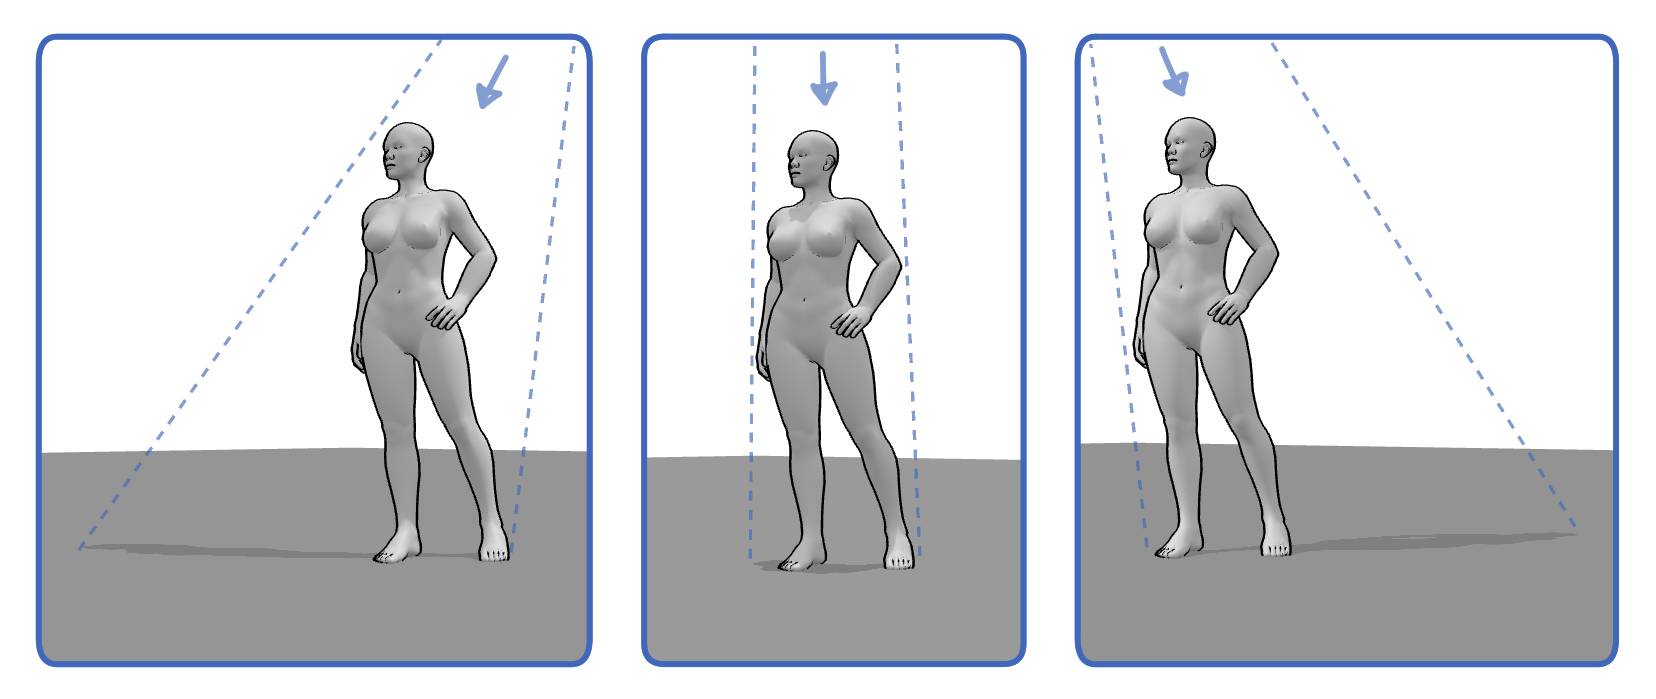
Look at the figure as a whole rather than trying to identify every individual shadow. When the light moves, notice how the illuminated side of the body changes, how form shadows appear on different surfaces, and how cast shadows shift across the figure and the ground.
This is a much more useful starting point than trying to memorize where a shadow “should” go. Once you understand where the light is coming from, you can work out the shadows from there.
You don’t need to calculate individual light rays for most drawings. Start with the light source, observe what it is doing to the major forms, and keep that lighting consistent throughout the drawing.
How Shadow Direction Works
One of the most common mistakes when drawing shadows is making them point in inconsistent directions.
This can happen easily when a figure has many separate shadow shapes. You might place one shadow under the arm, another on the torso, and another beneath the leg, without noticing that they are responding to slightly different light directions.
A 3D reference makes this much easier to check. Instead of trying to work out the direction of every shadow separately, you can set the light source and see how it affects the entire figure at once.
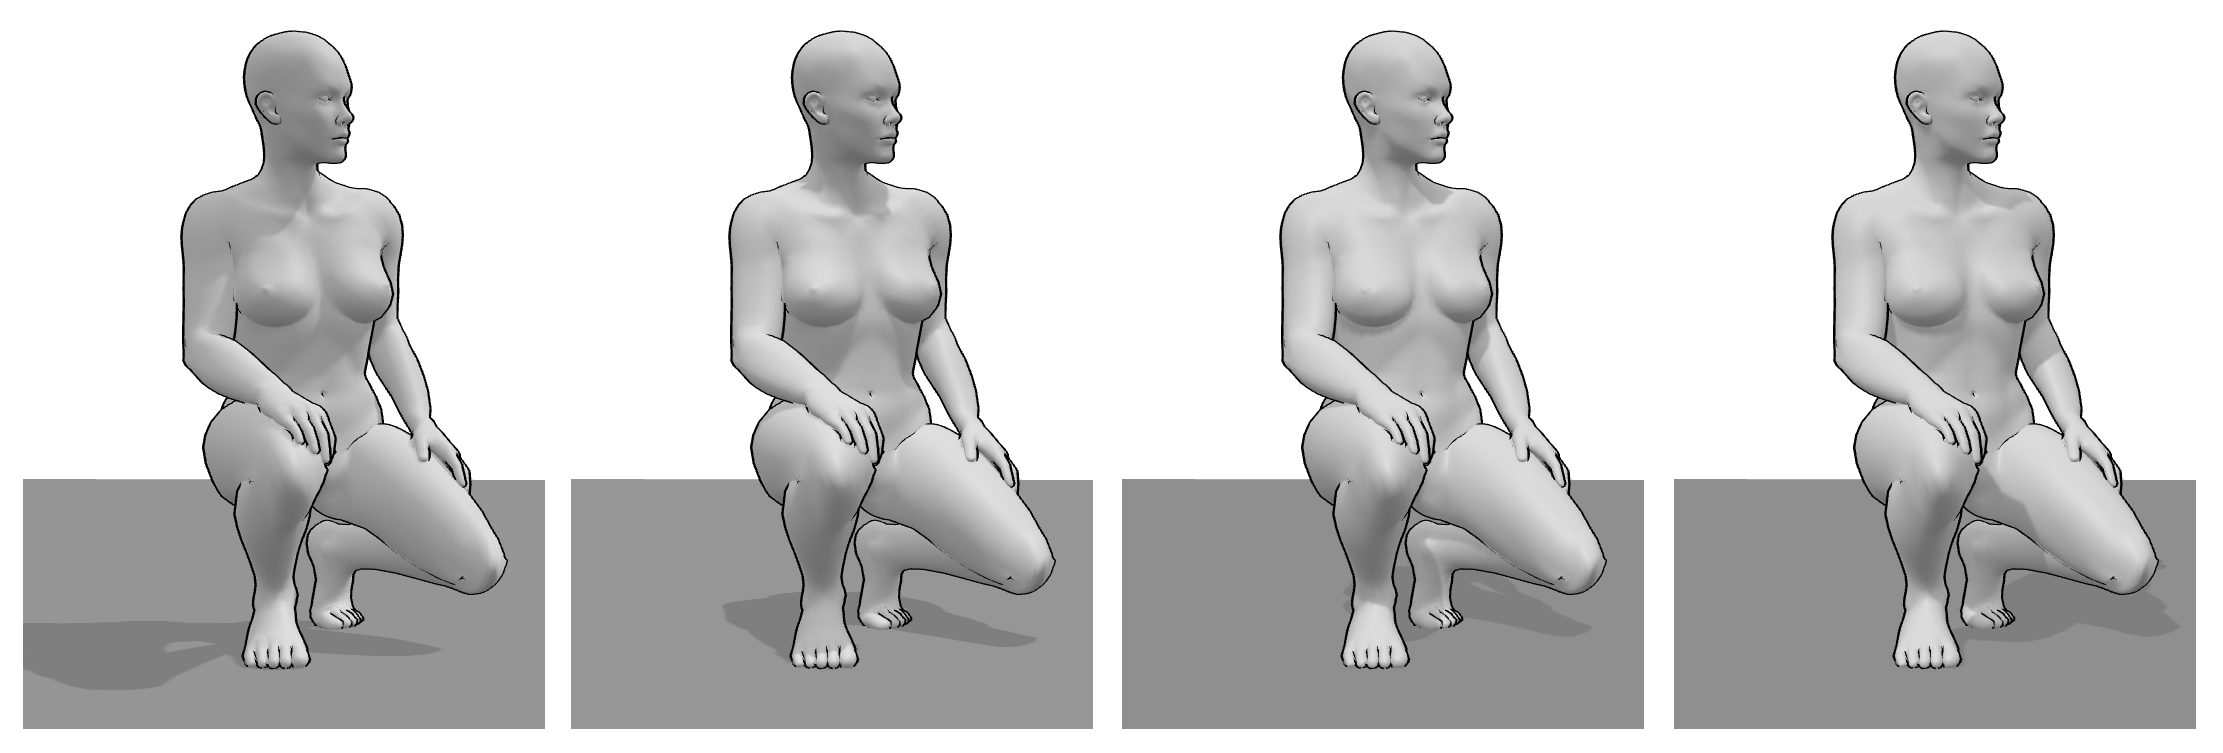
Because the figure is three-dimensional, the same light source affects every surface at once. You can see how a shadow from the arm falls onto the torso, how the head affects the neck, and how the body casts a shadow onto the ground. All of these shapes are automatically connected to the same lighting setup.
Shadows generally extend away from the light source, but their exact appearance depends on the surface they fall across. A shadow on the ground may look very different from one crossing the curved surface of the torso, even though both are created by the same light.
When drawing from a 3D reference, you don’t need to memorize each of these variations. Start by setting the light where you want it, then observe how it creates different shadow shapes across the figure.
Form Shadows and Cast Shadows
Not every dark area in a drawing is the same type of shadow.
Two particularly useful categories are form shadows and cast shadows.
Form Shadows
A form shadow happens when a surface turns away from the light. The shadow stays on the same form, following its shape as the surface curves or changes direction.
On a figure, this can happen across almost any rounded body part. The side of an arm can turn away from the light, for example, or one side of the torso can become darker as the body rotates away from the light source.
Cast Shadows
A cast shadow happens when one form blocks the light from reaching another surface.
This is common throughout the figure. The head can cast a shadow onto the neck, the arm can cast one onto the torso, or one leg can partially shadow the other. The figure can also cast a much larger shadow onto the floor.
The difference is simple: form shadows describe how a surface turns away from the light, while cast shadows show where something is blocking that light.
When you’re drawing, this distinction can help you understand why an area is dark instead of simply copying the shape you see. With a 3D reference, you can also move the light around and watch these two types of shadows change in real time.
Knowing the difference helps because these shadows don’t necessarily behave in exactly the same way. A form shadow follows the turning surface of the object, while a cast shadow is projected onto another surface.
Understanding the Shadow in 3D
The shadow will look different every time you change the pose, camera angle, model or light position. Instead of trying to memorize specific shadow shapes, it helps to use 3D references to work out what you are actually seeing.
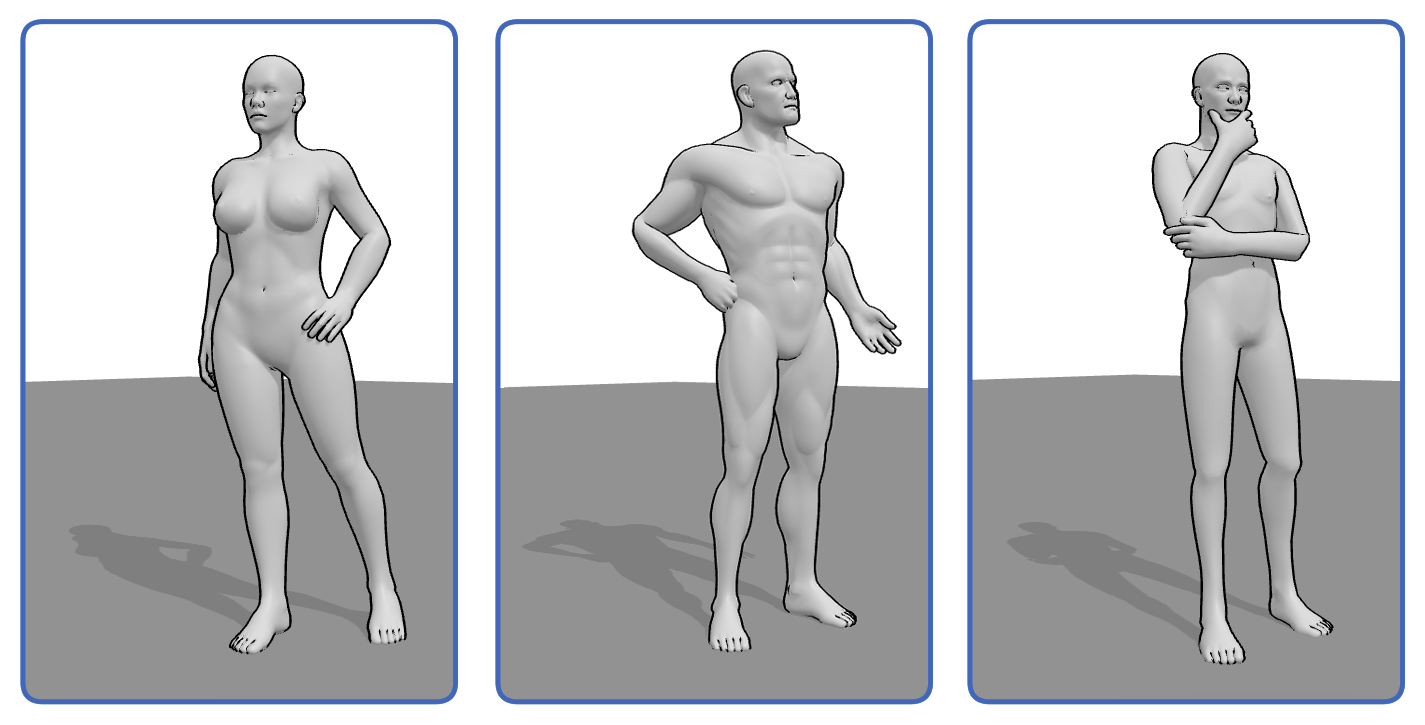
When working with a 3D reference, try this:
-
Set up the light.
Choose the position and direction of the light source before you start drawing the shadows. -
Simplify the figure.
Once you’ve drawn the figure, look at its overall silhouette rather than getting distracted by anatomical details. Think of the figure as a solid three-dimensional shape. -
Follow the light direction.
Imagine lines traveling from the light source toward the figure. Where the figure blocks those lines, the shadow continues behind it. In your mind, extend the figure’s silhouette along the direction opposite the light and imagine where that blocked light would reach the surrounding surfaces. -
Add the smaller shadows.
Once the main shadow pattern is in place, look for smaller shadows created by overlapping body parts, such as an arm across the torso or the head casting onto the neck.
This way of thinking can make complicated shadows much easier to construct. You are no longer asking yourself what the shadow should look like. You are following the light through the scene and working out what the figure blocks along the way.
The Light Doesn’t Just Change the Shadow
Changing the light source does more than move the cast shadow around. It changes which surfaces are illuminated, which forms become darker, and how clearly different parts of the figure are separated.
For example, lighting a face from above can leave the underside of the nose, brow, and chin in shadow. Move the light lower, and completely different planes of the face become illuminated.
This is one reason why lighting can dramatically change the mood of the same pose. By deliberately choosing where to place the light source, you can also use it to create a specific atmosphere in your scene. A strong light from one direction can create a more dramatic feeling, while a softer or more evenly distributed light can make the same pose feel calmer.
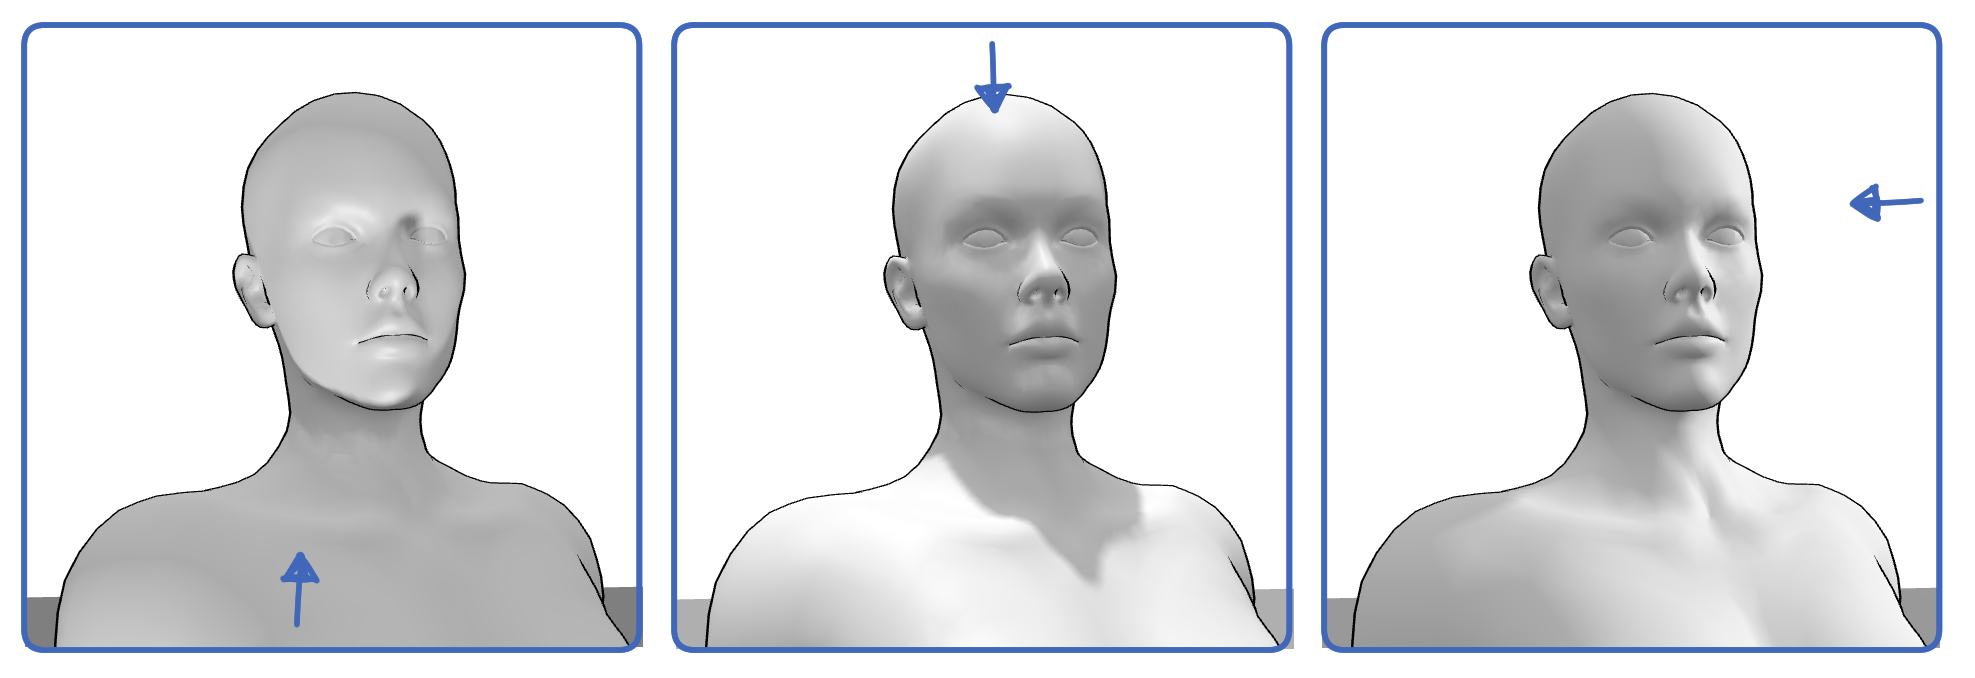
When studying shadows, don’t only look at the dark shapes. Look at what caused them and how the light changes the way the entire figure feels.
Using 3D References to Study Shadows
With PoseMyArt, you can set up your pose and camera, then move the light around the figure and watch the shadows change in real time. Move the light higher, lower, closer, farther to the side, or behind the figure and you can immediately see which parts become illuminated and which fall into shadow.
This is particularly useful when you’re trying to understand a complicated scene and its shadows. Instead of wondering why a shadow falls across the torso or disappears behind an arm, you can move the light and see exactly what causes the change.
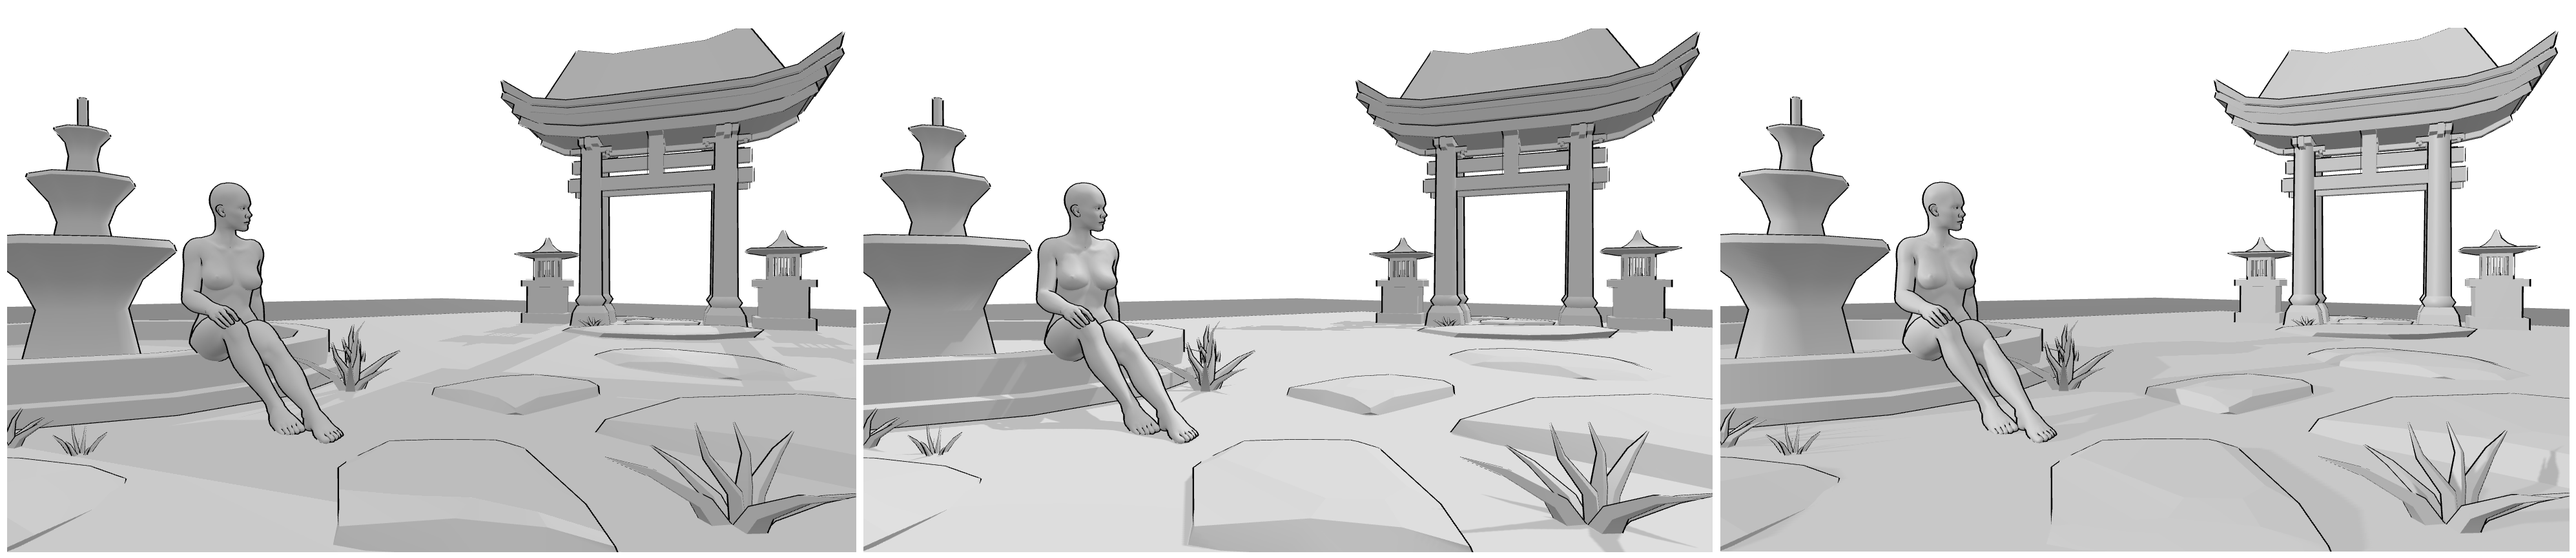
With a complicated scene, working out all the shadows can be difficult. There are too many overlapping forms to keep track of, and each object affects how light reaches the surfaces around it. By moving the light source, you can see how the shadows change across the entire scene instead of trying to figure out every shadow individually.
You can also use this to find the lighting you actually want for your drawing. Experiment with different light positions until the shadows create the effect you’re looking for, then use that setup as your reference.
For me, this is one of the most useful things about studying shadows with 3D references. You aren’t limited to observing one lighting setup. You can experiment with it and see the result immediately.
Try Drawing the Same Shadow From Different Angles
Once you have a lighting setup you understand, try changing the camera instead of the light.
Keep the model, pose, and light exactly the same, then rotate the camera around the figure. The shadow itself hasn’t changed, but the way you see it has.
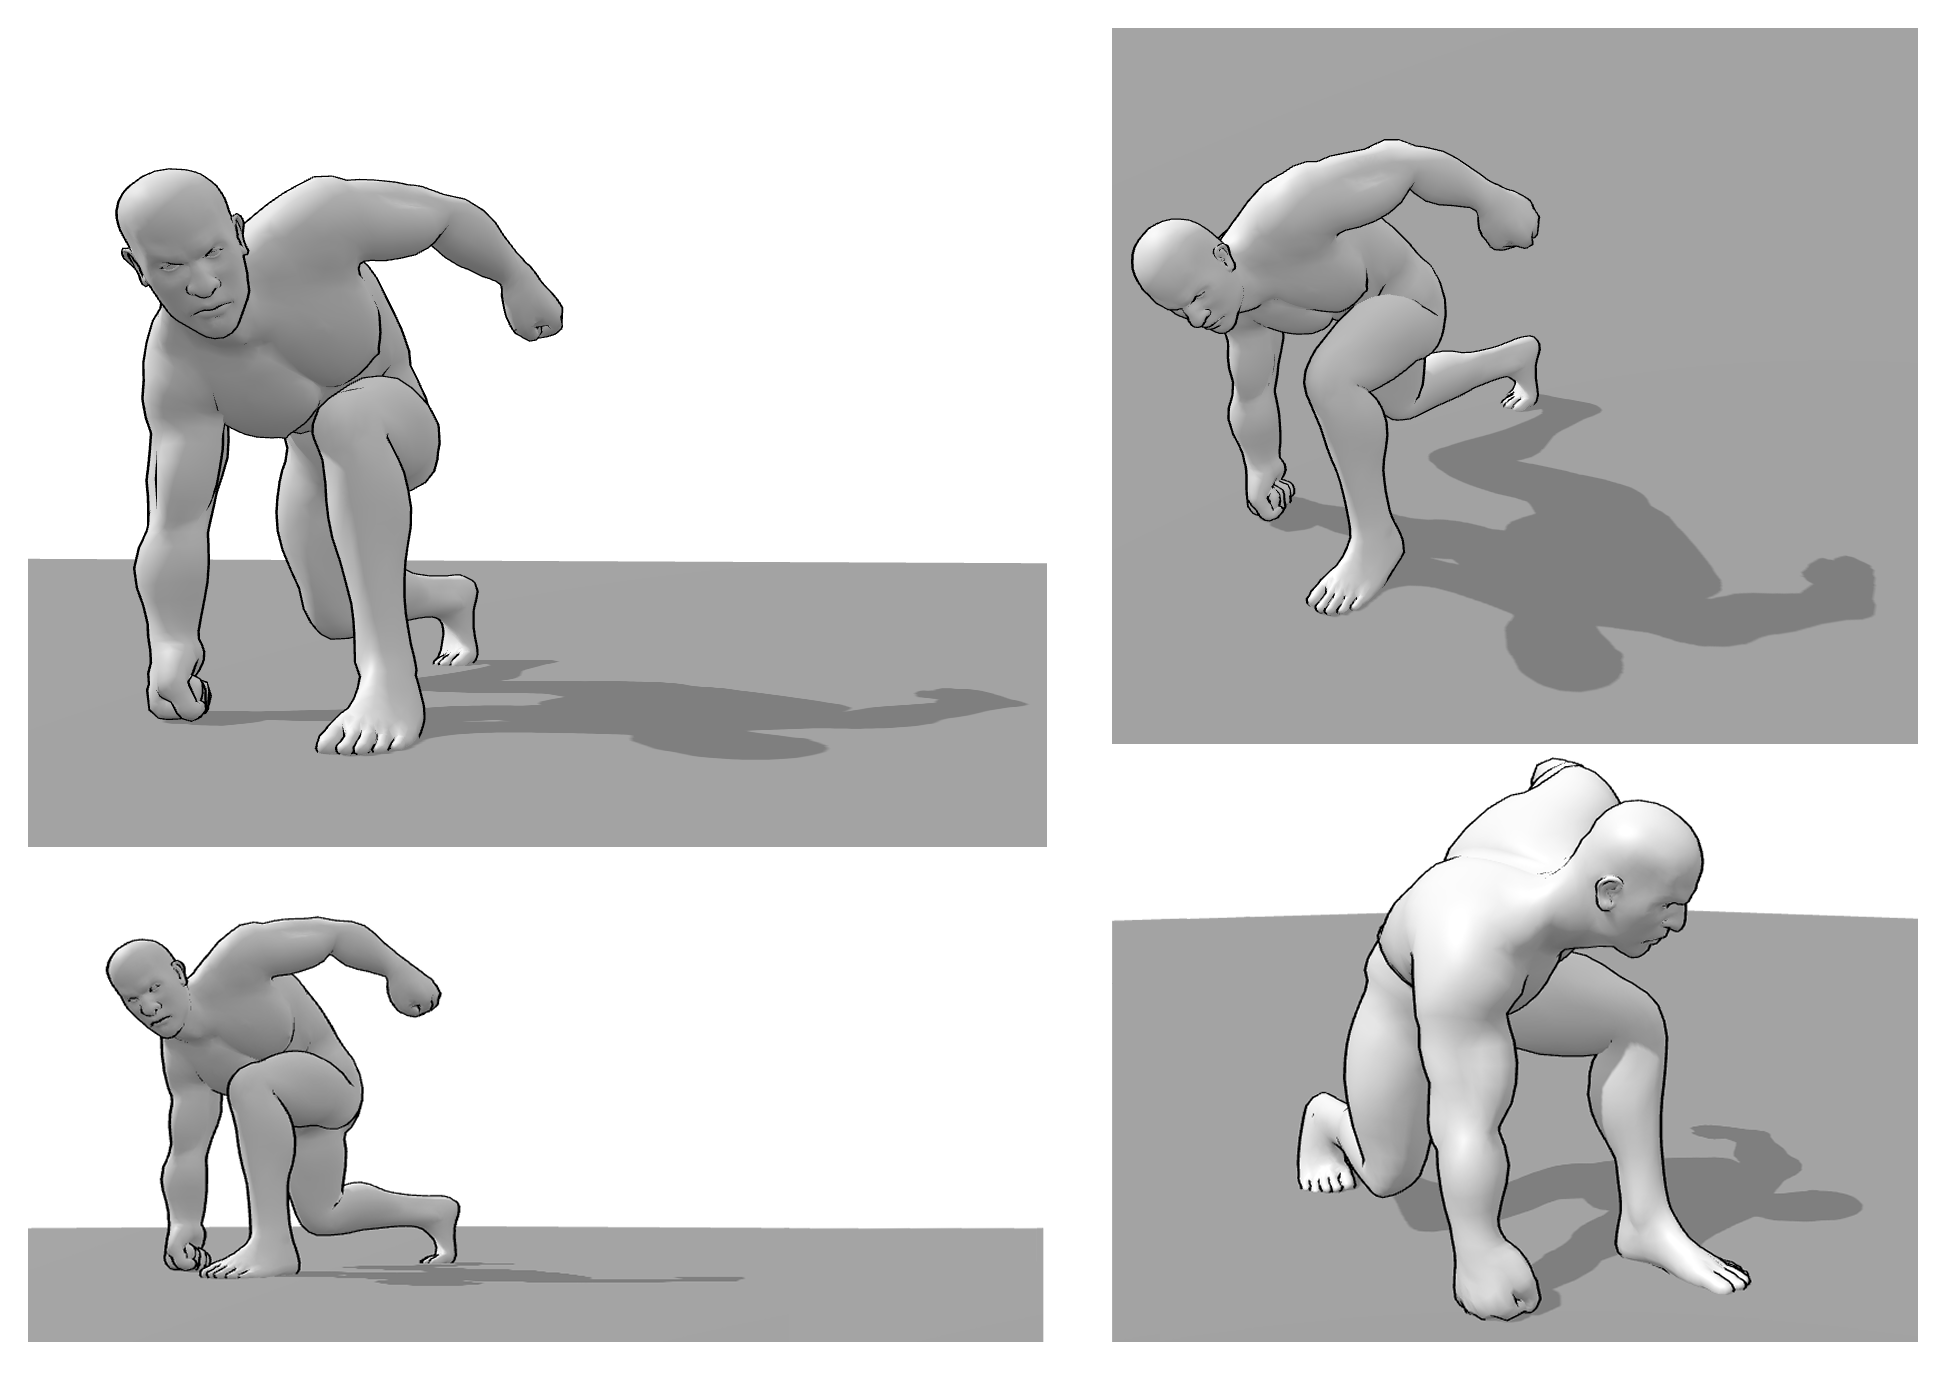
A shadow that looks like a simple shape from one angle can become much more complex from another because it may cross different surfaces or overlap with other parts of the figure. This is a useful way to get comfortable with shadows in three dimensions.
Final Thoughts
Learning how to draw shadows becomes much easier once you stop treating them as random dark shapes. Every shadow has a reason. Its direction comes from the light source, its shape is affected by the object blocking the light, and its appearance changes depending on the surface it falls across.
When you study these relationships with a 3D reference, you can experiment with the lighting instead of being limited to one fixed setup. Move the light, rotate the model, change the camera angle, and see how the shadow responds.
Once you start thinking about shadows this way, you can make more confident decisions even when you’re drawing without a reference.