How to Draw a Horse Easily with 3D Drawing References
Horses look simple until you actually try to draw one.
You can get the four legs onto the page, add a long neck and a horse-shaped head, and somehow end up with a creature that looks like it belongs in a completely different species. The problem usually isn’t a lack of drawing skill. Horses have a lot of large, connected forms, and small mistakes in their proportions can change the whole figure.
The easiest way to make the process more manageable is to stop thinking of the horse as one complicated animal and start breaking it down into a few simple masses.
The body becomes a large barrel-like form. The chest, pelvis, neck, and head become separate masses that connect to it. The legs can then be built from simpler sections rather than treated as four thin shapes that somehow have to look convincing.
And honestly, one of my favorite things about working with 3D references is that you don’t have to stop at drawing the horse itself. You can put a character on it too - a cowboy, a fantasy elf, a fairy, an archer, or whatever your idea calls for. Usually I can easily imagine the kind of scene I want to draw, but putting a horse and rider together on paper - with convincing anatomy and proportions - is much harder to do entirely from memory. Searching for the exact reference photo I need could take hours, and I’d probably never find the exact pose anyway.
With a 3D reference, I can simply build the scene I have in mind, adjust the horse’s pose and camera angle, and create my own reference to draw from.
So let’s break down the horse’s structure, proportions, and main forms, and see how 3D references can make it easier to understand the animal from different angles and poses.
- Start with the Main Body Masses
- Understand Horse Proportions
- Build the Horse’s Legs as Connected Forms
- Pay Attention to Weight and Balance
- Construct the Neck and Head
- Add the Ears, Mane, and Tail Last
- Study Horses from Different Angles
- Use 3D References to Create the Pose You Actually Need
- Horse and Rider: Think About the Two Figures Together
- Don’t Forget the Far-Side Legs
- From Simple Construction to a Finished Horse
- Practice the Same Horse in Different Poses
Start with the Main Body Masses
Before worrying about the legs, mane, ears, or facial details, look at the horse as a collection of large forms.
The main body can be simplified into a large barrel-like shape. The chest sits toward the front of it, while the pelvis creates a second major mass at the rear. The neck connects the body to the head, but it isn’t just a long tube sticking out of the torso. Its angle and thickness change depending on the horse’s position and movement.
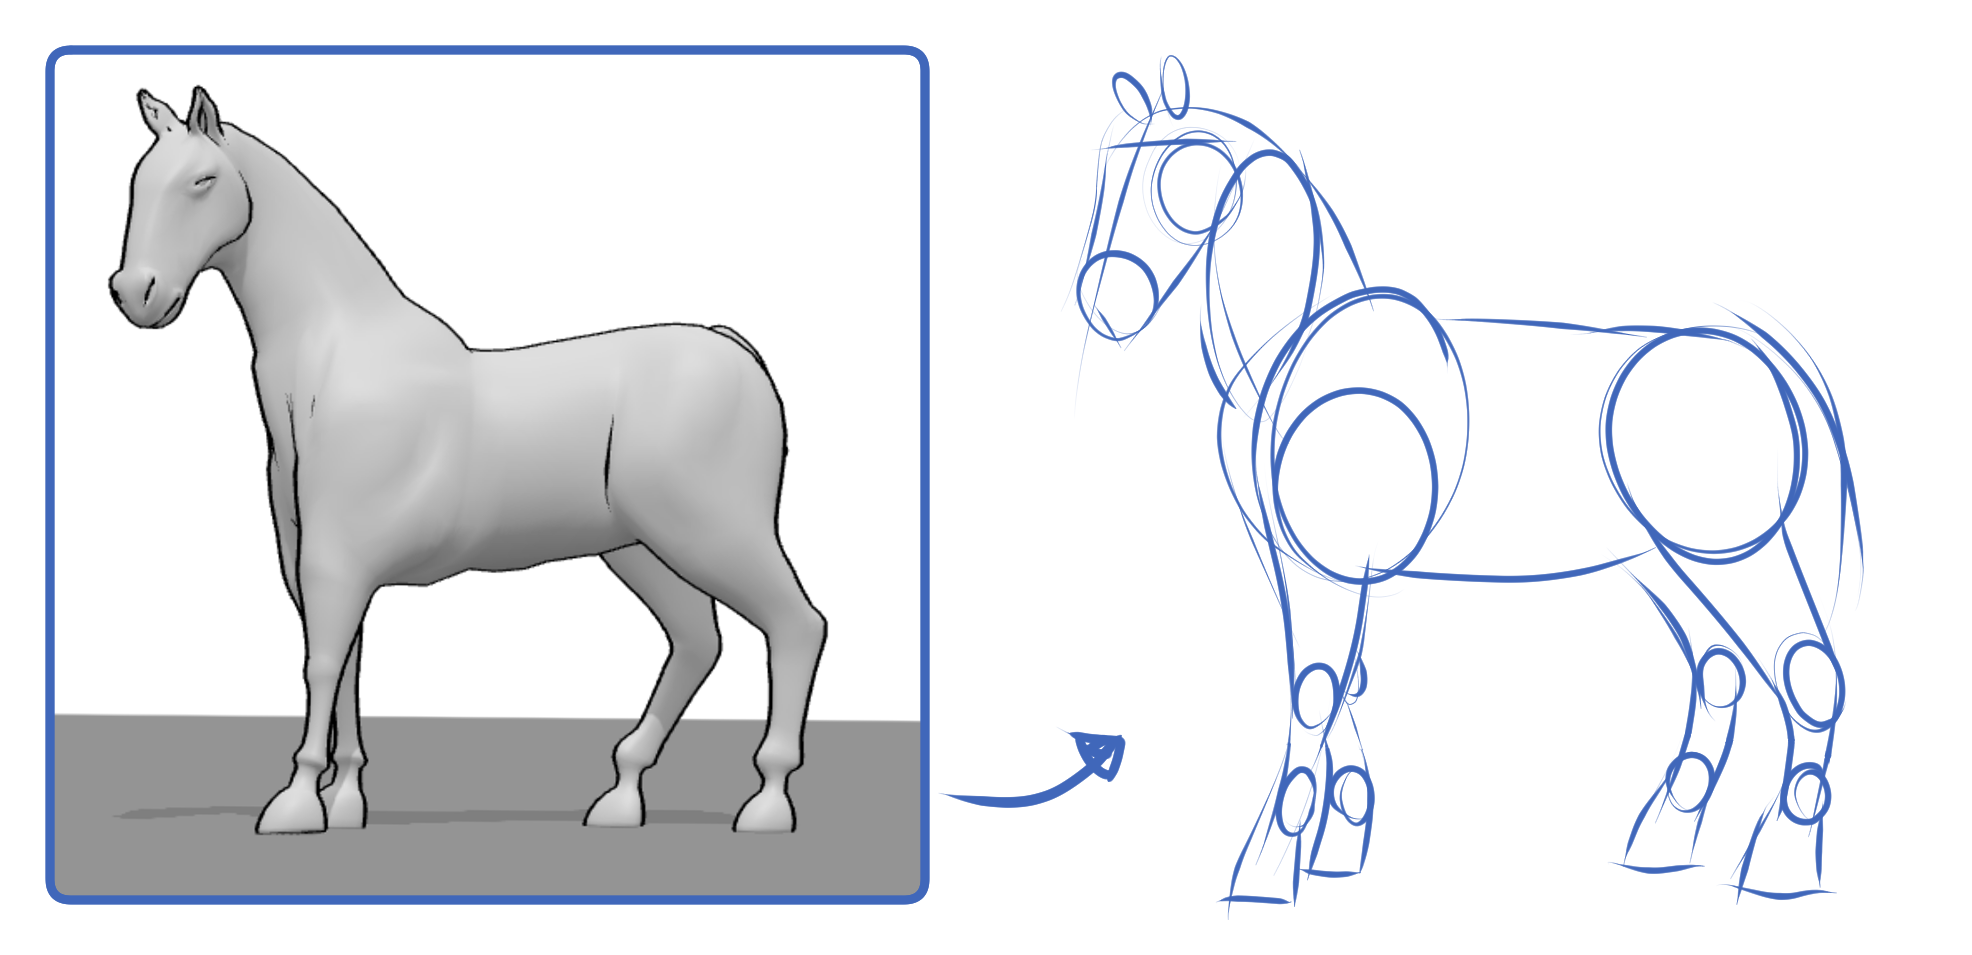
This simple breakdown gives you something much more useful than an outline. You can think about the direction of each form, how much of it is visible, and how the masses overlap when the horse turns.
I find it much easier to construct a horse this way than to start by copying its silhouette. A silhouette can tell you what the finished shape looks like, but the underlying masses explain why it looks that way.
This becomes particularly important when you move away from a clean side view. In a three-quarter pose, the chest, ribcage, pelvis, and neck can overlap in ways that are difficult to understand if you’ve only studied horses from photographs.
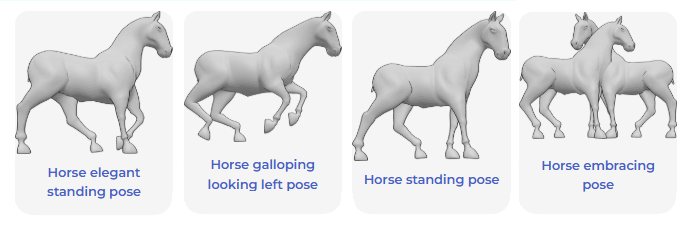
With a 3D reference, you can rotate the model and check those relationships directly instead of guessing what is happening on the other side of the body. You can explore different horse drawing references to study the main forms from different angles.
Understand Horse Proportions
Once you have the main masses in place, proportions become much easier to judge.
The body of a horse is not simply a long rectangle with four legs underneath it. The chest, ribcage, pelvis, neck, and head all have their own proportions, and their relationship changes the character of the animal.
Start by comparing the major masses rather than measuring every individual feature. How long is the body compared with the height? How large is the head compared with the neck? Where does the chest sit in relation to the front legs? How far does the pelvis extend behind the body?
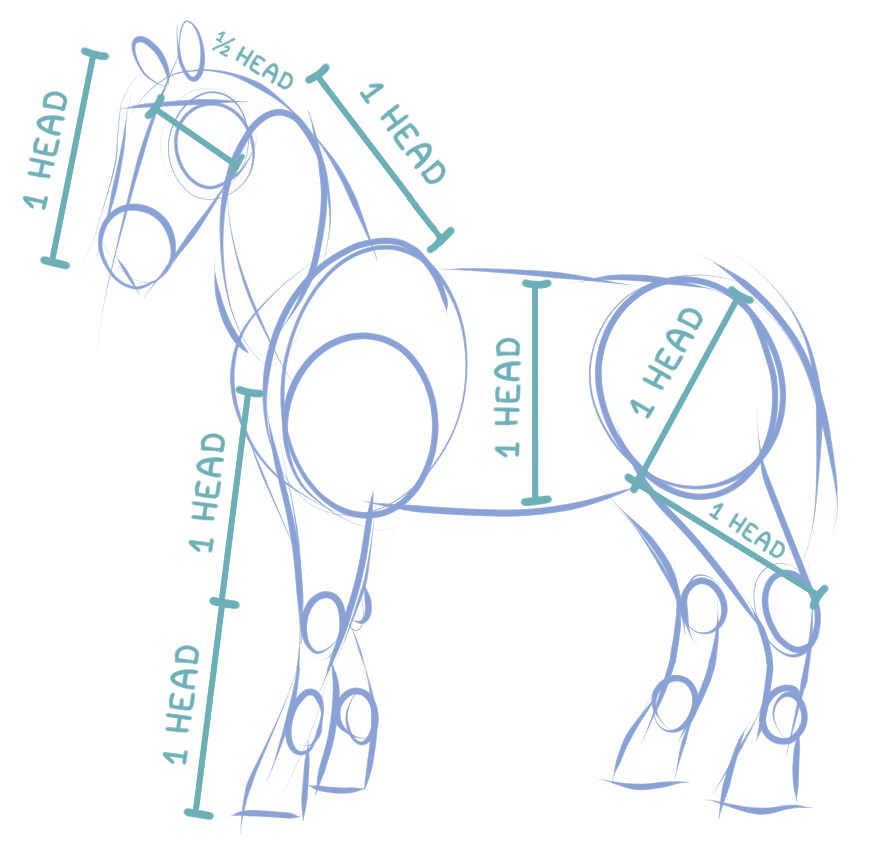
These relationships are more useful to memorize than a collection of exact measurements, especially when you’re drawing horses in different poses.
The proportions also change visually when the horse turns. A body that looks long in profile can appear much shorter from the front or rear because of perspective: you’re seeing the body from a different angle, with less of its length visible.
This is another situation where a 3D reference can save a lot of guesswork. Rotate the model around the body and compare the same forms from several angles. Once you understand the three-dimensional structure, you can make more confident changes to the pose without losing the basic proportions.
Build the Horse’s Legs as Connected Forms
The legs are usually where a horse drawing starts to fall apart.
They’re long, relatively thin, and full of changes in direction, so it’s tempting to draw them as simple lines and add the shape around them later. That can work for a very loose gesture drawing, but for a finished figure it helps to think of each leg as a connected series of forms.
Look at the upper leg, lower leg, ankle, and hoof as parts of one structure. Pay attention to the direction of each section rather than treating the whole leg as a single straight shape.
The joints are especially important. A small change in their position can completely alter the character of the pose. A relaxed standing horse, a walking horse, and a running horse may have the same basic anatomy, but the legs create very different silhouettes and weight distribution.
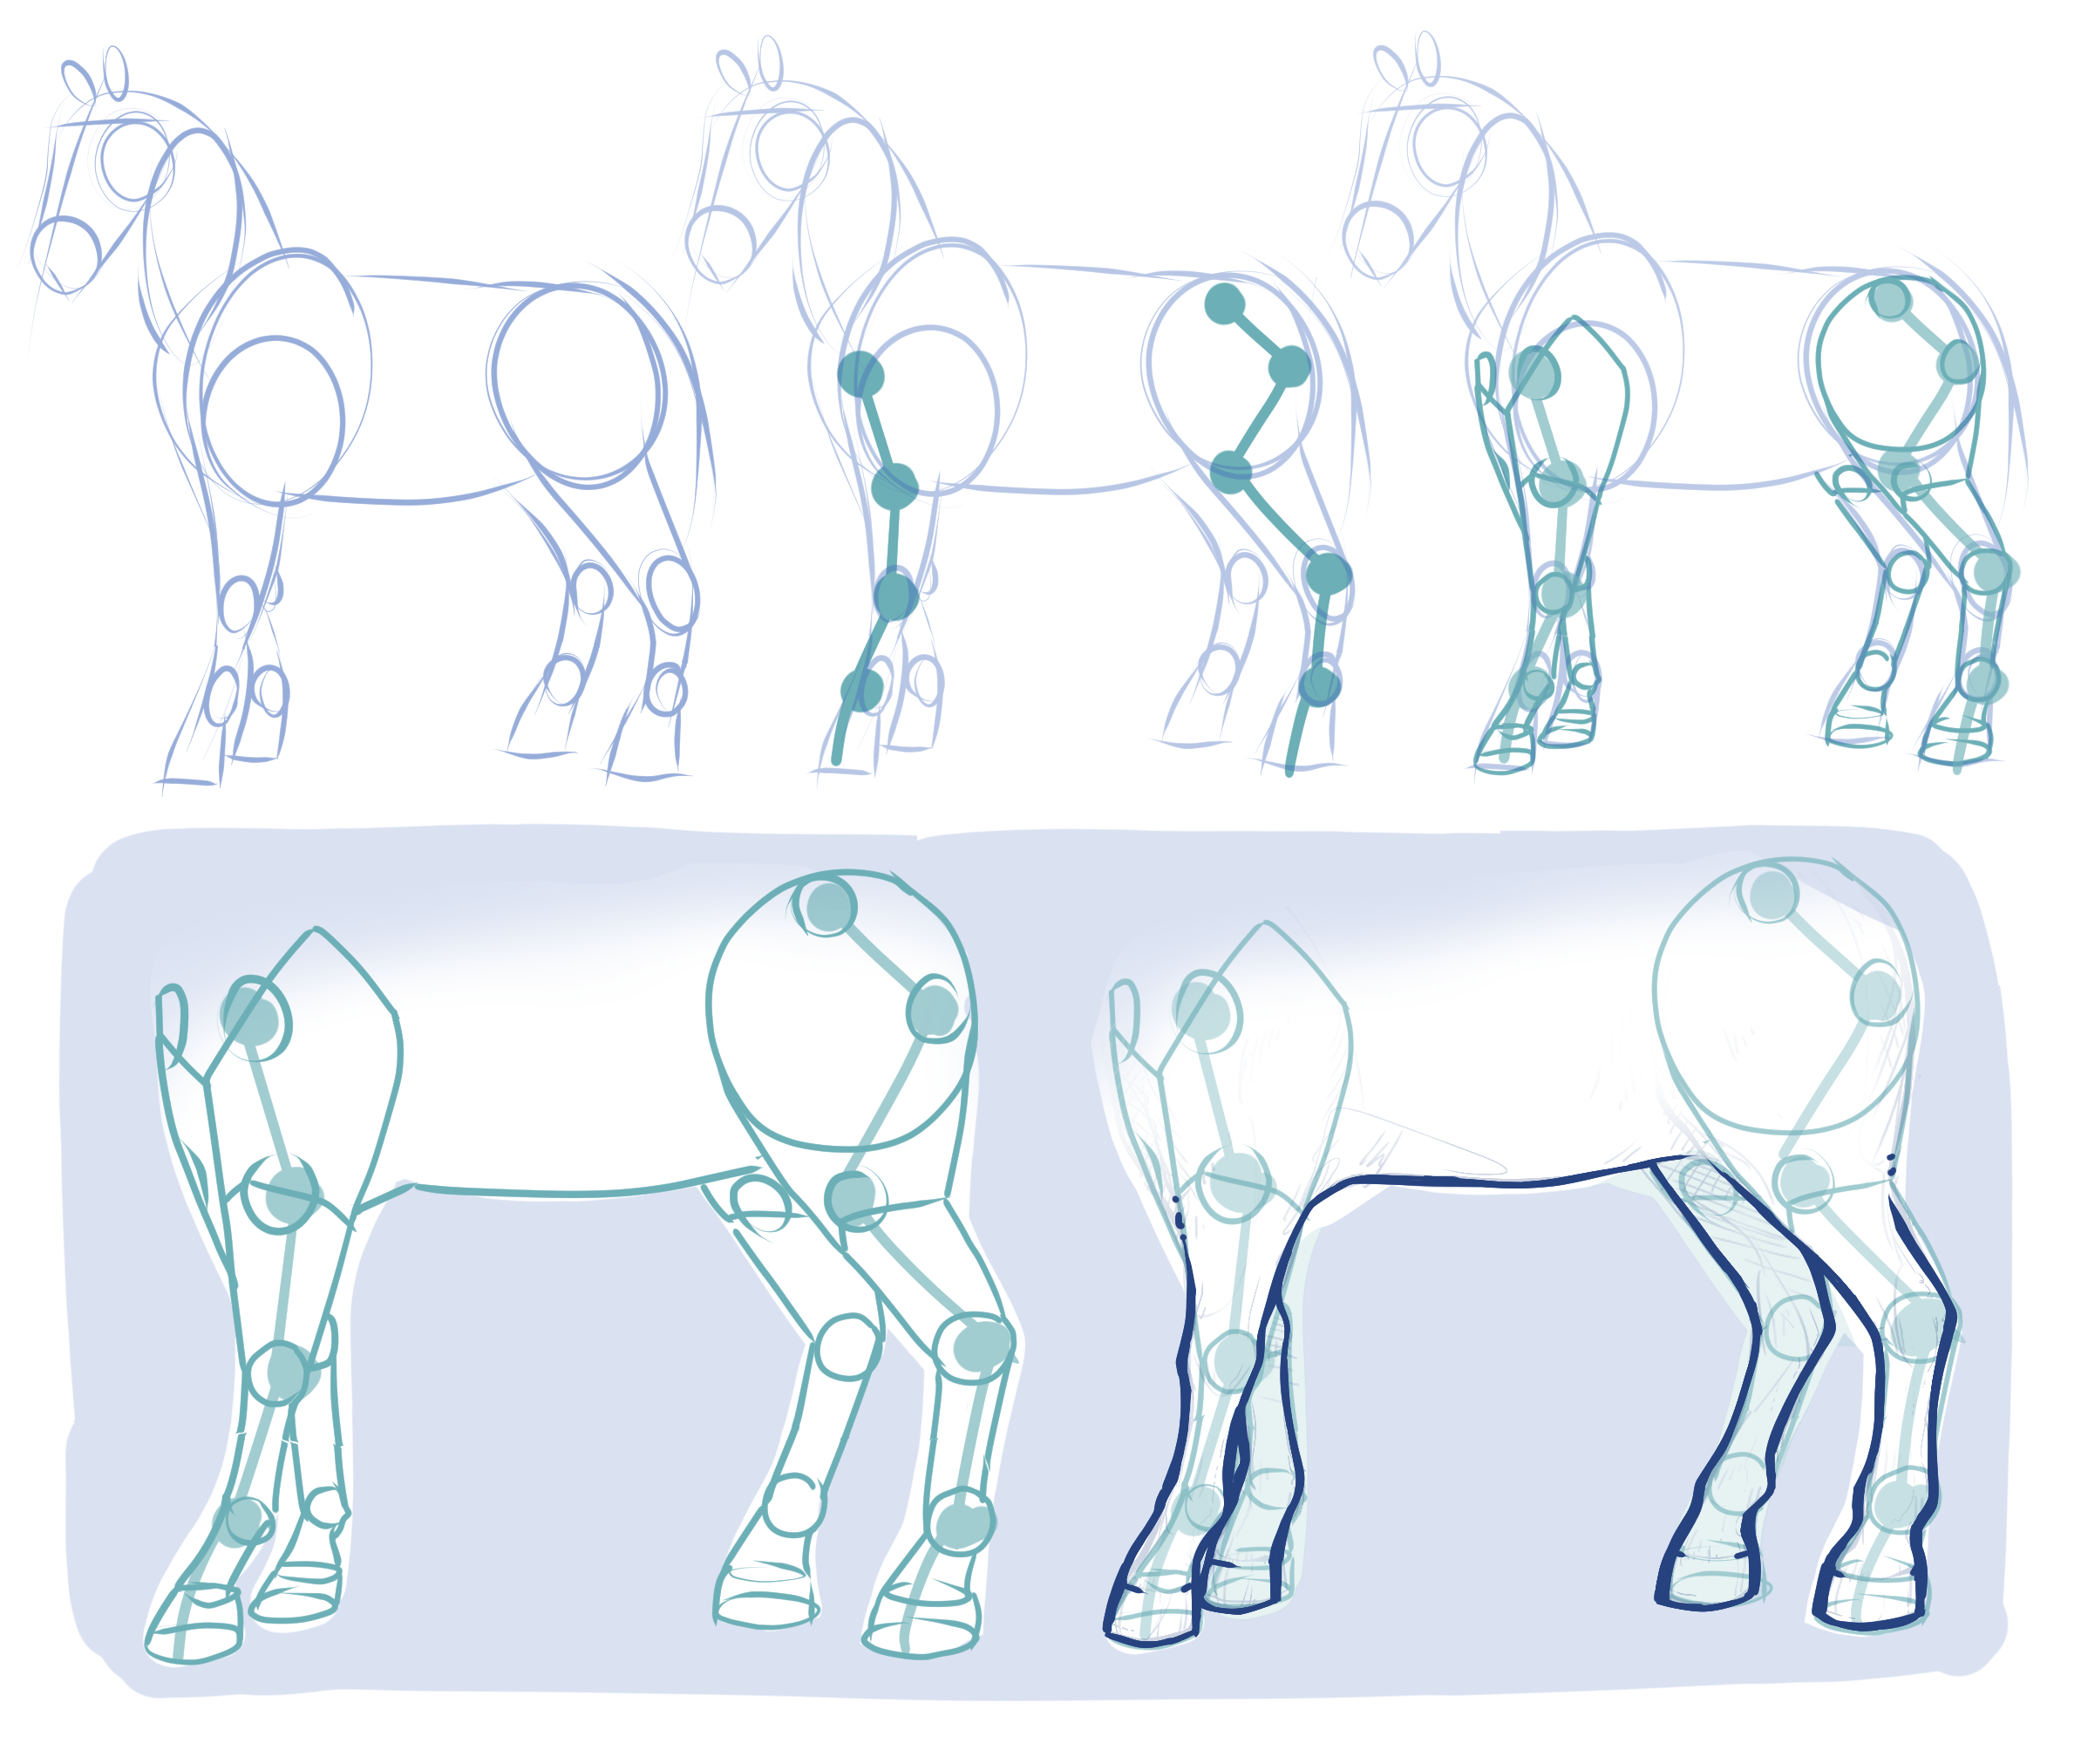
This is also why it helps to study horses in motion rather than only in a standing pose. Exploring dynamic horse poses can help you understand how the legs and body work together during more complex movements.
If you’re using a 3D reference, rotate around the model and check the legs from several angles. A leg that looks almost perfectly straight from one view may actually be angled toward or away from you in space.
Pay Attention to Weight and Balance
Once the legs are built as connected forms, the next thing to look at is how the horse is actually supporting its weight.
A horse doesn’t simply stand with all four legs doing the same job. Depending on the pose, some legs carry more weight while others may be relaxed, lifted, or positioned differently. Even in a quiet standing pose, the distribution of weight can create subtle changes in the position of the hips, shoulders, and legs.
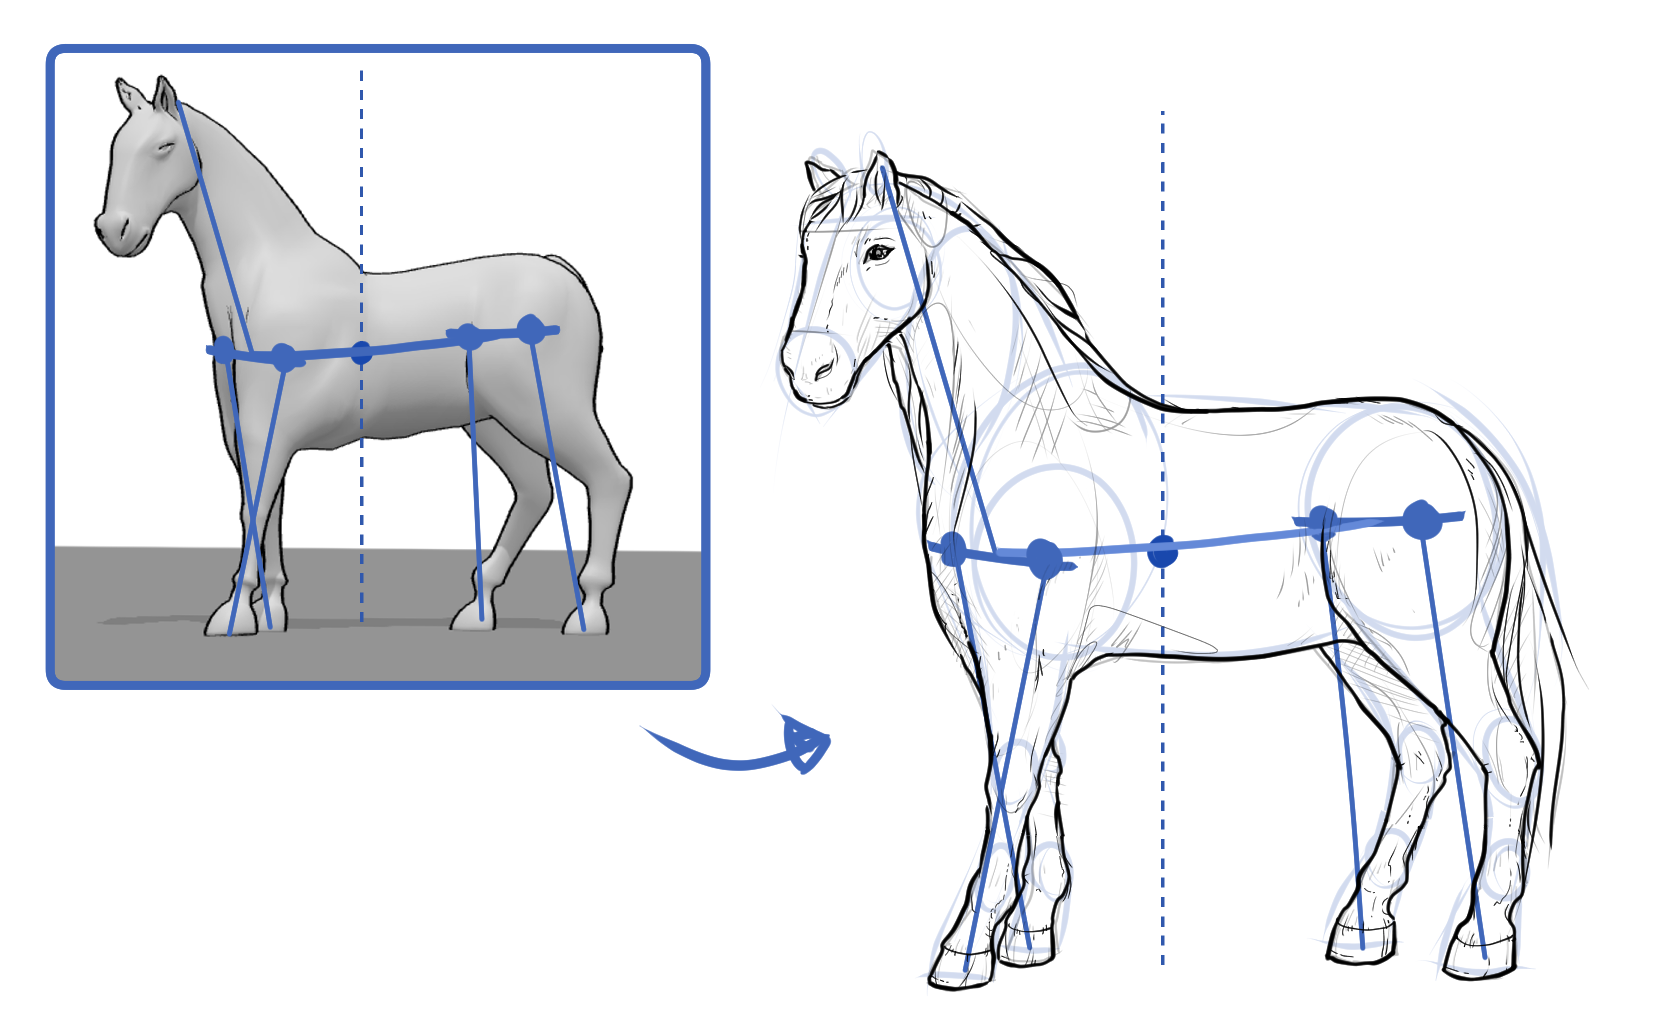
Before drawing the individual limbs in detail, ask yourself where the horse’s weight is going. Which legs are supporting the body? Which leg is relaxed? Is the body leaning forward, backward, or staying relatively centered?
These questions can make a surprisingly big difference. You can draw every anatomical part correctly and still end up with a horse that feels like it is about to fall over if the weight distribution doesn’t make sense.
A 3D references are useful here as well, because you can change the pose and immediately see how the body responds. You can also rotate around the model to check whether the supporting legs actually line up with the rest of the body in three-dimensional space.
Construct the Neck and Head
The neck is one of the most recognizable parts of a horse, but it is also easy to oversimplify.
Instead of thinking of it as one long curved shape, look at it as a thick, tapering form that connects the chest to the base of the skull. The muscles and contours change depending on whether the horse is standing naturally, stretching its neck, looking upward, or moving forward.
The head can also be broken down into simpler masses before you worry about the muzzle, eyes, ears, or other features. Start with the main cranium and muzzle, then consider how the jaw and facial planes connect to them.
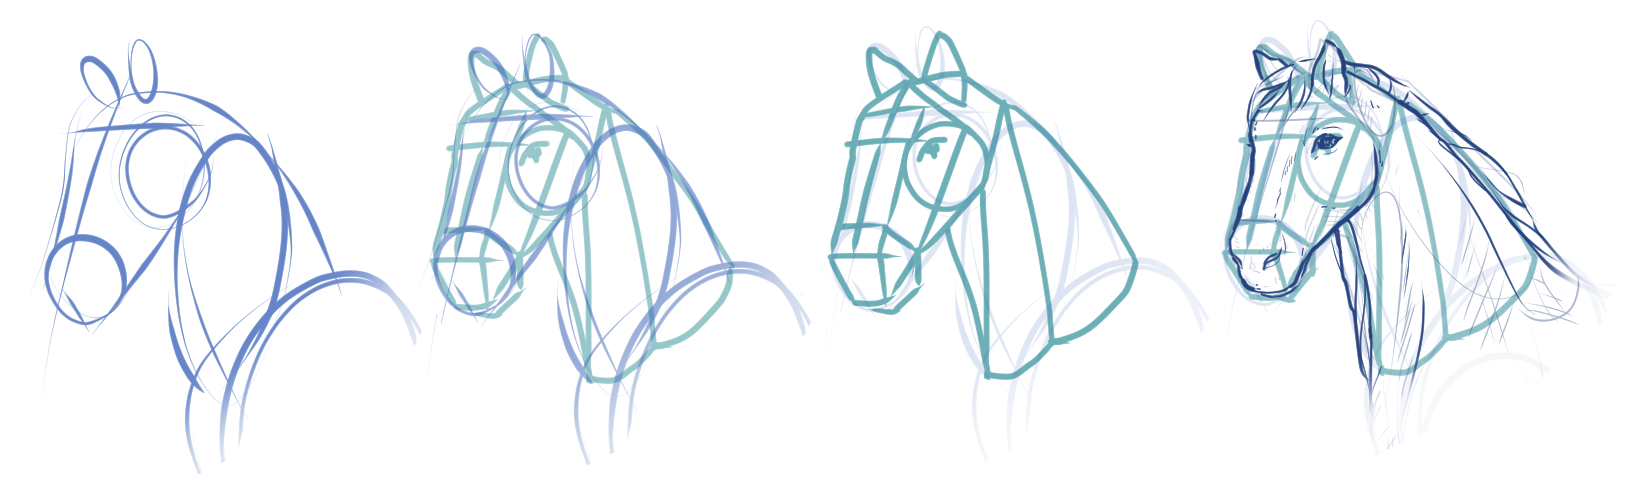
The angle of the head can change the entire expression of the pose. A horse looking toward the ground has a very different silhouette from one raising its head, even though the underlying anatomy is the same.
Add the Ears, Mane, and Tail Last
Once the main structure is working, you can start adding the features that make the horse immediately recognizable.
The ears are small compared with the rest of the body, but their direction matters. They can point forward, backward, sideways, or in different directions, and each position changes the character of the pose.
The mane and tail are similar. They shouldn’t be treated as random decorative shapes added around the finished drawing. Their direction can help communicate movement, especially when the horse is running or turning.
I usually find it easier to establish the movement of the body first and then let the mane and tail follow that movement. If the horse is moving forward, for example, the hair can help reinforce the direction and energy of the pose rather than sitting passively around the neck and tailbone.
The same applies to other small details. If the large forms and proportions are working, you don’t need many details to make the horse recognizable. If the underlying structure is wrong, adding more details usually just makes the drawing more complicated.
Study Horses from Different Angles
A horse can look surprisingly different depending on where you place the camera.
A side view makes the length of the body and the arrangement of the legs relatively easy to see. A front view compresses that length and makes the chest, shoulders, and leg spacing more important. A rear view brings the pelvis and hind legs into focus instead.
Three-quarter views are especially useful because they force you to think about depth. You have to decide how much of the chest is visible, how far the far-side legs sit behind the near-side legs, and how the neck connects to the body when viewed from an angle.
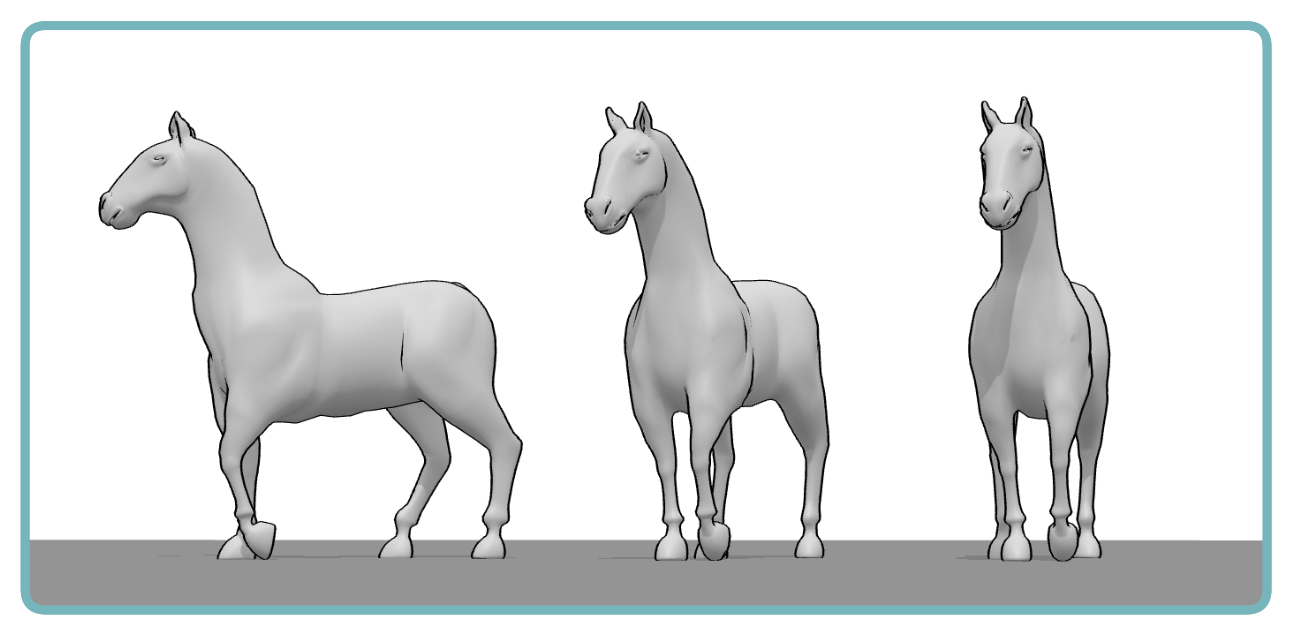
This is one of the reasons I like using 3D references for horse drawing. I can keep the same horse and simply change the camera angle instead of finding completely different photographs for every view.
It also makes it easier to compare your drawings. If you understand the horse from one angle, rotate the model and try the same construction from another. You start to see which parts of your drawing come from actual understanding and which parts were only working because the original view was familiar.
Use 3D References to Create the Pose You Actually Need
One of the biggest advantages of a 3D reference is that you don’t have to settle for whatever pose happens to exist in a photograph.
If I want to draw a horse rearing with a rider, I can build that scene around the idea rather than searching endlessly for a photograph that happens to show the exact combination of horse, rider, camera angle, and body position I need.
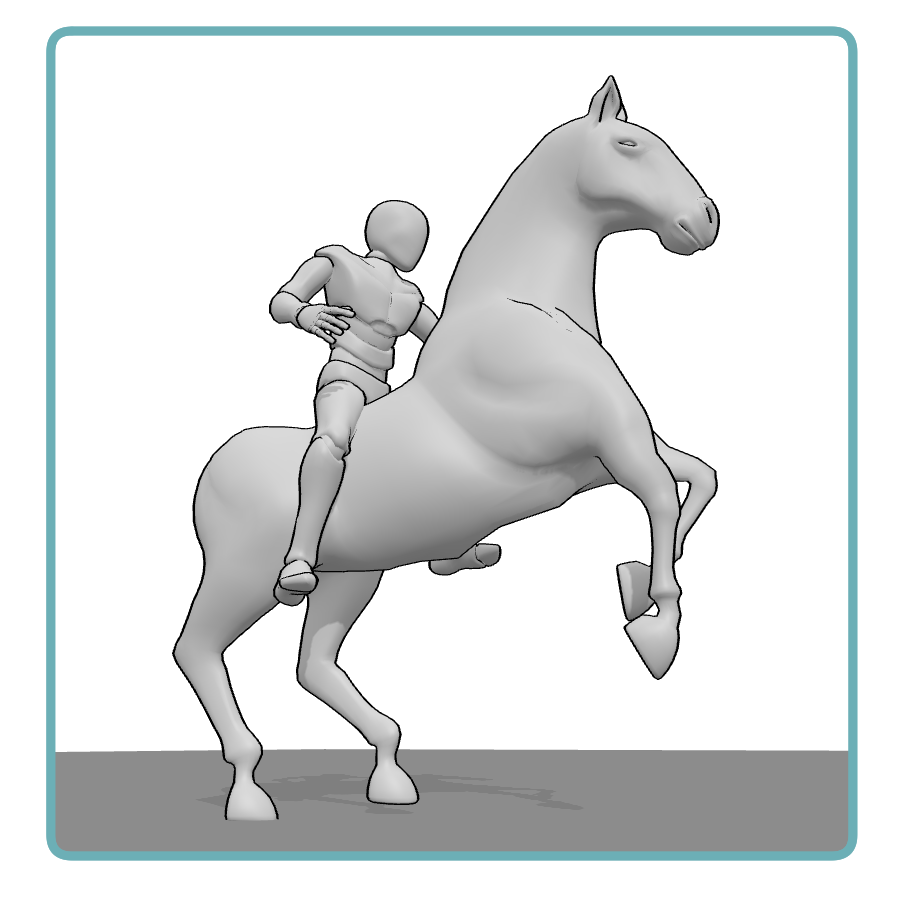
You can also experiment with the composition before committing to the drawing. Move the horse, change the camera angle, adjust the pose, and see how the major shapes work together.
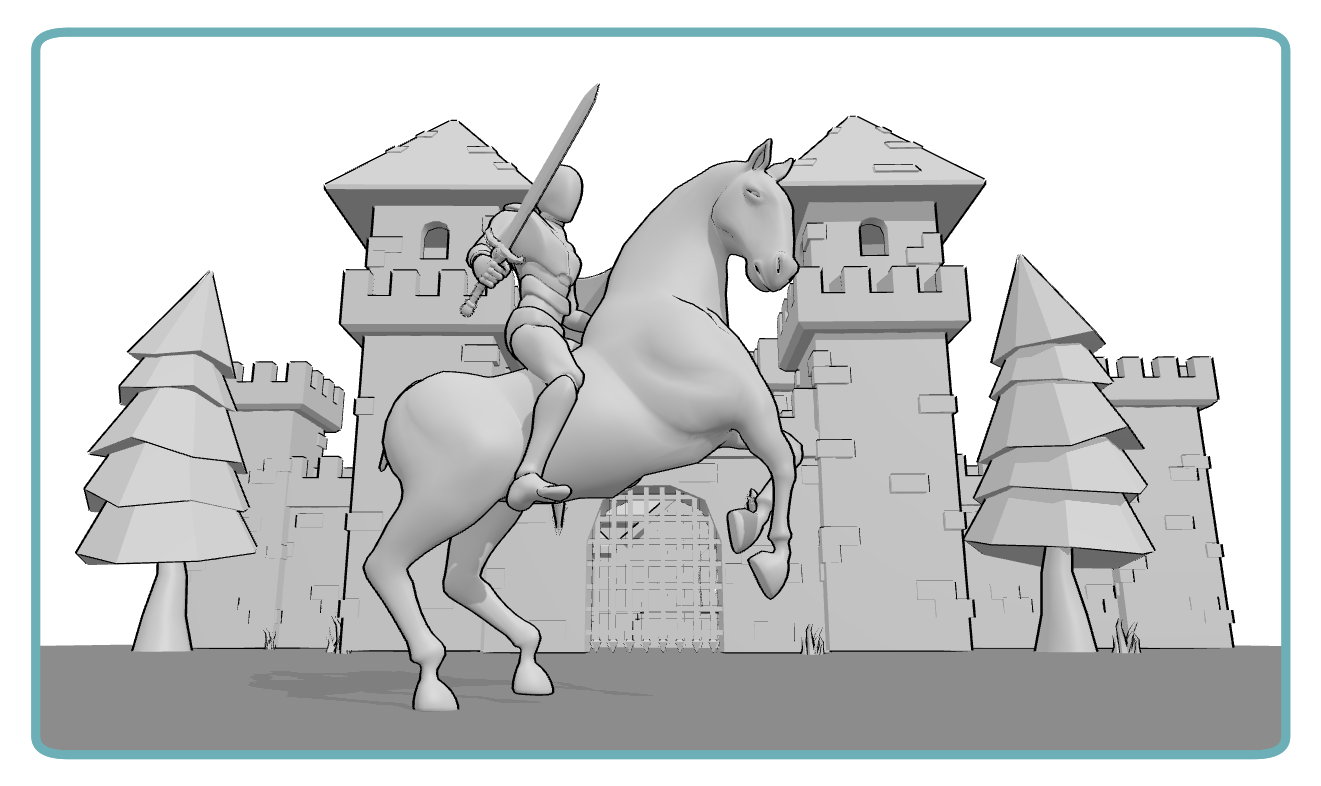
This is particularly helpful when the horse is carrying a character. The rider changes the visual balance of the entire scene, and the relationship between the two figures needs to make sense from the chosen viewpoint.
For example, a cowboy sitting upright, an archer leaning forward, or a fantasy character riding with a flowing cape will all create different shapes around the horse. You don’t necessarily need a photographic reference of the exact scene. You need enough information to understand how the bodies occupy the same three-dimensional space.
If you’re looking for ideas for a horse and rider scene, these horse riding poses offer more combinations to explore.
Horse and Rider: Think About the Two Figures Together
When drawing a horse with a rider, it can be tempting to finish the horse first and simply place the character on top.
That usually makes the scene harder than it needs to be.
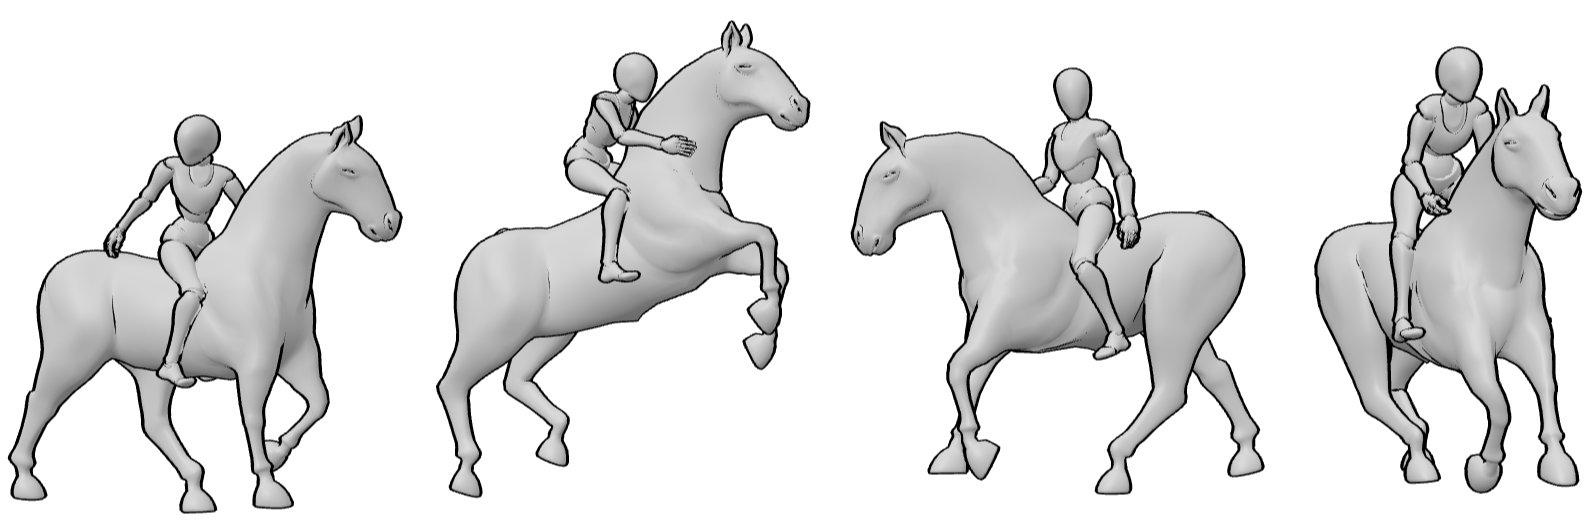
Instead, think about the horse and rider as one composition from the beginning. The rider’s weight affects the horse’s posture, while the horse’s movement affects the rider’s balance and position.
Even a simplified rider can help you judge whether the composition is working. You don’t need to draw the character in detail at this stage. A basic mannequin is enough to establish the torso, pelvis, arms, and legs and see how they interact with the horse.
You can explore different horse and rider poses to study how the two figures interact before adding anatomical details.
With PoseMyArt, you can build the entire scene around your original idea, adding props and a background if needed. Instead of adapting your drawing to an existing photograph, you can create a composition that fits the scene you want to bring to life.
Don’t Forget the Far-Side Legs
One small thing that can make a big difference in horse drawings is what you do with the legs on the far side of the body.
When the horse is viewed from an angle, those legs are partly hidden, but they still need to exist in your construction. If you ignore them completely, the visible legs can start looking disconnected from the body.
You don’t need to draw every hidden part with equal detail. In fact, that can make the drawing unnecessarily confusing. Instead, establish where the far-side limbs are positioned in space and let the body overlap them naturally.
A 3D model makes this much easier to check. Rotate the camera slightly and you’ll immediately see how the hidden legs are positioned behind the visible ones.
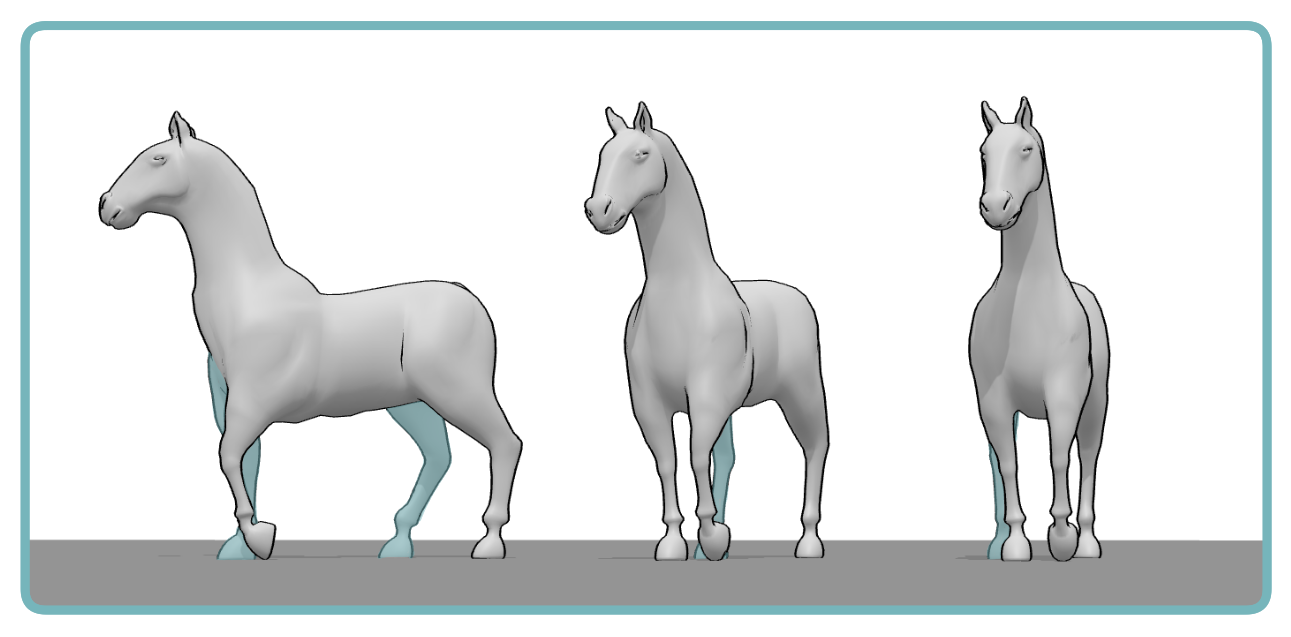
This is one of those things that is difficult to understand from a single reference image but becomes much more obvious once you can see the entire model.
From Simple Construction to a Finished Horse
Once the main masses, proportions, legs, and pose are working, you can gradually move toward the final drawing.
Start replacing the construction forms with more specific anatomical shapes. Refine the chest and ribcage, define the pelvis, shape the neck, and clarify the joints and hooves.
The important part is not to abandon the construction too early. Even when you’re adding the final contours, keep thinking about the forms underneath them.
If a line doesn’t look right, go back and ask which underlying mass is causing the problem. Is the ribcage too narrow? Is the pelvis facing the wrong direction? Is the neck attaching at the wrong angle? Is a leg pointing somewhere different from the weight of the body?
Those questions are much more useful than simply trying to fix the outline by eye.
Practice the Same Horse in Different Poses
One of the best ways to check whether you’ve actually understood the structure is to draw the same horse in several different poses.
Try a relaxed standing pose first. Then change the position of the head and neck. Lift one leg. Try a walking pose. After that, experiment with a more dynamic movement such as running, jumping, or rearing.
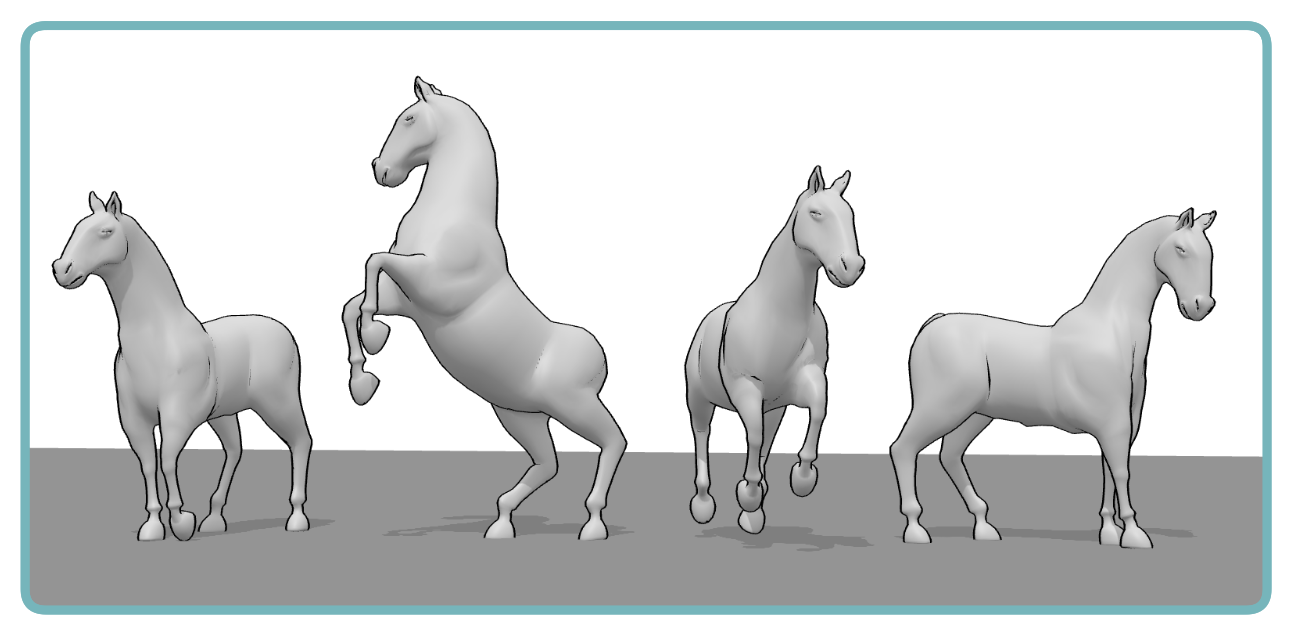
The goal isn’t to memorize one perfect horse drawing. It’s to understand how the same basic masses behave when the pose changes.
Over time, you start recognizing the horse as a three-dimensional structure rather than a collection of lines you have to reproduce.
Final Thoughts
Drawing a horse gets much easier once you stop treating it as one complicated shape.
Start with the large masses, pay attention to how the chest, ribcage, pelvis, neck, and head connect, and build the legs as connected forms rather than four separate lines. Then look at weight, balance, perspective, and movement before getting lost in smaller details.
You don’t need to memorize every anatomical measurement either. Understanding the relationships between the major forms will take you much further, especially when you want to draw horses from unusual angles or in dynamic poses.
And if the reference you need doesn’t exist, you can always build it yourself.
That’s probably my favorite part of using 3D references. I can start with an idea rather than a photograph - whether that’s a simple horse study, a cowboy riding through a landscape, an archer preparing to shoot, or a completely imaginary fantasy scene - and adjust the model until the pose and camera angle actually match what I want to draw.
The 3D model doesn’t do the drawing for me. It simply gives me a way to understand the structure, perspective, and pose before I put pencil or brush to the final artwork.