How to Draw Heads Using the Loomis Method and 3D Drawing References
Drawing a head from the front is one thing. Turn it slightly to the side, tilt it up, or look down at it, and suddenly that perfectly reasonable circle starts behaving like it has a personal grudge against you.
This is where head construction becomes useful. Instead of trying to place the eyes, nose, mouth, and jaw by guessing their position, you can first build the head as a simple 3D form and use that structure to guide the features.
The Loomis Method is one of the most widely used approaches for doing exactly that. Developed and taught by American artist Andrew Loomis, the method simplifies the head into a ball, a side plane, and a set of construction lines that help establish its direction and proportions.
I find this especially useful when working with 3D references. A photo can show you the shapes from one angle, but a 3D model lets you rotate the head and change the camera angle, so you can see why those shapes change in the first place.
In this guide, we’ll go through the basic Loomis construction, look at the head from the front, side, and three-quarter views, and see how 3D references can make those changes much easier to understand.
- What Is the Loomis Method?
- Start with the Basic Head Shape
- Find the Center Line and Brow Line
- Build the Side Plane
- Extend the Structure
- Add the Hairline and Nose Line
- Front, Side, and Three-Quarter Views
- Using 3D References to Understand Head Angles
- Adding Facial Features Without Losing the Structure
- Using Skull and 3D Anatomy References
- Common Loomis Method Mistakes
- Practice Heads from Different Angles
What Is the Loomis Method?
The basic idea behind the Loomis Method is to treat the head as a solid object rather than a flat collection of facial features.
You start with a rounded form representing the cranium. The sides are then simplified into a flatter plane, creating a more recognizable head shape. From there, construction lines establish the direction the head is facing and help you place the major facial features.
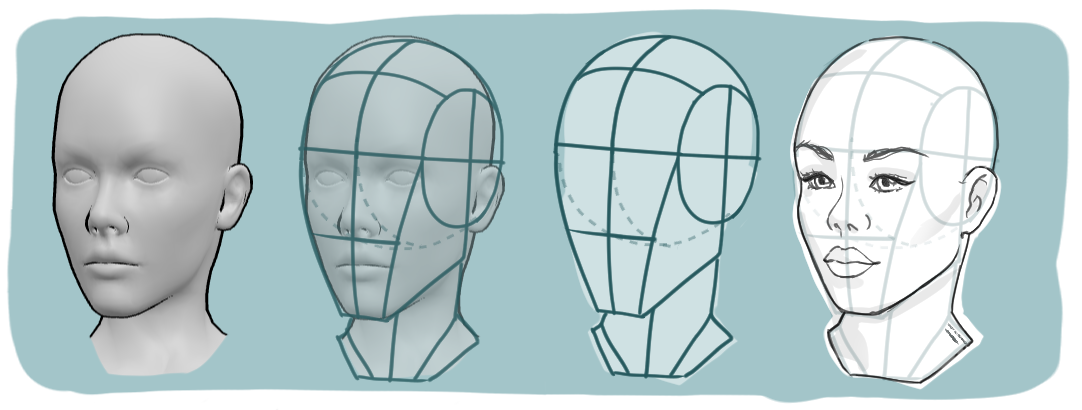
The important part is not the exact shape of the circle or the number of lines you draw. The useful part is learning to feel the head as a 3D form.
That distinction matters. If you memorize the Loomis construction as a formula, it is easy to get stuck when the head moves into an angle you haven’t practiced. If you understand what the construction is describing, you can adapt it.
My favorite way to draw heads is to combine the Loomis Method with 3D references. First, I choose a 3D model and set up the pose and angle I want, then use the Loomis Method to build the head in my drawing. I do use references, but I don’t copy them. Instead, I use them to help me understand the head’s angle, proportions, and construction so I can build the drawing more accurately.
Start with the Basic Head Shape
The first step is the cranium.
Think of it as a ball rather than a flat circle. In a drawing, you may only see an ellipse or a circle-like outline, but you should still imagine the complete rounded form continuing behind the visible part of the head.
This is one of the things that makes head construction so useful. You are not only drawing what you can see. You are establishing the form that exists underneath it.
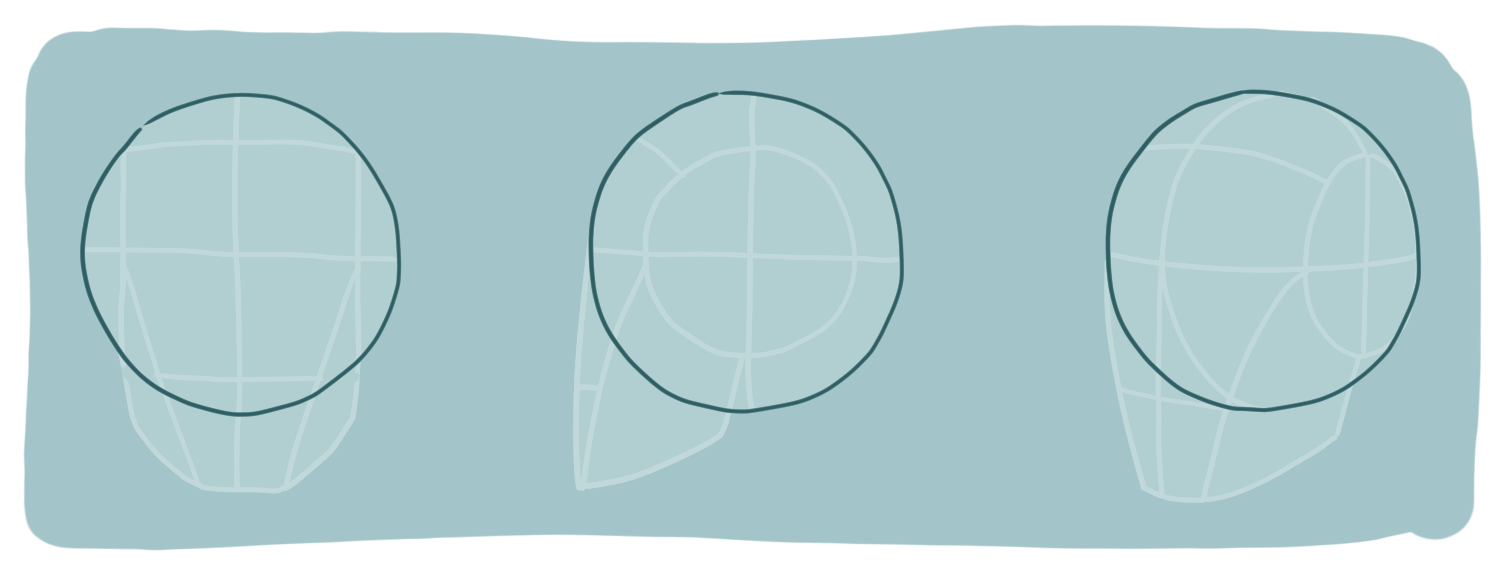
I usually keep these first lines very light. At this stage, accuracy is more important than making the drawing look pretty. The construction lines are there to give you something solid to build on, so there is no need to polish them too early.
Find the Center Line and Brow Line
Once you have the basic form, you need to establish its direction.
The center line runs down the front of the face and helps indicate which way the head is turned. The brow line crosses the head and establishes another important reference for the placement of the features.
These lines are much more useful when you think of them as wrapping around a 3D form.
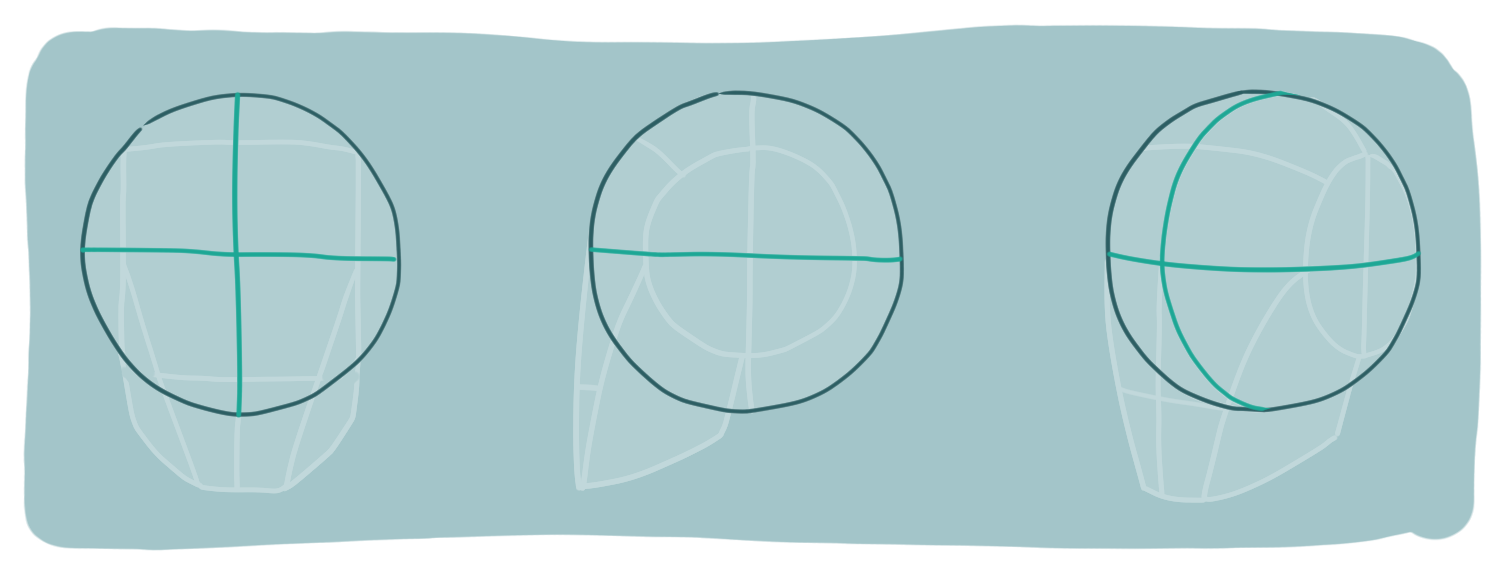
On a straight front view, the center line can look almost perfectly vertical and the brow line relatively straight. Turn the head, however, and both lines begin to curve around the surface.
This is where a common mistake happens: artists often draw the construction lines as if they are sitting on a flat oval. The result may look fine from one angle but quickly falls apart when the head turns.
Build the Side Plane
The human head isn’t a perfect sphere. The sides of the cranium are flatter, and the facial structure extends forward from that rounded mass.
The Loomis Method simplifies this by creating a side plane from the sphere. This gives you a more useful structure for placing the ear, jaw, and facial features.
It also makes the head much easier to rotate mentally.
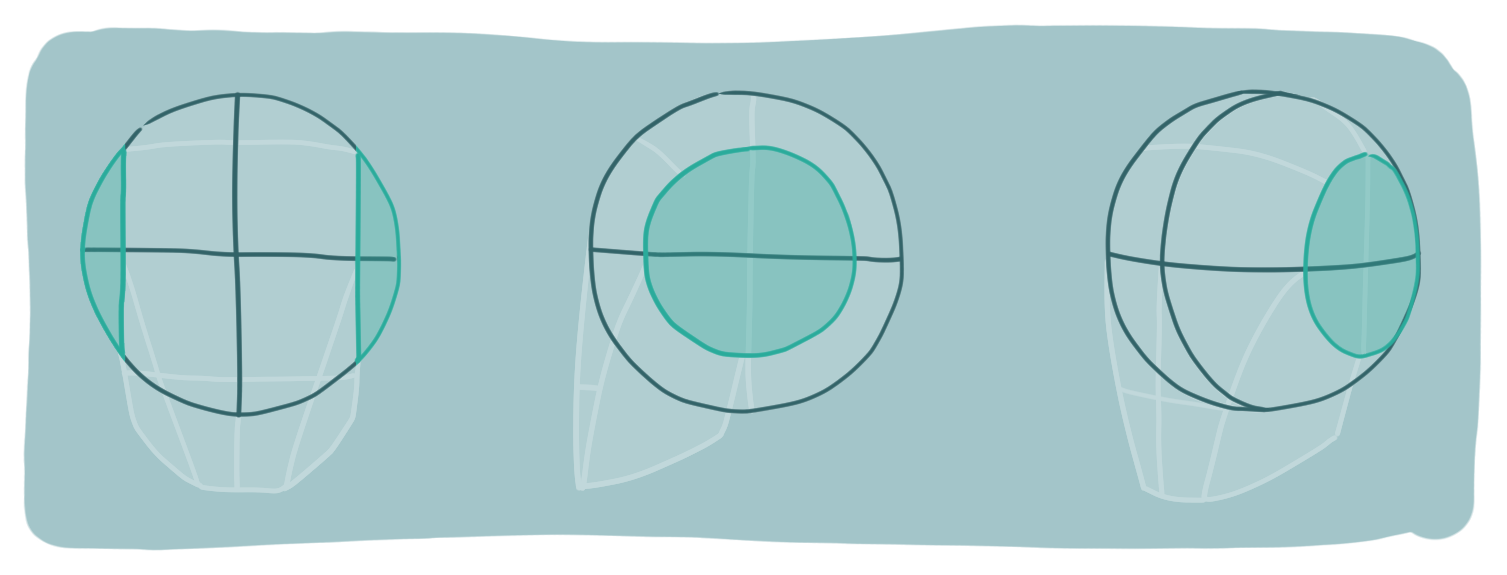
When you look at a front-facing head, the side plane may not be very obvious. In a three-quarter view, however, it becomes much easier to see. One side of the head becomes more visible while the opposite side recedes.
This is one of those details that is much easier to understand when you can actually rotate a model rather than staring at a single drawing and trying to reverse-engineer it.
Extend the Structure
Once the side plane is in place, you can extend the construction downward and forward to establish the rest of the head.
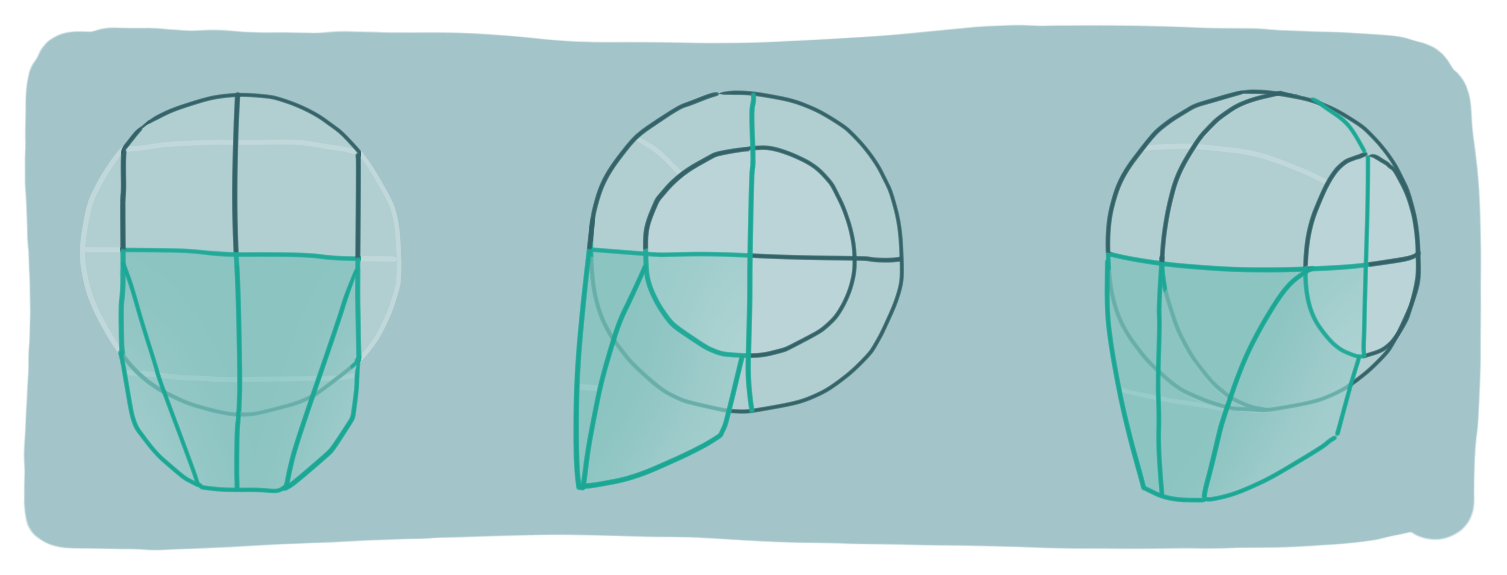
The jaw connects the cranium to the lower part of the face, while the front of the face projects outward from the rounded mass of the skull. At this stage, you are still thinking in terms of simple forms rather than individual features.
The exact shape will vary depending on the head you are drawing. Some heads may have a longer or narrower jaw, while others may be wider or more compact. The construction gives you a starting point, but it does not lock you into one specific head shape.
Add the Hairline and Nose Line
With the main structure established, you can add a few more lines to help divide the face.
The hairline gives you a useful upper boundary for the face, while the nose line helps establish the vertical placement of the nose and the lower part of the face. These lines also give you clearer landmarks for placing the eyes, nose, and mouth later.
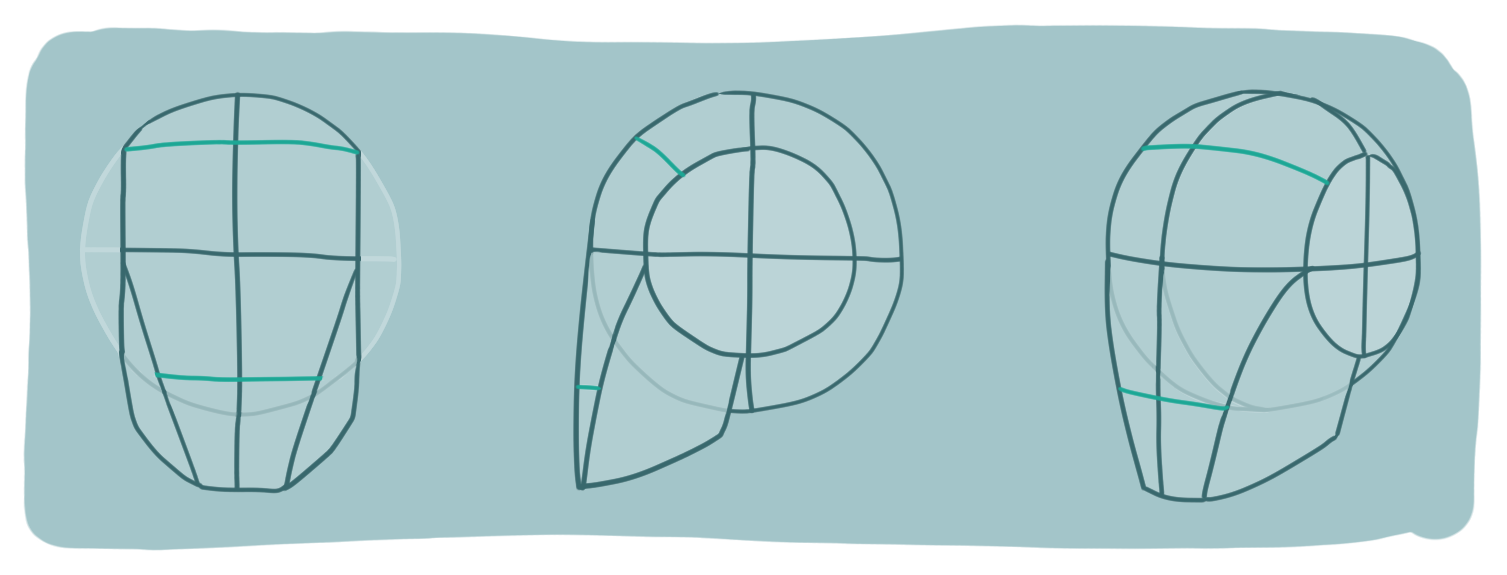
In the basic Loomis construction, the hairline, brow line, bottom of the nose, and chin are spaced at roughly equal intervals. This gives you a simple proportional framework, but these are not fixed rules. Every face has its own proportions and structure, so these measurements can be adjusted depending on the head you are drawing.
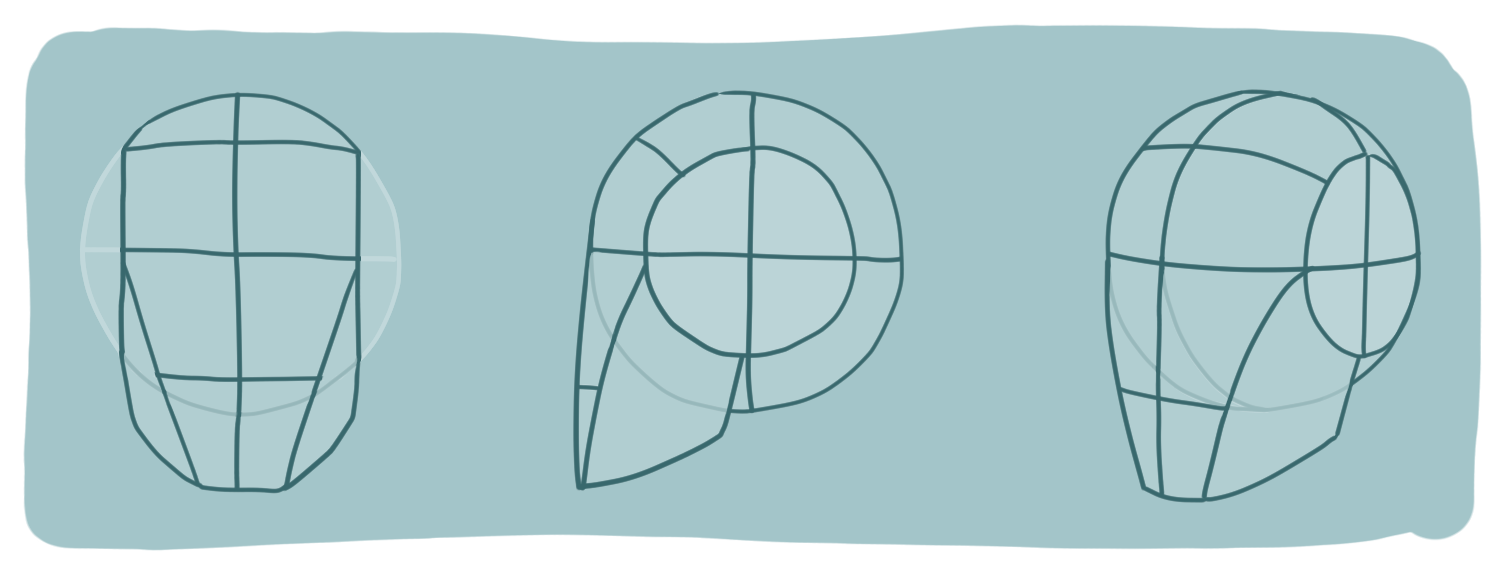
Just like the center and brow lines, these lines should follow the orientation of the head rather than sit flat across the page. Their position will change depending on the angle of the head, which is much easier to understand when you think of the construction as a 3D form.
Front, Side, and Three-Quarter Views
The same construction behaves differently depending on how the head is turned.
Front View
The front view is the easiest place to understand the basic structure because most of the construction is symmetrical.
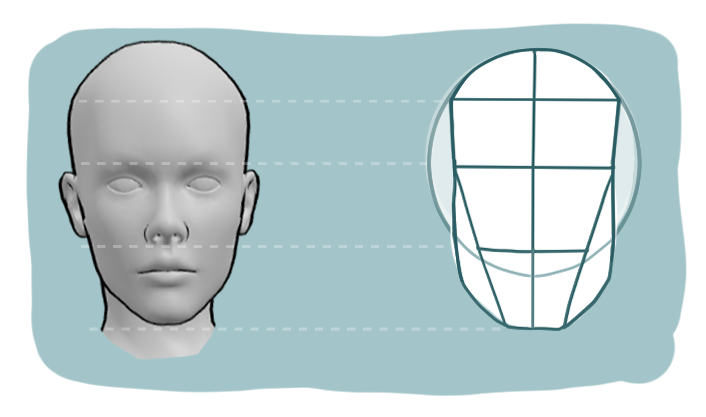
The center line sits near the middle of the face, and the brow line runs across the front of the head. From here, you can establish the basic placement of the eyes, nose, mouth, and chin.
But even in a front view, try not to think of the head as a flat mask. The cranium still has depth, and the facial forms project outward from it.
Side View
In profile, the construction becomes much more about depth.
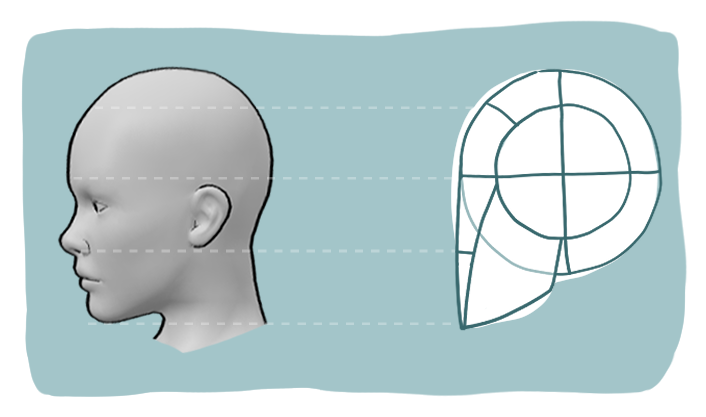
You can clearly see the relationship between the cranium, forehead, nose, mouth, chin, and jaw. The face projects forward from the main mass of the skull, while the back of the head continues behind it.
This view is particularly useful for checking whether your head actually has volume. A drawing can look convincing from the front while being completely impossible from the side.
I’ve found that alternating between front and side views is a simple way to catch these problems early.
Three-Quarter View
The three-quarter view is where the Loomis construction becomes especially useful.
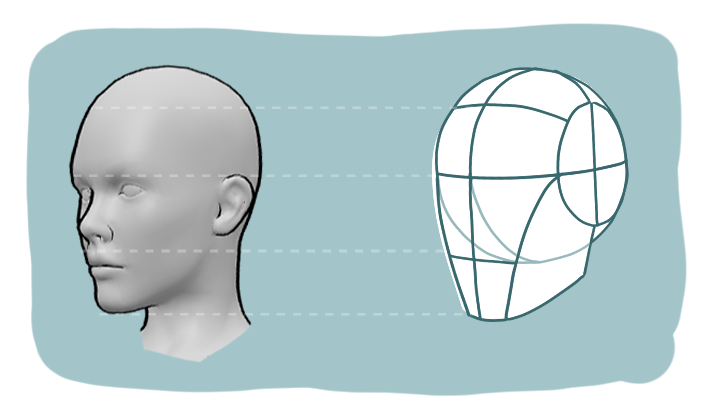
You can see both the front and side of the head at once, but neither is presented completely. The center line curves around the face, the far side becomes narrower, and the features change their apparent spacing because of perspective.
This is also the point where trying to rely on memorized proportions alone becomes much less reliable.
Using 3D References to Understand Head Angles
When you look at a photograph or another 2D reference, you only get one view of the head. You can study it carefully, but you still have to mentally reconstruct what the hidden forms are doing.
With a 3D reference, you can rotate the model and see those changes directly.
For example, take the same head and rotate it from front view into a three-quarter view. The center line moves across the face, the visible side plane becomes wider, the far side recedes, and the features change their apparent spacing.
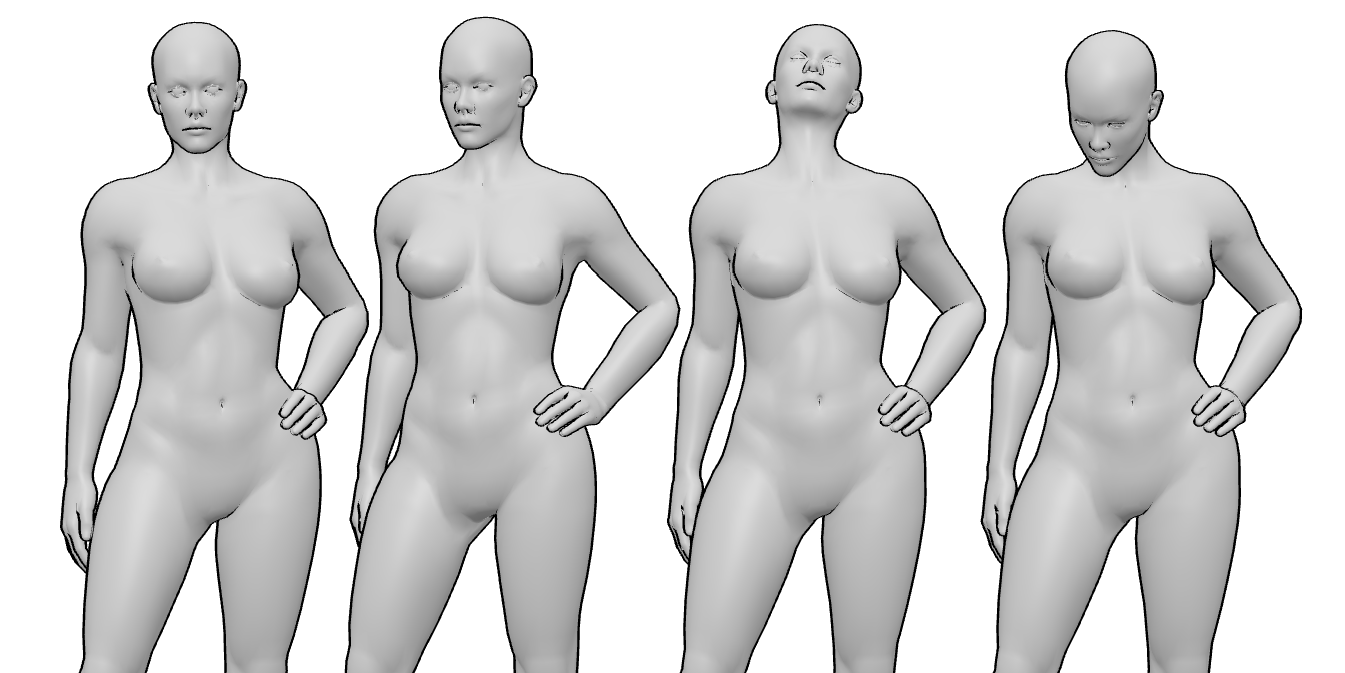
Tilt the head upward and you start seeing more of the underside of the nose and chin. Tilt it downward and the opposite happens.
These changes can seem surprisingly complicated when you’re trying to memorize them. Once you can rotate a 3D head yourself, they become much easier to understand.
For drawing, I often find it more useful to ask “What is this form doing in space?” than “What line am I supposed to draw here?”
Adding Facial Features Without Losing the Structure
Once the basic construction is working, the facial features can be placed within it.
The important thing is not to treat the eyes, nose, and mouth as independent stickers that happen to live on the same face.
Their position depends on the underlying head.
The eyes follow the orientation of the face. The nose projects outward from it. The mouth sits across the front plane and changes shape as the head turns. The jaw connects everything back into the larger structure.
This is why I prefer adding features relatively late in the process. If the head direction is wrong, beautifully drawn eyes aren’t going to rescue it.
This is also where working with different head types can help you see how the same basic construction can be adapted to different proportions.
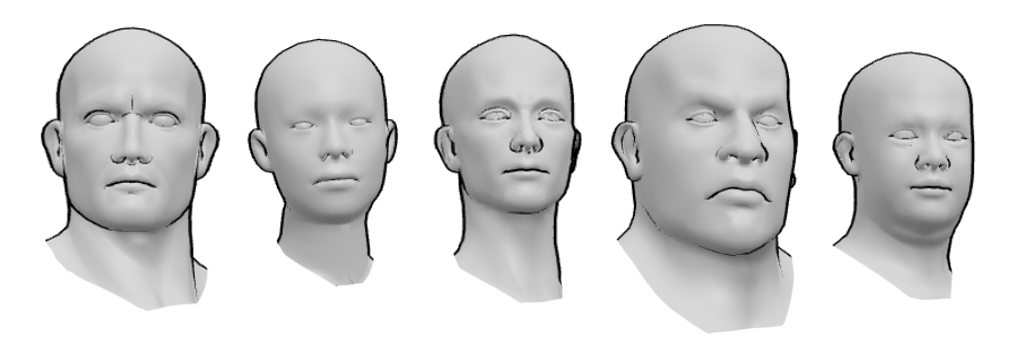
A realistic female model and a realistic male model can share the same basic construction while still having noticeably different proportions and surface forms. The Loomis Method gives you the framework; the individual model gives you the variation.
The same applies to stylized characters. Once you understand the basic construction, you can stretch, compress, widen, narrow, or otherwise modify the forms without completely losing the sense of a head underneath.
Using Skull and 3D Anatomy References
If you are struggling with head construction, don’t only study finished portraits.
A skull can sometimes explain the structure much more clearly.
The skull removes a lot of the surface information and lets you see the cranium, facial plane, jaw, cheekbones, and eye sockets more directly. This makes it easier to understand why certain parts of the face appear where they do.
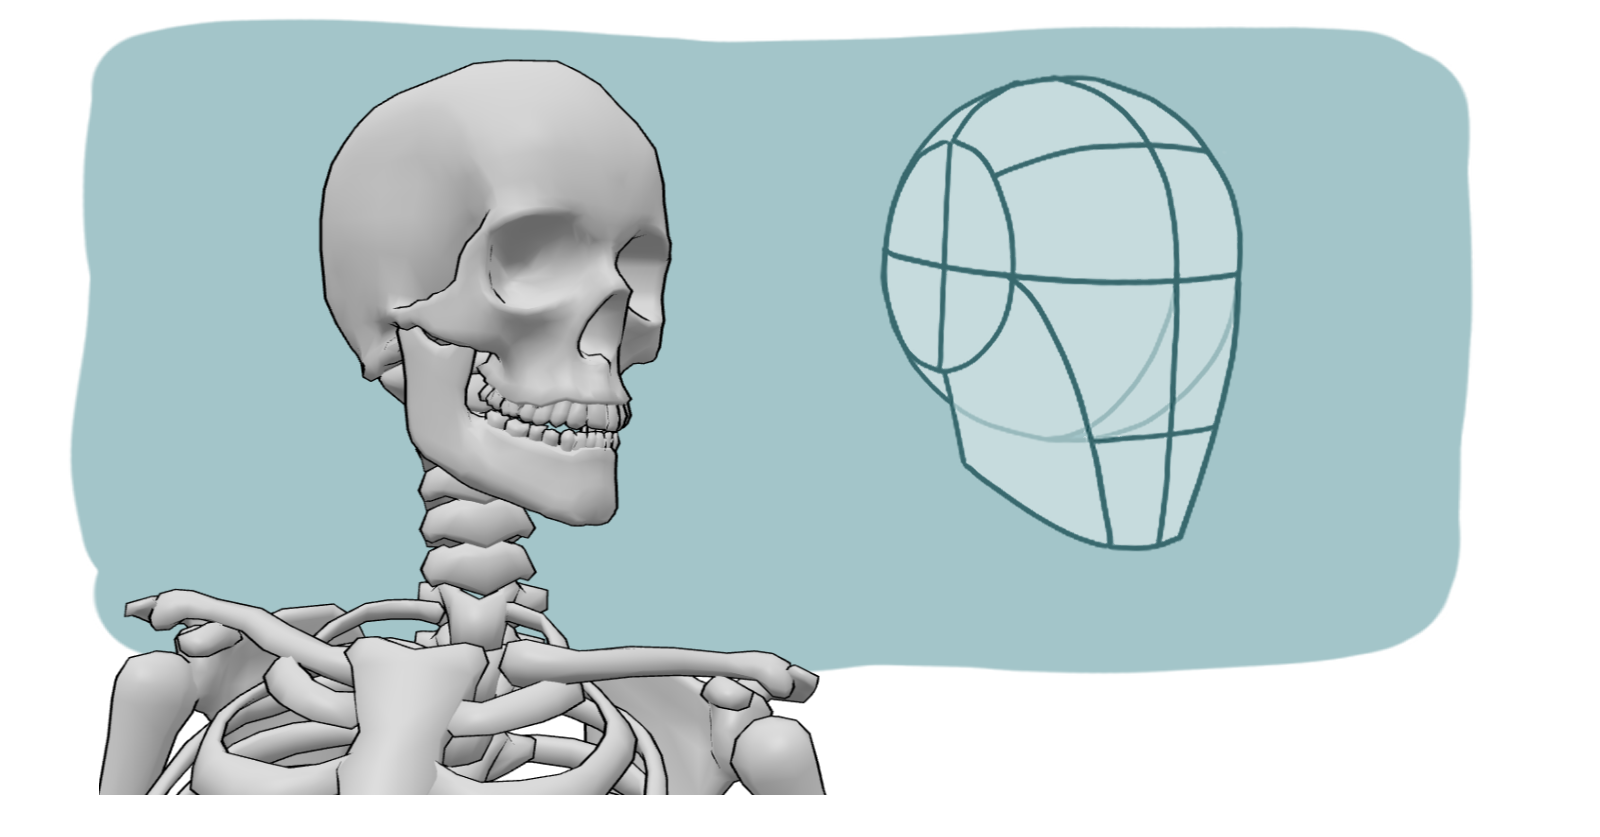
The Human Skull References collection can be useful for this kind of study, you can rotate the skeleton model and examine it from different angles rather than being limited to a single photograph.
I also like switching between different models when studying a construction. A realistic female model, realistic male model, or more simplified figure can all help you notice different aspects of the same underlying structure.
You don’t need to find one “perfect” head reference. In fact, working with different heads is probably more useful because it stops you from accidentally memorizing one person’s proportions.
Common Loomis Method Mistakes
The Loomis Method is simple enough to understand quickly, but using it well takes practice. A few problems tend to appear repeatedly.
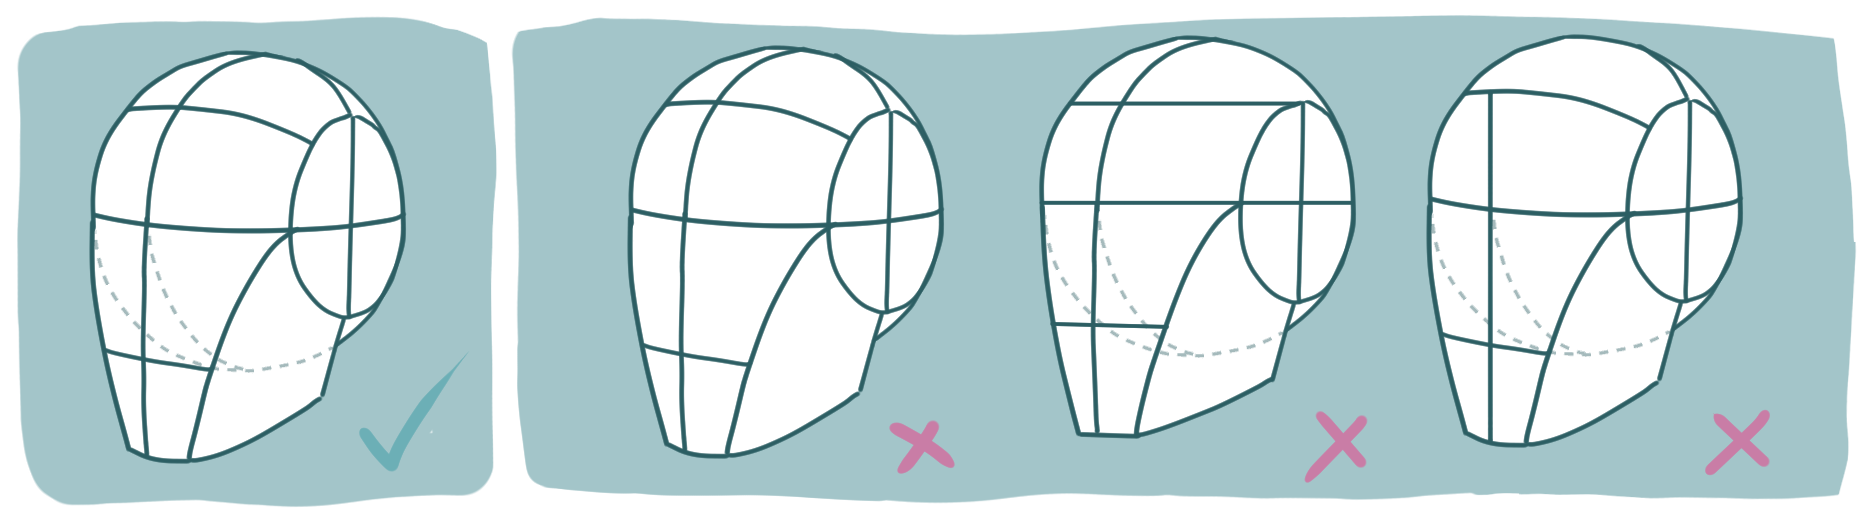
Treating the sphere as a flat circle
The circle is only the visible outline of a 3D form. If you forget the volume behind it, the construction lines will stop making sense as soon as the head turns.
Keeping the center line straight
In a turned head, the center line needs to follow the surface of the form. Drawing it as a straight vertical line can make the face appear pasted onto the front of the skull.
Placing features independently
If the eyes, nose, mouth, and chin are each positioned separately, small errors can accumulate quickly. Use the construction to establish their relationships first.
Using the same proportions for every head
The Loomis Method gives you a framework, not a universal human head template.
Real heads vary. Fantasy characters vary even more.
I think this is one of the most useful things to remember when learning any construction method: the goal is not to make every head look like the same head.
Drawing only the visible half
This is a mental trap rather than a drawing mistake. Even when you can’t see the far side of the head, it still exists.
Thinking about that hidden volume makes three-quarter and profile views much easier to construct. Loomis himself emphasized building the head as a complete solid form rather than constructing only the visible portion.
Practice Heads from Different Angles
Once you understand the basic construction, don’t spend all your practice drawing the same front-facing head.
Choose a model, set up a camera angle, and draw the head using the Loomis construction. Then rotate the model slightly and try again.
You can make the exercise more useful by keeping the model the same while changing only the camera angle. This makes it much easier to see which changes come from perspective rather than from the anatomy itself.
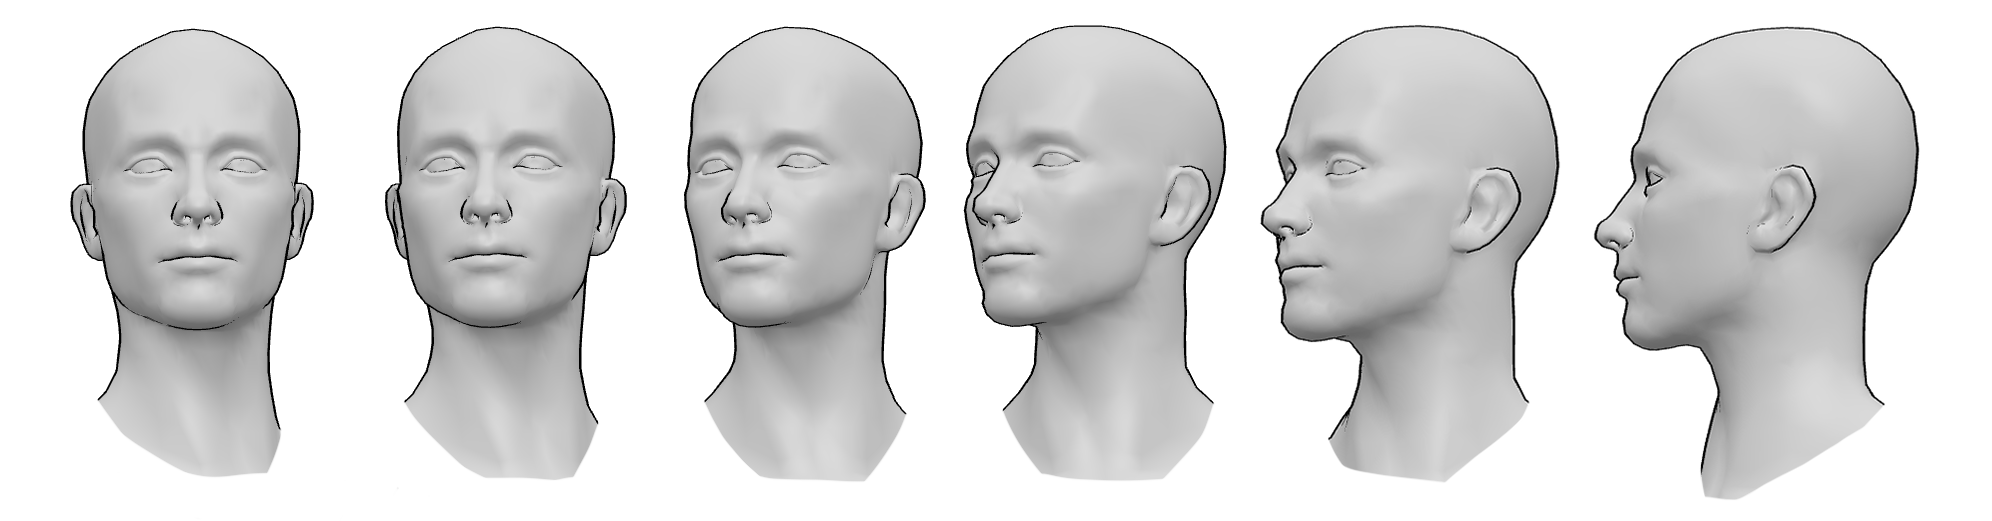
Then switch models.
Try a realistic female head, a realistic male head, a skull, and a simpler figure. Compare what stays consistent and what changes.
The Head Angle Reference collection is useful for this because it includes different head positions and angles, including heads turning left and right and looking up or down.
You can also combine head studies with full-body references. A head doesn’t exist separately from the rest of the figure, and the angle of the head often affects the neck, shoulders, and overall gesture.
For broader figure practice, collections such as Body Proportions Drawing References, Body Types Drawing References, and Realistic Drawing References give you different models and poses to work from.
The more you change the reference while keeping the construction method consistent, the more useful the method becomes.
Final Thoughts
The Loomis Method is not really about drawing a particular kind of circle or memorizing a fixed set of measurements. Its real value is that it gives you a way to think about the head as a solid form in space.
Front, side, and three-quarter views may look like completely different drawings at first, but underneath them is the same basic structure rotating through space.
This is also why I like combining the Loomis Method with 3D references. I can choose a pose and angle with a 3D model, then use the Loomis construction to work out the head’s structure instead of simply copying what I see. The 3D reference helps me understand how the head is positioned in space, while the Loomis Method gives me a way to translate that into a drawing.
And once you stop treating the Loomis Method as a formula, it becomes much more flexible. You can change the proportions, use different models, exaggerate features, or develop your own characters while still having a solid structure underneath.
The point isn’t to make every head follow the same recipe. It’s to understand the form well enough that you can change the recipe without losing the head.