How to Draw Female and Male Bodies: Key Anatomical Differences
A female and male figure can share the same pose, the same gesture, and even similar overall proportions - yet still look noticeably different. After years of drawing, I’ve found that this is often where a figure starts to feel either convincing or slightly “off”: not because the anatomy is wrong, but because the underlying structure doesn’t quite match the body you’re trying to draw.
The differences often come from the pelvis, ribcage, shoulders, limbs, and the relationships between them. None of these features needs to be exaggerated; small shifts in shape, width, or angle can change the entire silhouette.
Looking at these structures in 3D makes their differences much easier to understand. You can see how the pelvis sits beneath the ribcage, how the shoulders relate to the torso, and how the proportions change as the body turns in space.
In this guide, we’ll look at the main anatomical differences between female and male bodies and how they affect the way we construct the figure.
Overall Proportions and Body Structure
Before studying individual features, look at the body as a whole. Female and male figures can differ in height, torso length, leg length, shoulder width, pelvis width, and muscle mass, but these proportions vary from person to person. The Body Types Drawing References collection is useful for studying these variations, with different female and male body types that make it easier to compare how the same basic structure can look across different builds.
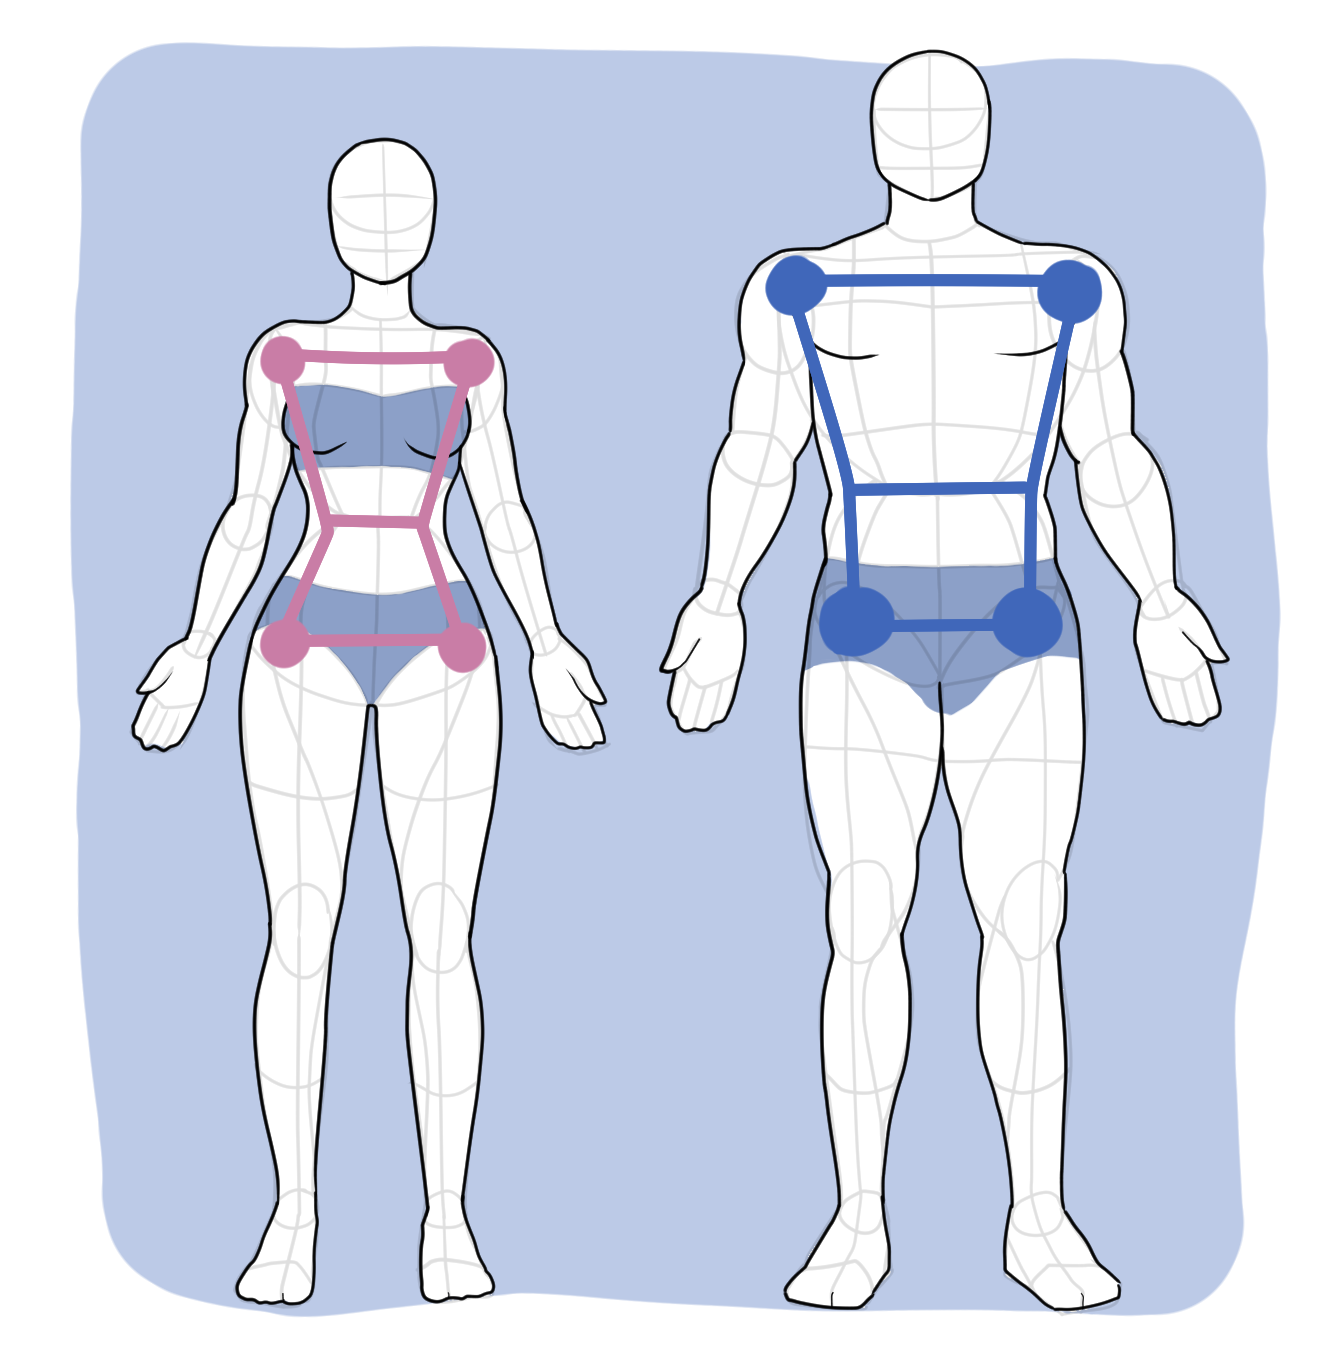
When studying female body proportions, compare the relationships between the major forms rather than memorizing fixed measurements. Male body proportions can often show broader shoulders and a narrower pelvis, while female figures may show a different balance between the shoulders and hips.
Perspective can also change how proportions appear. A leg pointing toward the camera may look shorter, while a closer shoulder may appear wider. This is why 3D body references are useful: you can rotate the figure and separate structural differences from camera distortion.
Start by placing the head, ribcage, pelvis, and major joints. Then use these landmarks to judge the proportions of the torso and limbs. The Body Proportions Drawing References collection offers female and male 3D poses for studying proportions from different angles.
Ribcage and Torso Shape
The ribcage is one of the first places where the overall structure of a female and male figure can begin to diverge. Rather than thinking of it as a collection of individual bones, simplify it into a solid 3D form with width, depth, and a clear direction in space.
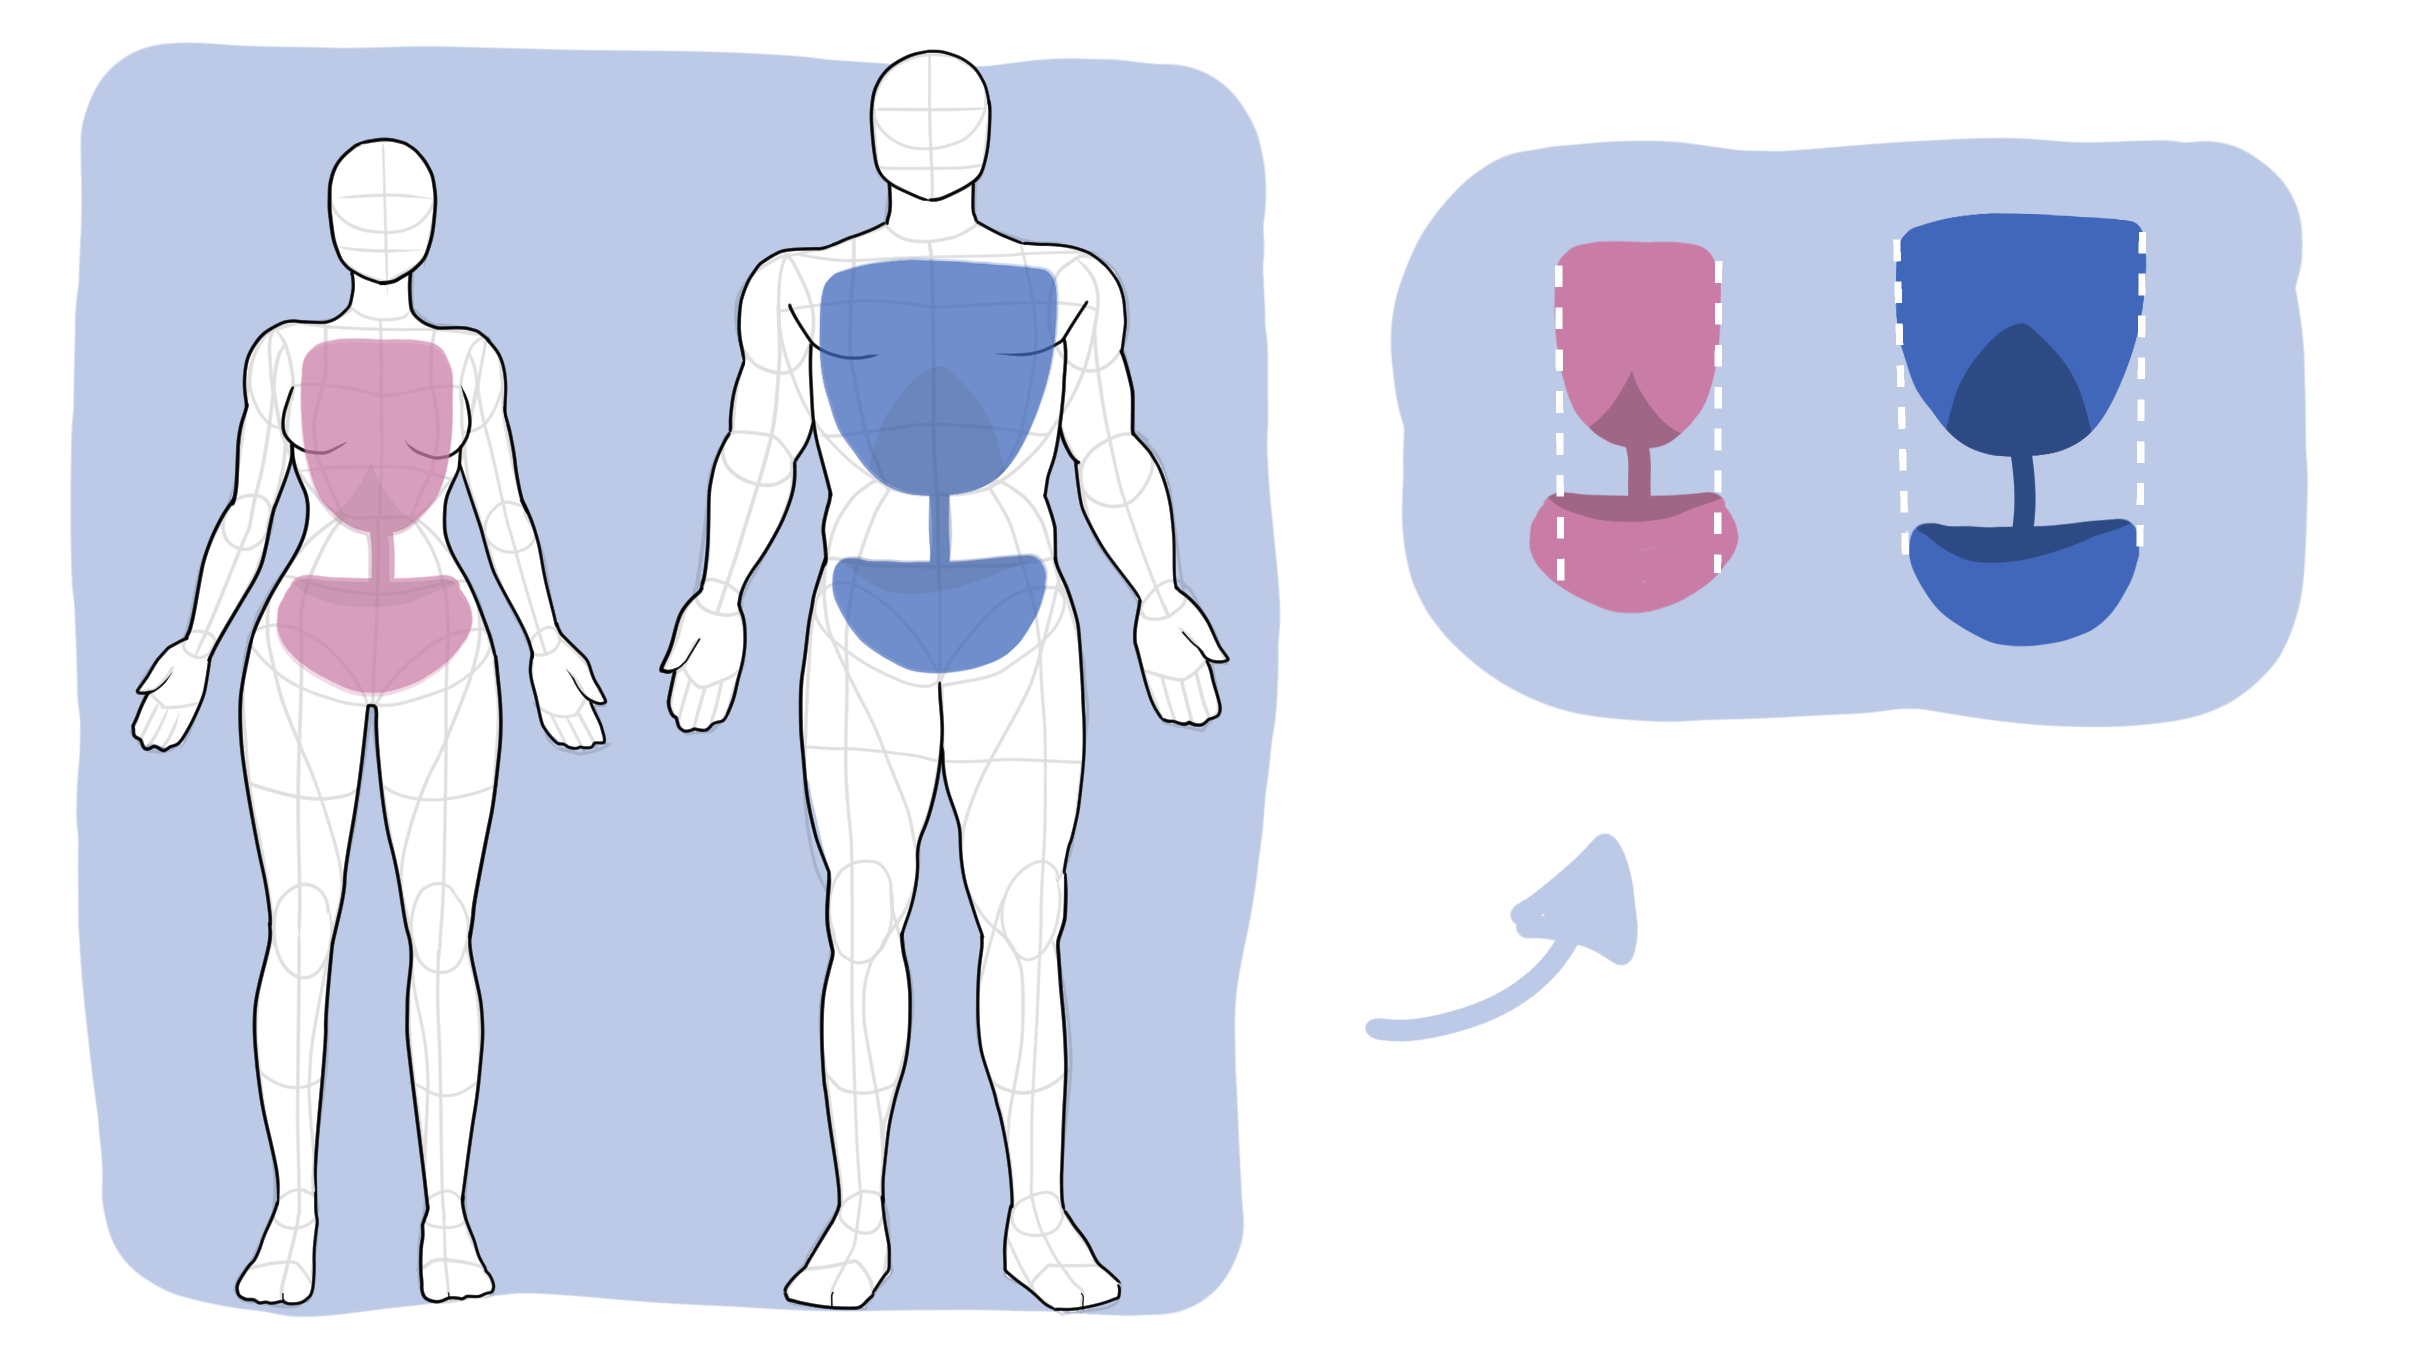
Male ribcages tend to be broader and more substantial, with more width through the upper torso. Female ribcages are often narrower relative to the pelvis, creating a more noticeable transition between the chest and waist. These are general tendencies rather than fixed rules, but they can make a significant difference when constructing a figure.
The difference becomes easier to see from different angles. A three-quarter or side view can reveal changes in depth, curvature, and the relationship between the ribcage and spine that may be difficult to notice from the front.
When studying the ribcage, pay attention to its width, depth, tilt, and rotation rather than trying to memorize a specific shape. Once you understand the ribcage as a 3D form, it becomes much easier to build the rest of the torso around it.
Pelvis: One of the Biggest Differences
The pelvis is another major structural difference between female and male figures, and it has a strong influence on the entire lower body. For drawing purposes, it helps to think of it as a solid bowl-like form rather than a collection of separate bones.
Female pelvises tend to be broader and relatively shorter, while male pelvises are generally narrower and taller, creating a more vertical, compact structure. These differences can affect the distance between the waist and hips, the angle of the upper legs, and the overall silhouette.
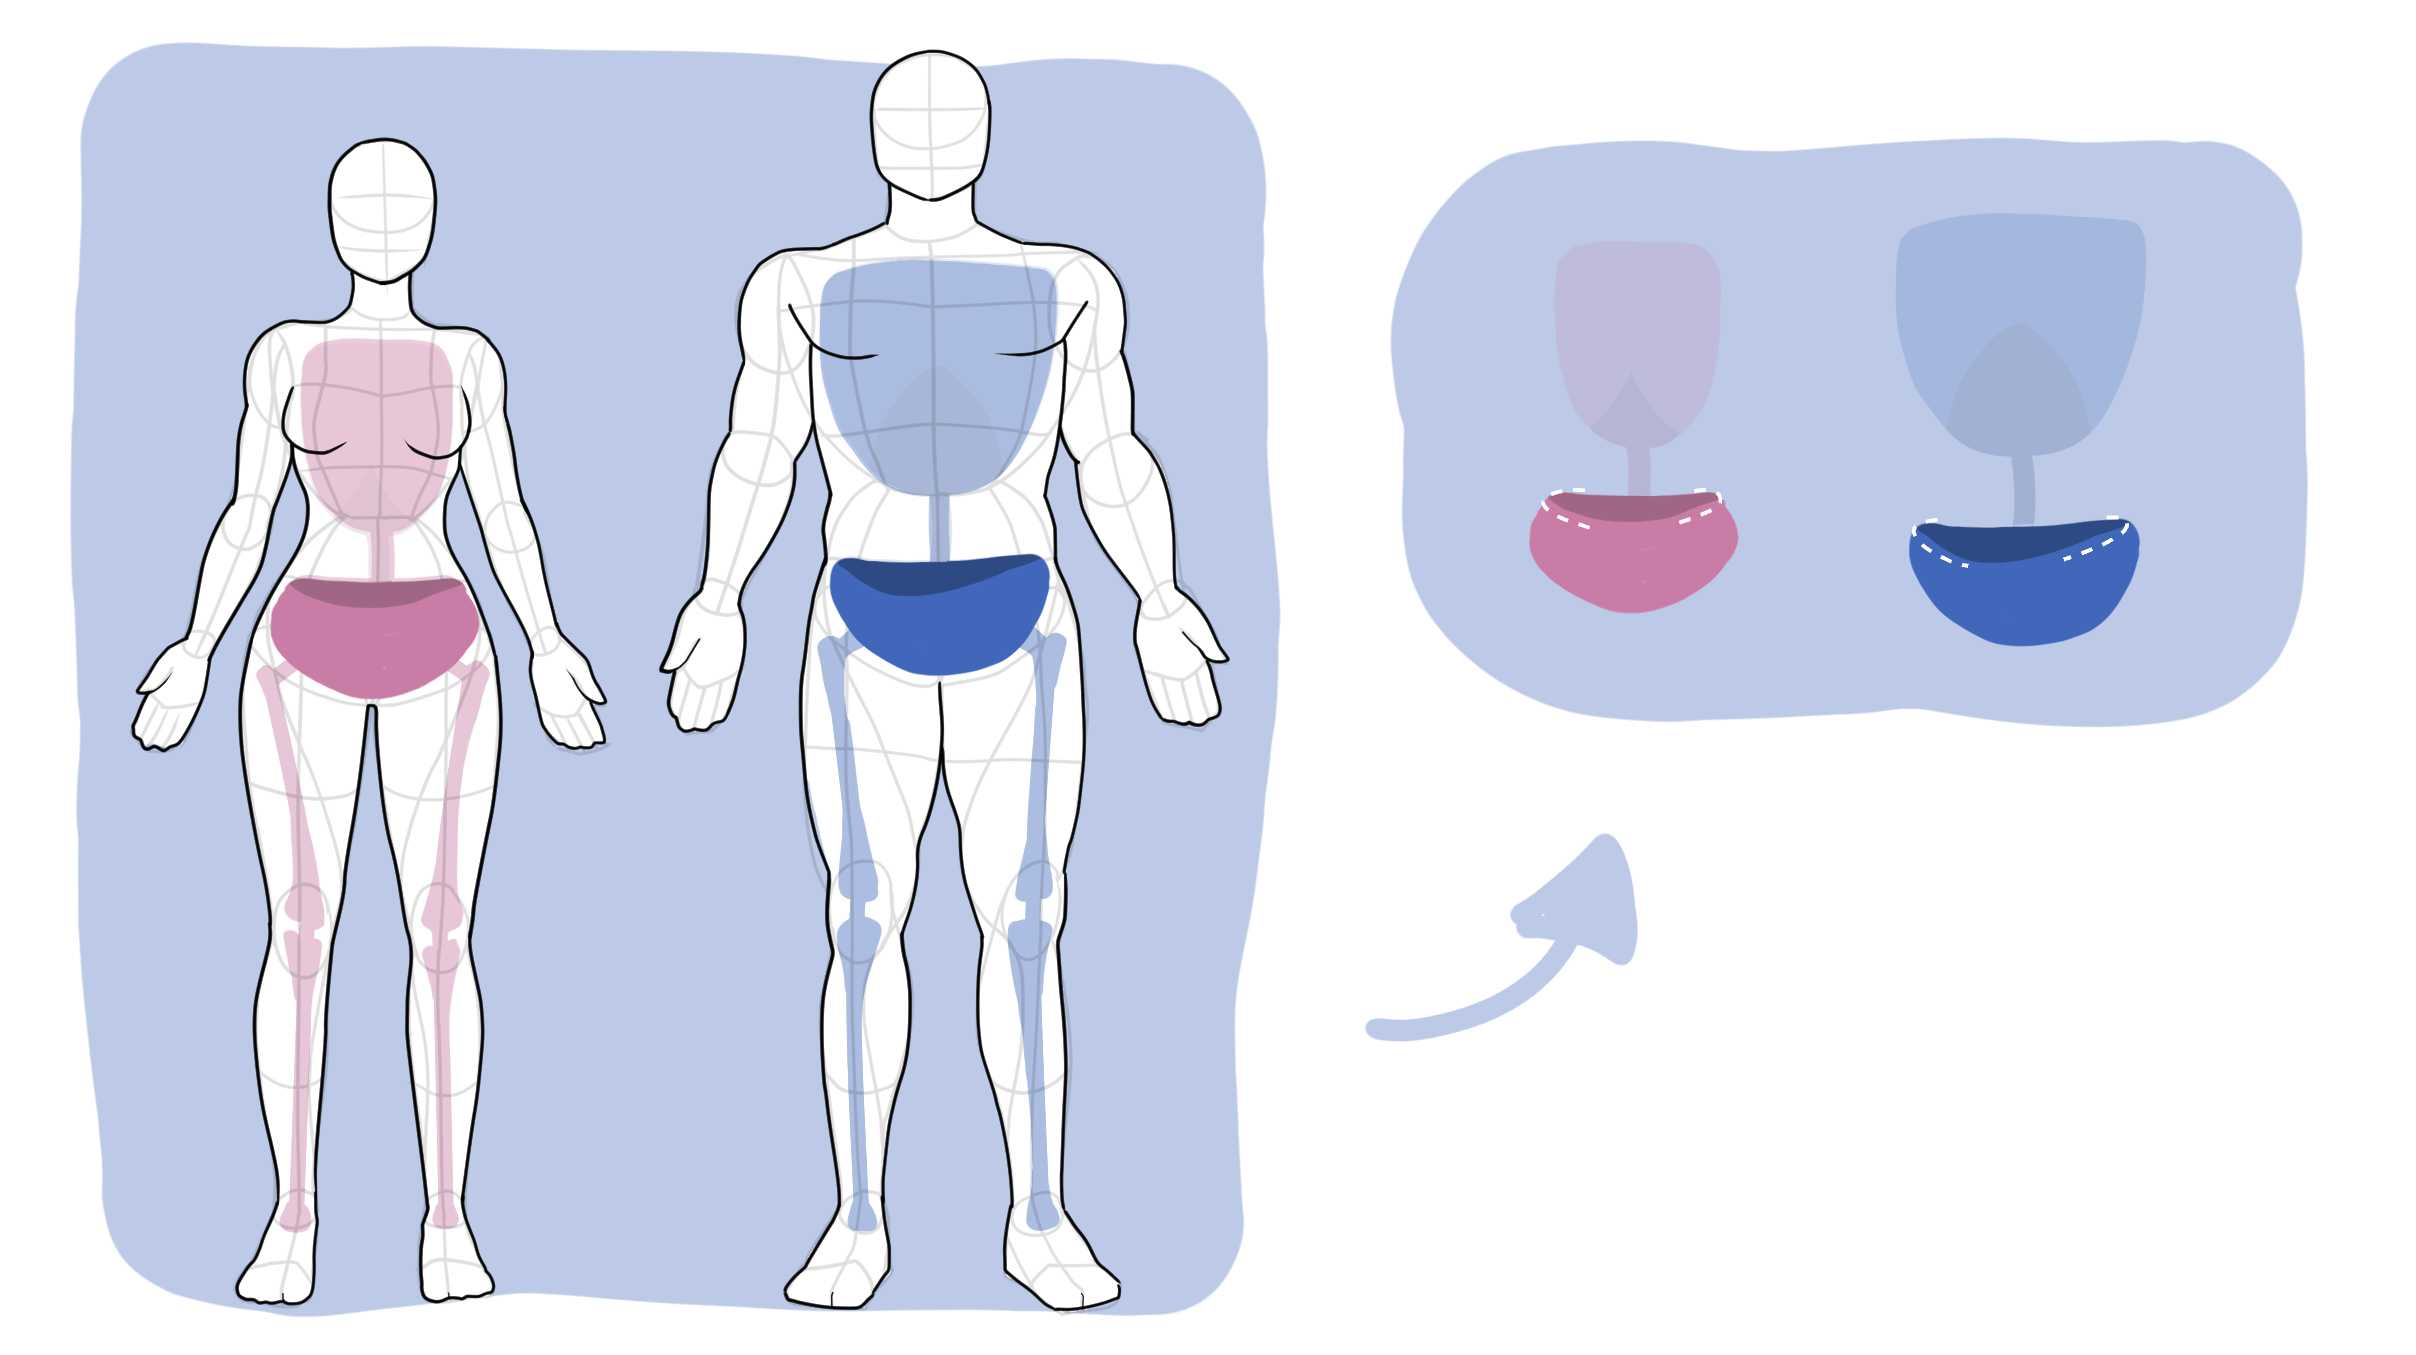
The iliac crest and the shape of the hips are especially useful when constructing the pelvis. Once you establish their position, you can judge the width and tilt of the pelvis and connect it more accurately to the ribcage above and the femurs below.
The pelvis also needs to be studied in motion. Its tilt and rotation can change dramatically with the pose, affecting the position of the legs, the curve of the lower back, and the distribution of weight.
Shoulders and Upper Body Structure
The shoulders are another area where relatively small structural differences can change the character of a figure. The clavicles, shoulder joints, and upper ribcage work together to determine the width and shape of the upper body, so it is useful to study them as connected forms.
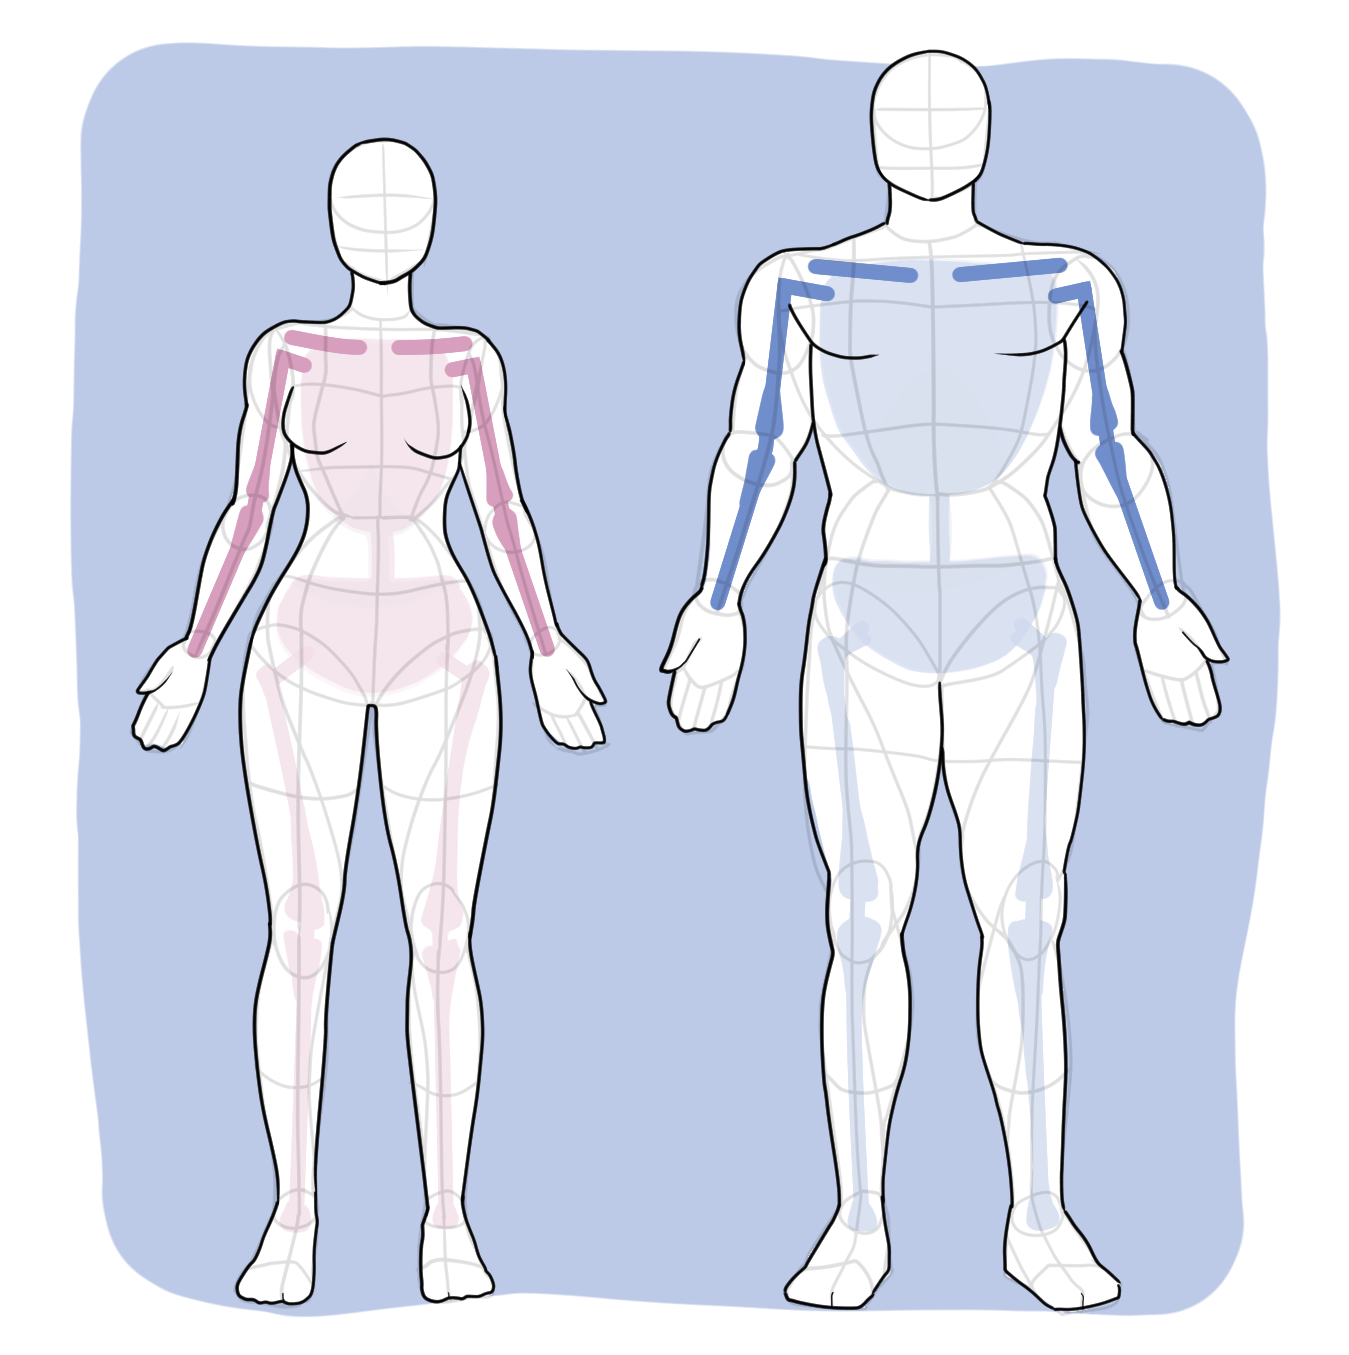
Male figures generally tend to have broader shoulders in relation to the pelvis, with a more substantial upper torso. Female figures often have a narrower shoulder-to-hip relationship, although individual proportions can vary considerably.
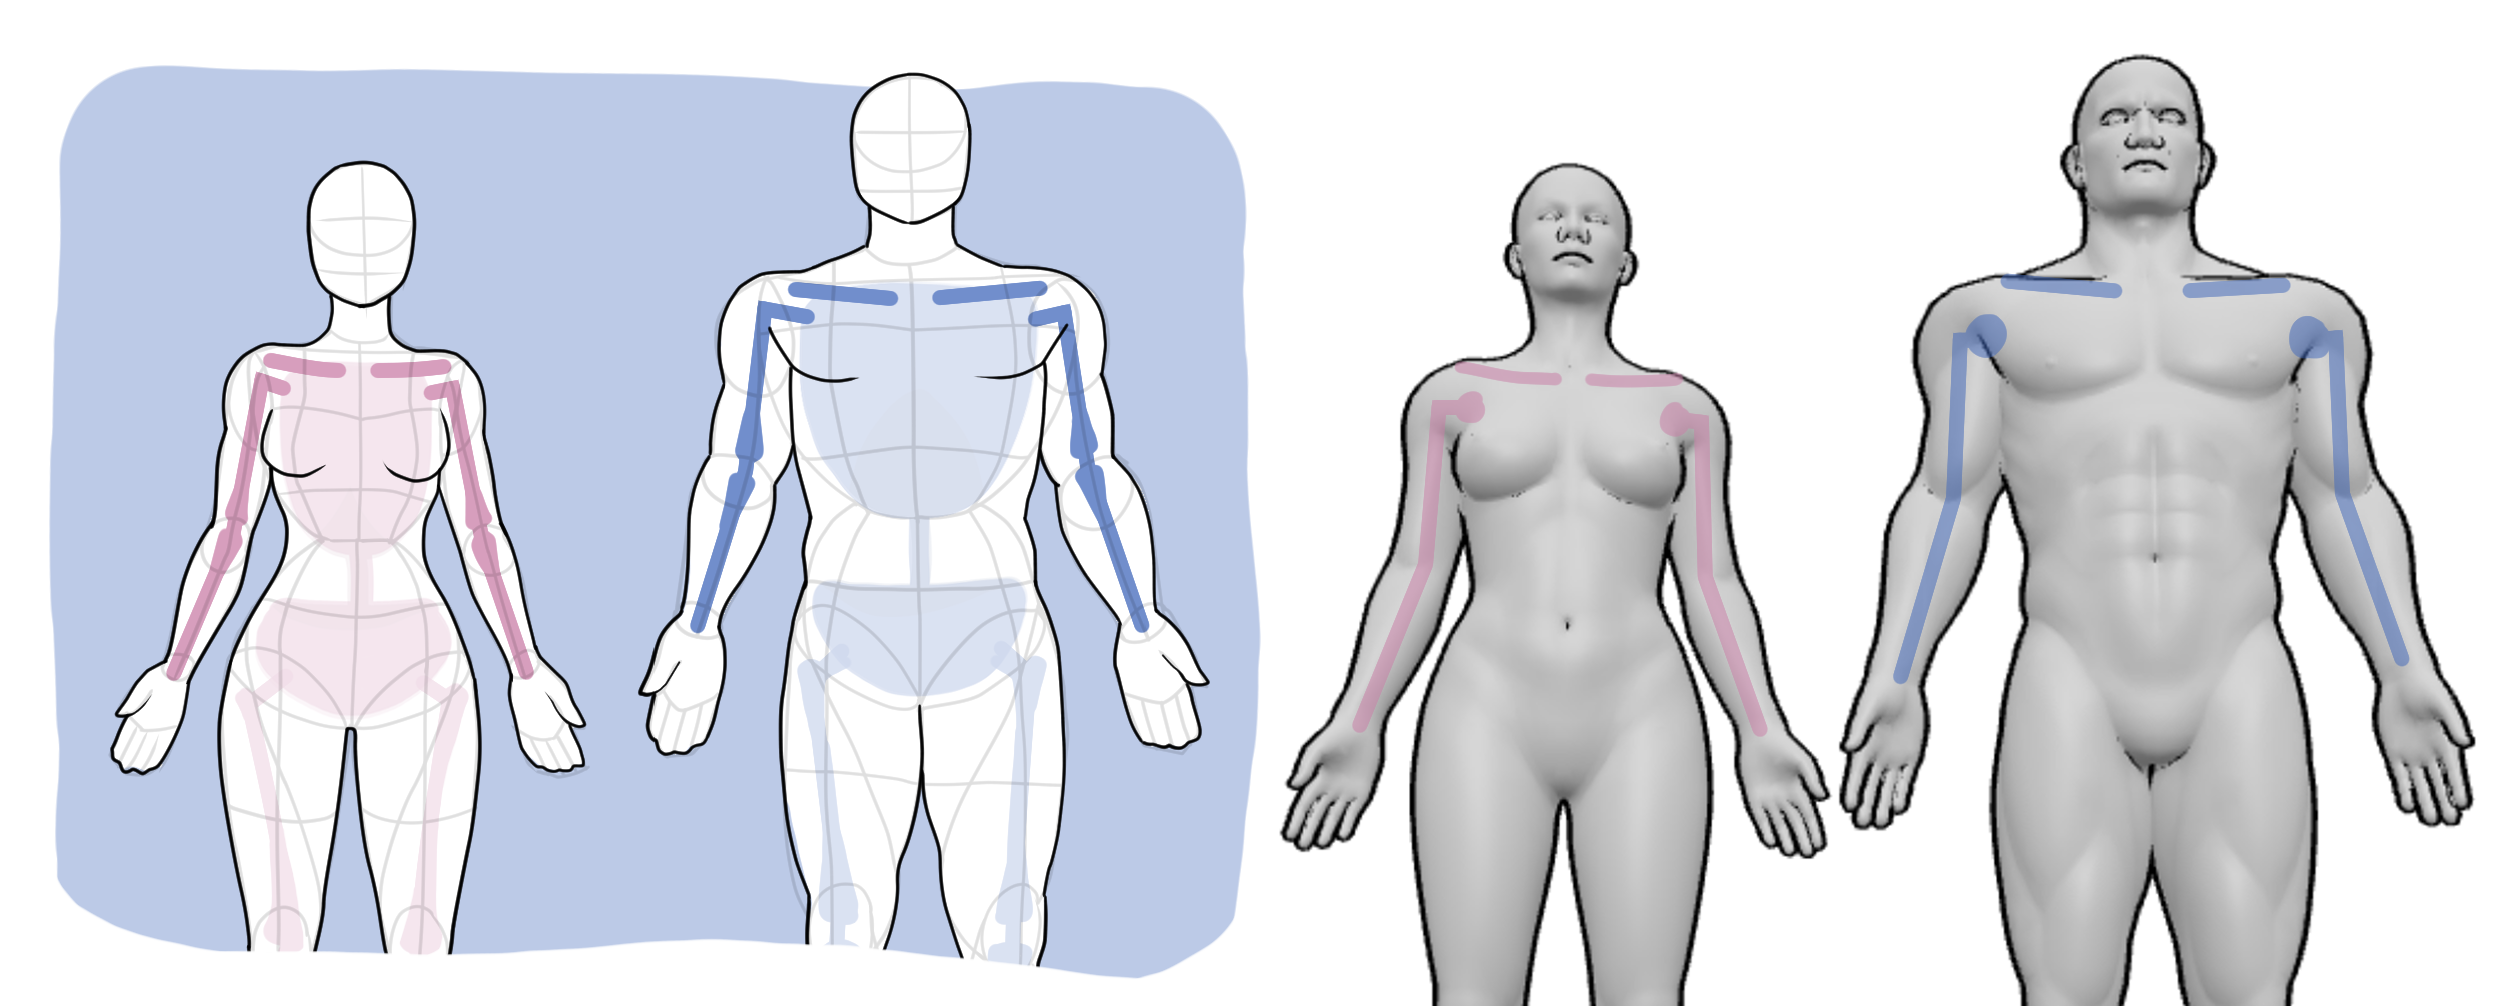
The clavicles and shoulder joints are particularly useful landmarks. The clavicles help establish the direction of the shoulders, while the shoulder joints determine where the arms emerge from the torso. When the figure turns, raises an arm, or leans to one side, these landmarks shift in space and change the apparent width of the upper body.
Rather than memorizing a single “male” or “female” shoulder shape, focus on the relationship between the shoulders, ribcage, and pelvis. These three forms provide much of the framework for the upper and middle body.
Chest and Breast Shape
The chest is another area where female and male figures can appear quite different, but it is important to separate the underlying structure from the surface forms.
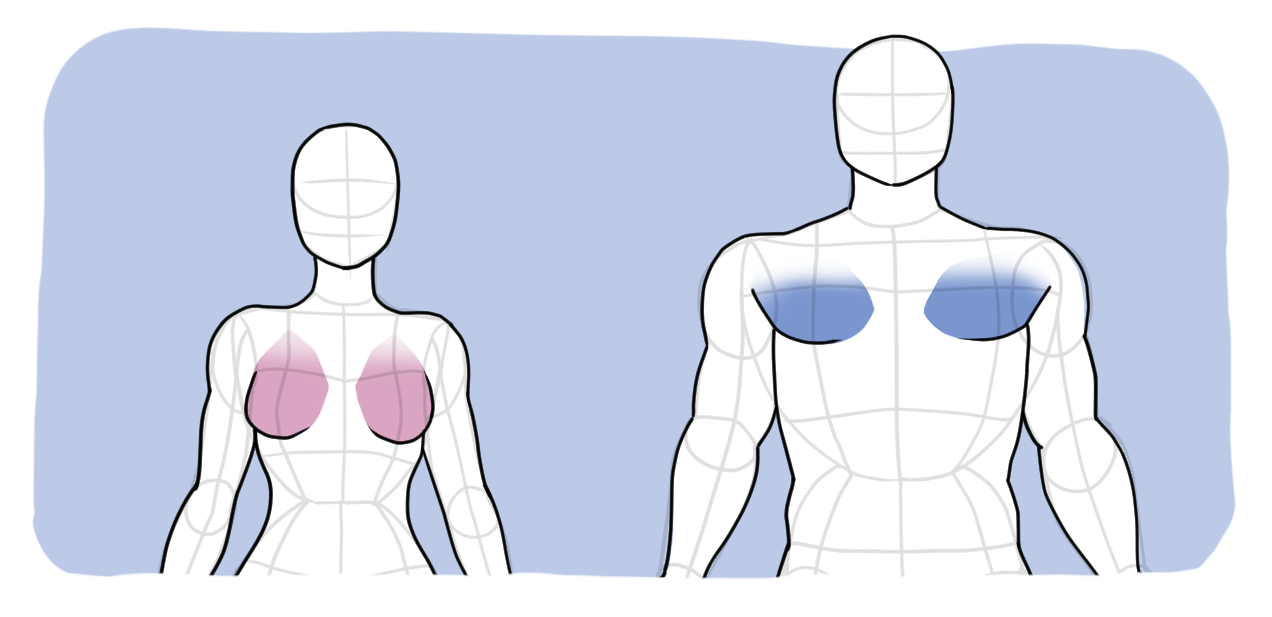
The ribcage provides the underlying framework for the torso in both male and female bodies. The visible forms of the chest follow this structure, responding to its shape and orientation rather than being treated as separate shapes.
This becomes especially important when drawing the figure from different angles. The apparent size, position, and shape of the breasts can change significantly depending on the rotation of the torso, the camera angle, and the pose. A three-quarter view, for example, can make one side of the chest appear more prominent while the opposite side recedes into perspective.
The position and orientation of the ribcage also affect how the chest is drawn. If the torso bends, twists, or leans, the chest forms shift with that movement. Gravity and the position of the body can also affect their visible shape, which is why simply memorizing a front-facing breast shape rarely works well for figure drawing.
A 3D reference gives you a clearer view of how the chest relates to the ribcage. Rotate the model to study the forms from different angles and see how their shapes change as the torso turns.
Focus first on the ribcage and the large planes of the torso, then use the pectoral muscles, breasts, and surface contours to describe the visible forms.
Rather than memorizing a specific “female chest shape” or “male chest shape,” focus on the underlying structure. Once the ribcage, torso rotation, and major landmarks are correctly positioned, the visible chest forms become much easier to construct.
Arms and Legs
The differences in the limbs are often more subtle than those in the torso, but they still contribute to the overall structure. Male bodies tend to have greater overall muscle mass and thicker limb proportions, while female bodies often have relatively slimmer limbs. These are broad tendencies, not rules that apply to every individual.
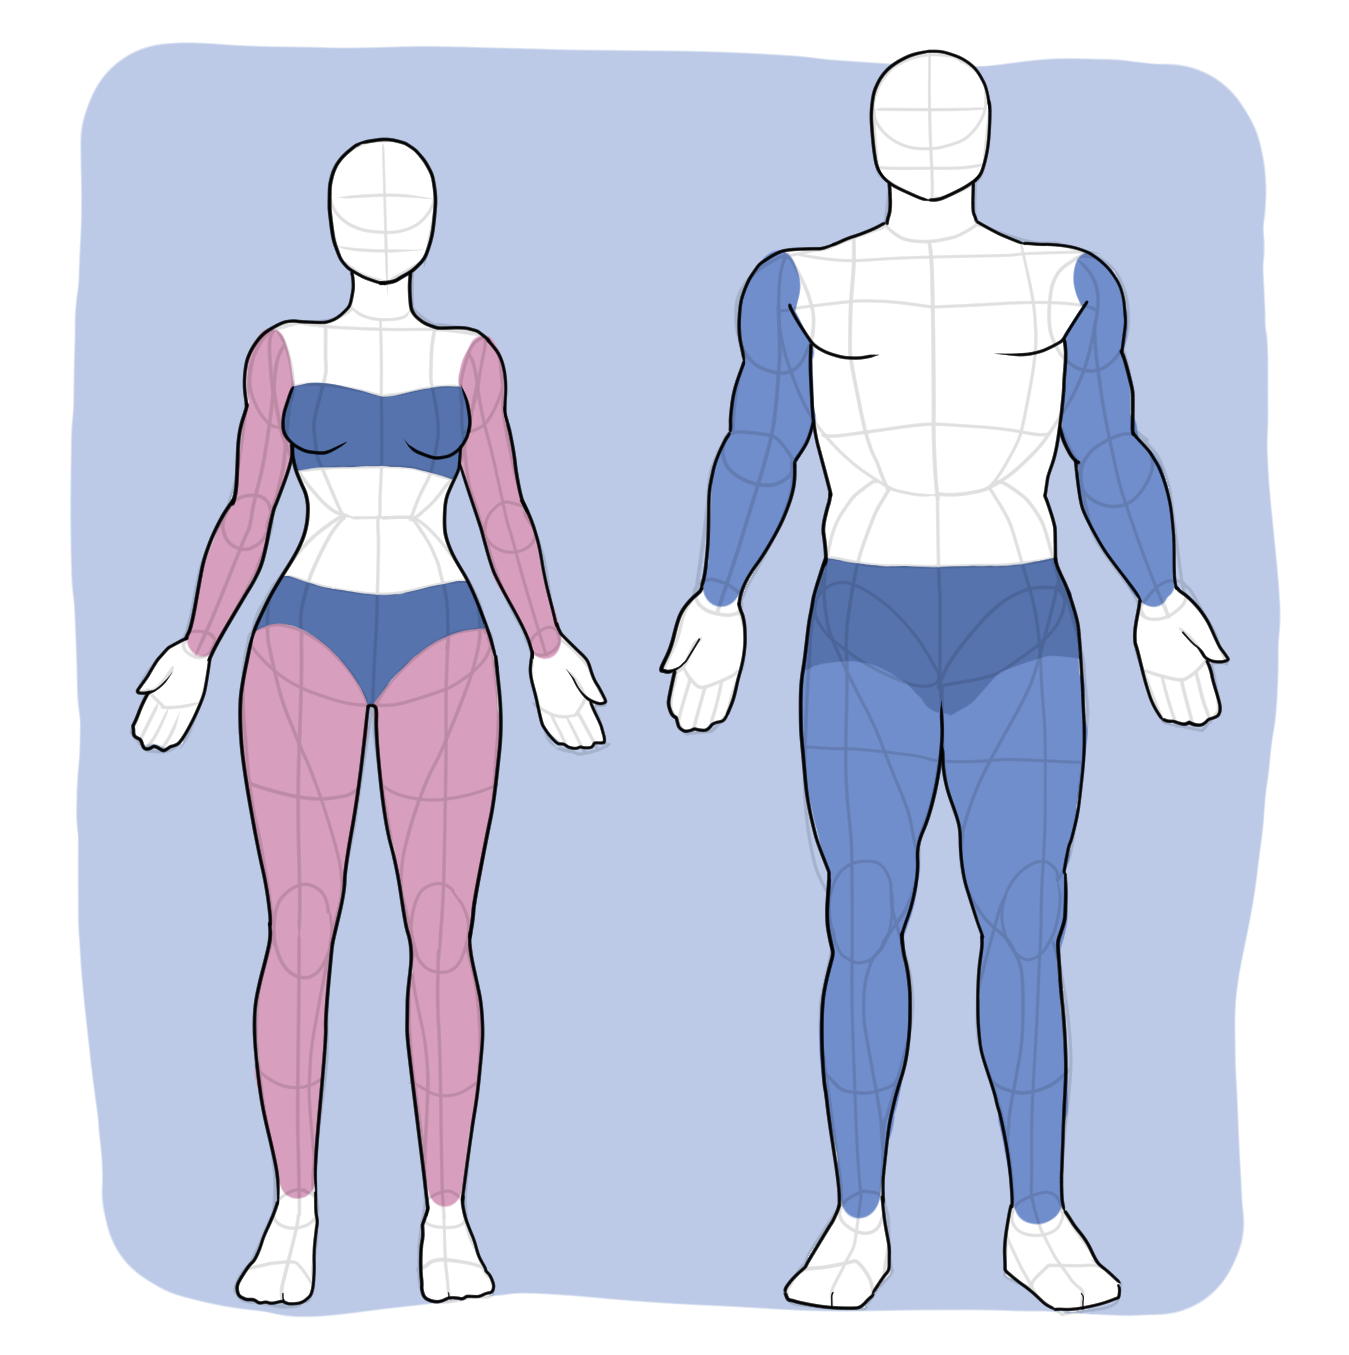
When drawing the arms, look at the relationship between the shoulder, elbow, and wrist rather than focusing only on circumference. The same principle applies to the legs: the hip joint, knee, and ankle create the basic chain that determines the position and direction of the limb.
A broader pelvis can change the apparent angle at which the thighs emerge from the body, while differences in muscle mass affect the outer contour of the thighs, calves, and arms.
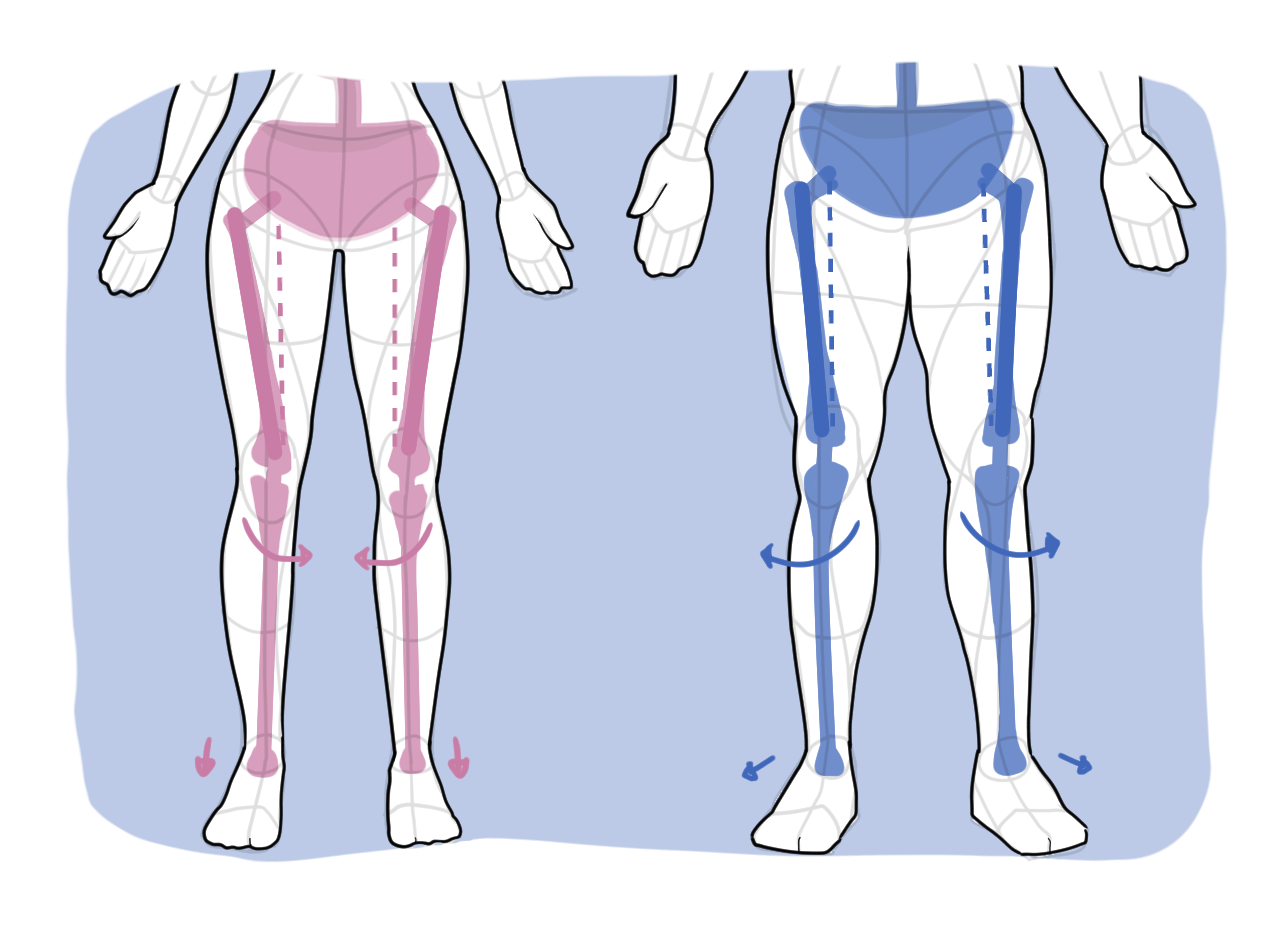
When studying a reference in 3D, pay particular attention to the joints. They act as connection points between the larger forms and make it easier to understand why a limb bends or rotates the way it does.
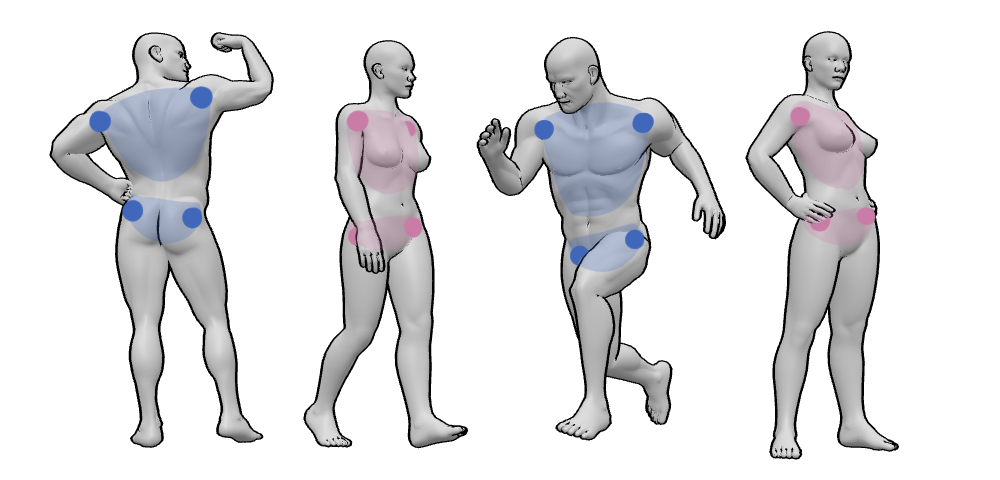
Think of the limbs as long, articulated volumes rather than collections of individual anatomical details. This keeps the figure readable and makes it easier to adapt the structure to different body types.
Waist, Hips, and Silhouette
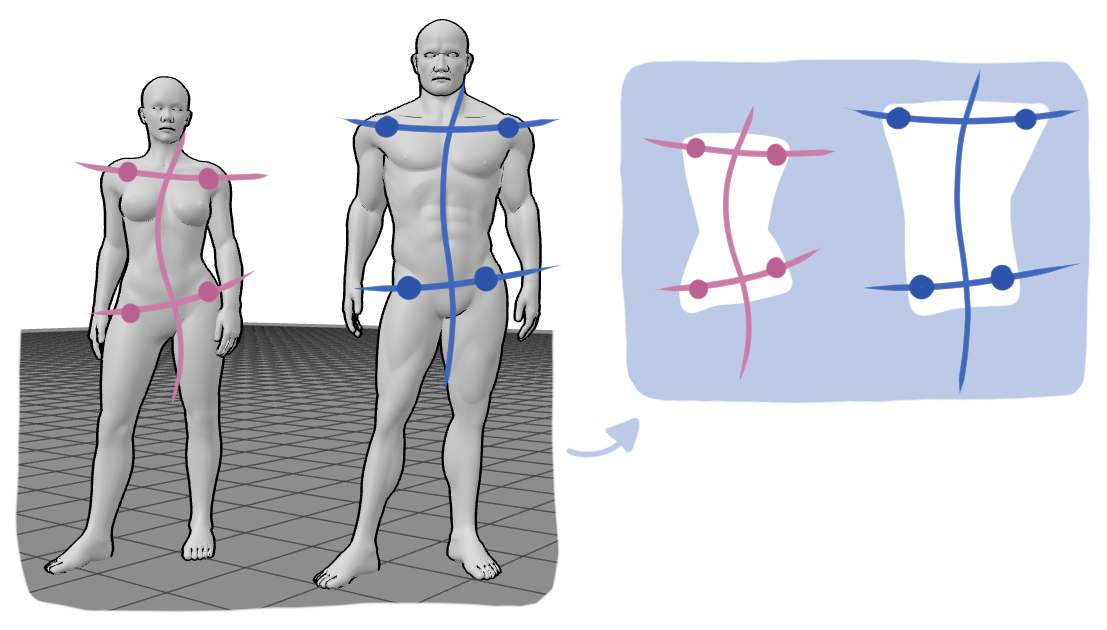
The relationship between the ribcage, waist, and pelvis has a major influence on the silhouette. Instead of treating the waist as an isolated feature, look at the transition between the larger forms around it.
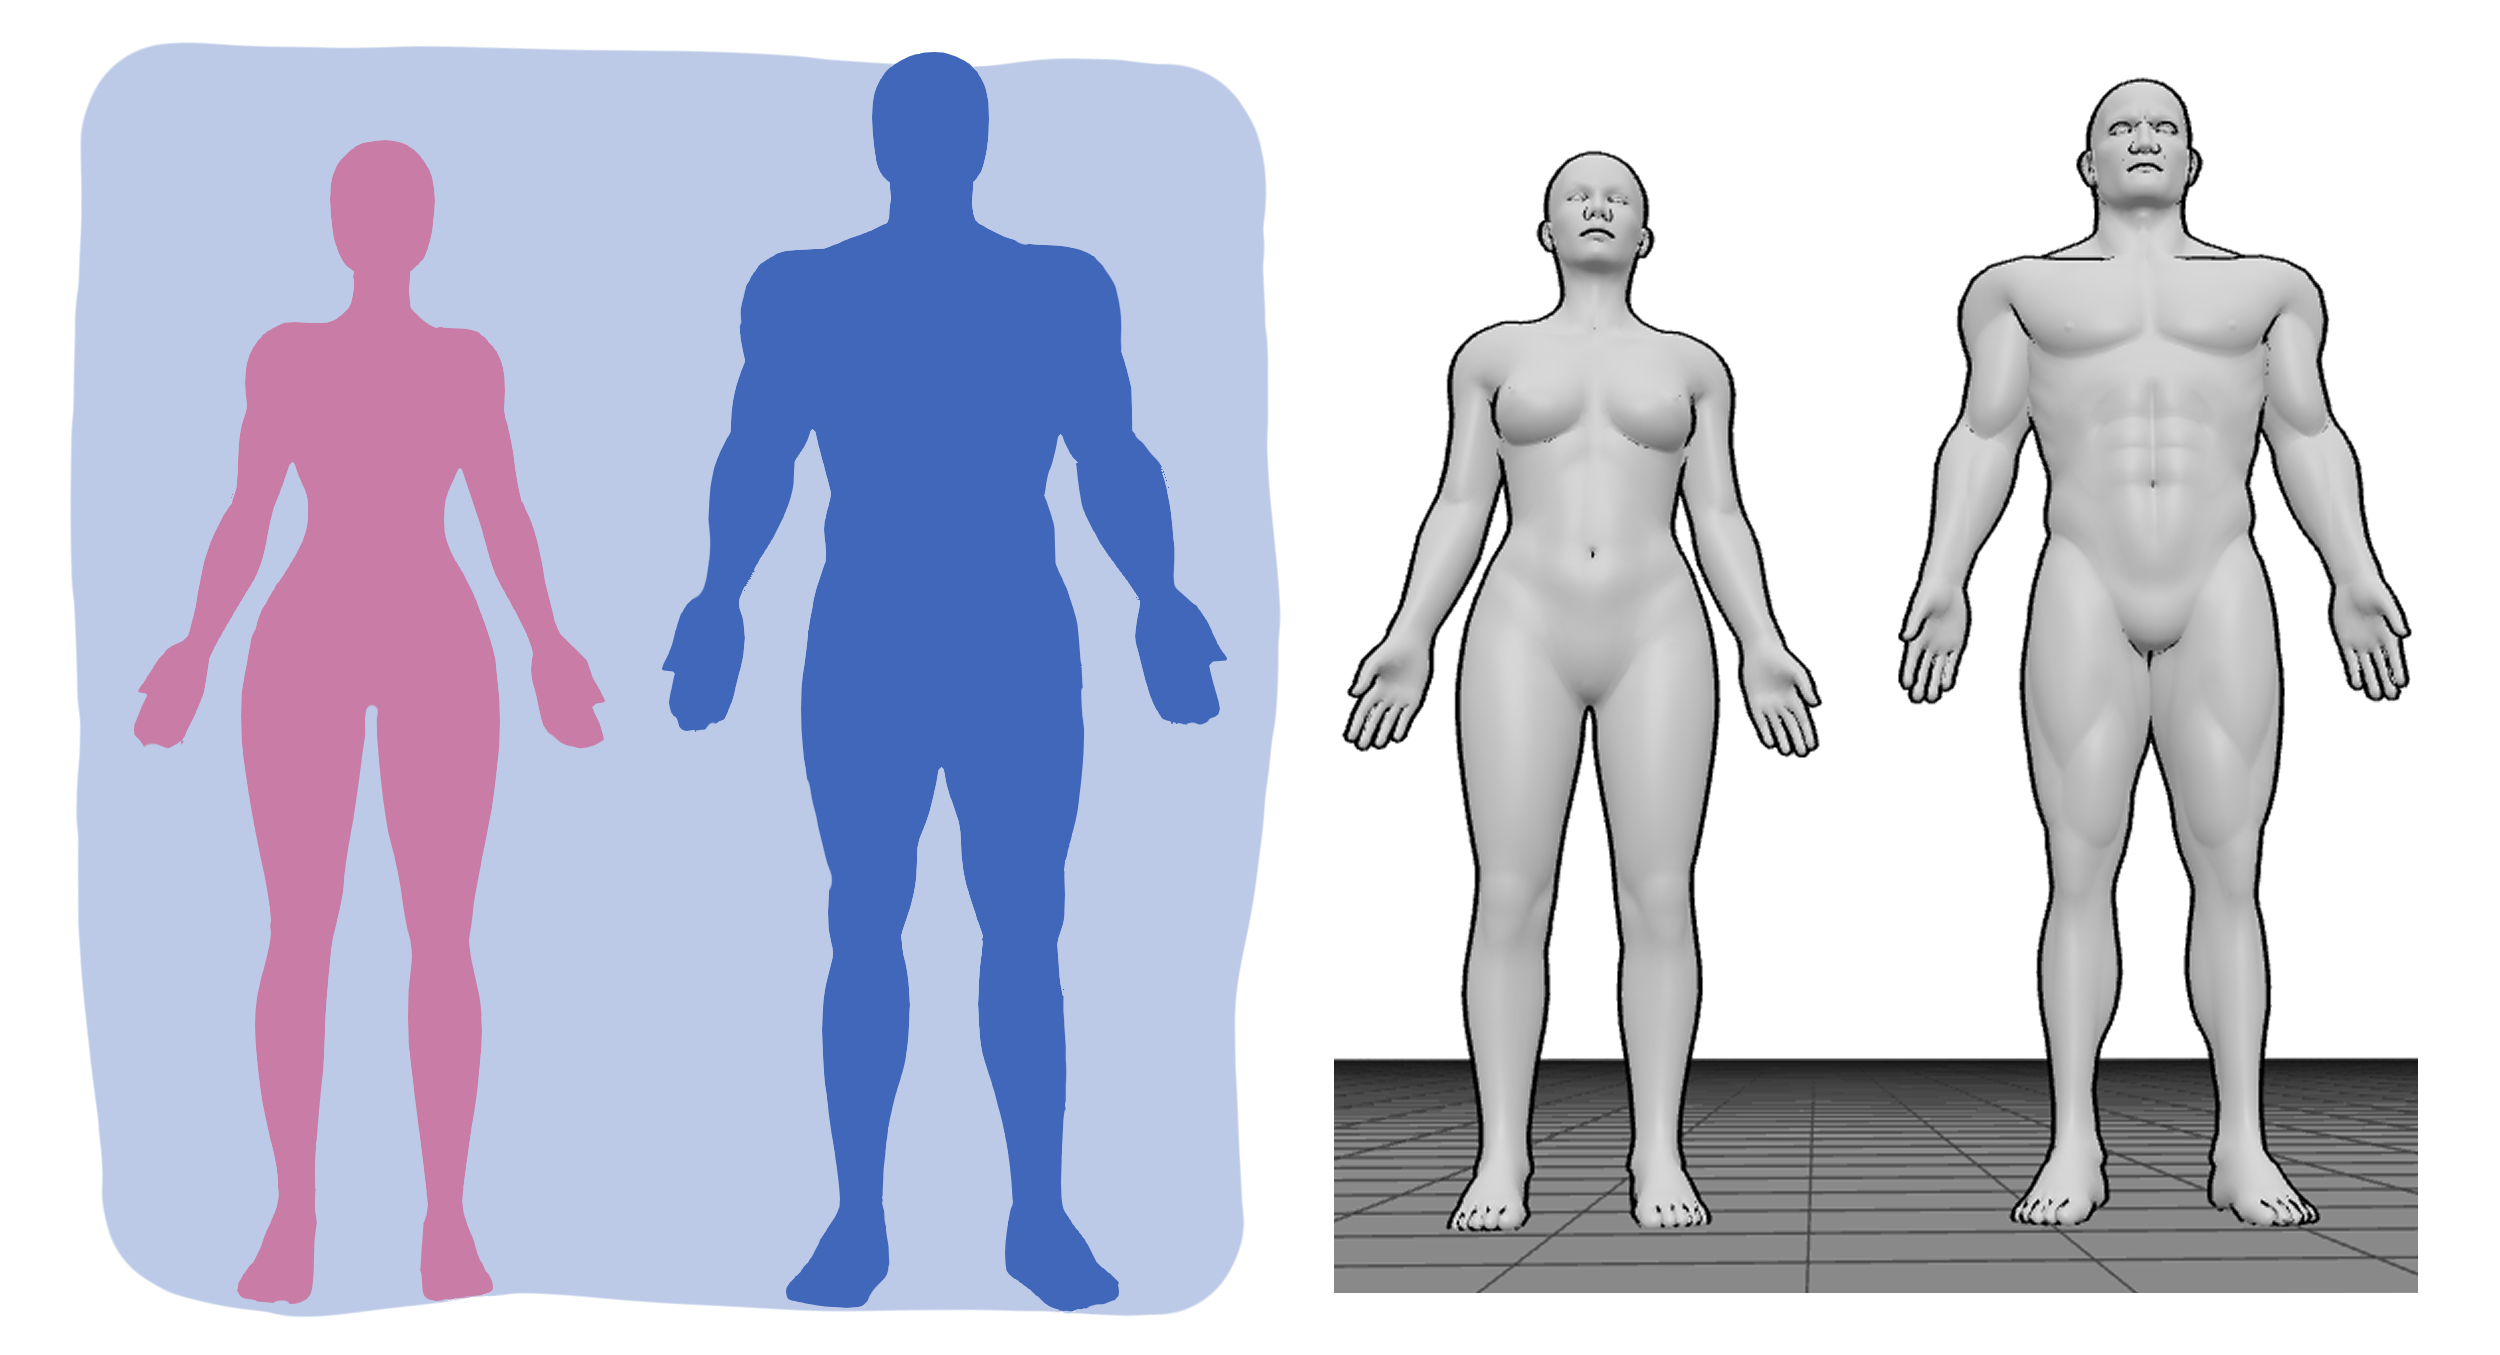
Female figures often show a more pronounced difference between the width of the ribcage and the pelvis, with a narrower waist connecting the two. Male figures tend to have a more gradual transition from the ribcage toward the pelvis, creating a straighter overall torso shape. Individual proportions can vary considerably, so these should be treated as tendencies rather than formulas.
The waist is essentially a space between larger forms. Its appearance depends on the width and angle of the ribcage above it, the shape of the pelvis below it, and the rotation of the torso.
The hips also influence the direction of the legs. In a three-quarter view, the position and rotation of the pelvis can make the hips appear very different from what you might expect from a front view.
When constructing the silhouette, look for the rhythm between the ribcage, waist, and pelvis rather than trying to reproduce a predefined hourglass or rectangular shape.
How These Differences Affect a Pose
Anatomical differences become especially noticeable when the body is moving. The same gesture can produce very different silhouettes depending on the width and orientation of the ribcage, the shape of the pelvis, and the proportions of the limbs.
Imagine two figures leaning onto one leg with the same arm position. The shift of the pelvis can create a different curve through the waist and lower back, while differences in shoulder and hip width change the overall balance of the silhouette. The pose itself has not changed, but the way the body occupies that pose has.
This is why it helps to establish the ribcage and pelvis before adding surface anatomy. Once these forms are tilted and rotated correctly, you can see how the spine connects them and how the limbs respond to their position.
Weight distribution is part of this process too. A shift in the pelvis affects the supporting leg, the opposite hip, and often the angle of the shoulders. These small changes are what make a figure feel like it is actually standing, leaning, or moving rather than simply holding a pose.
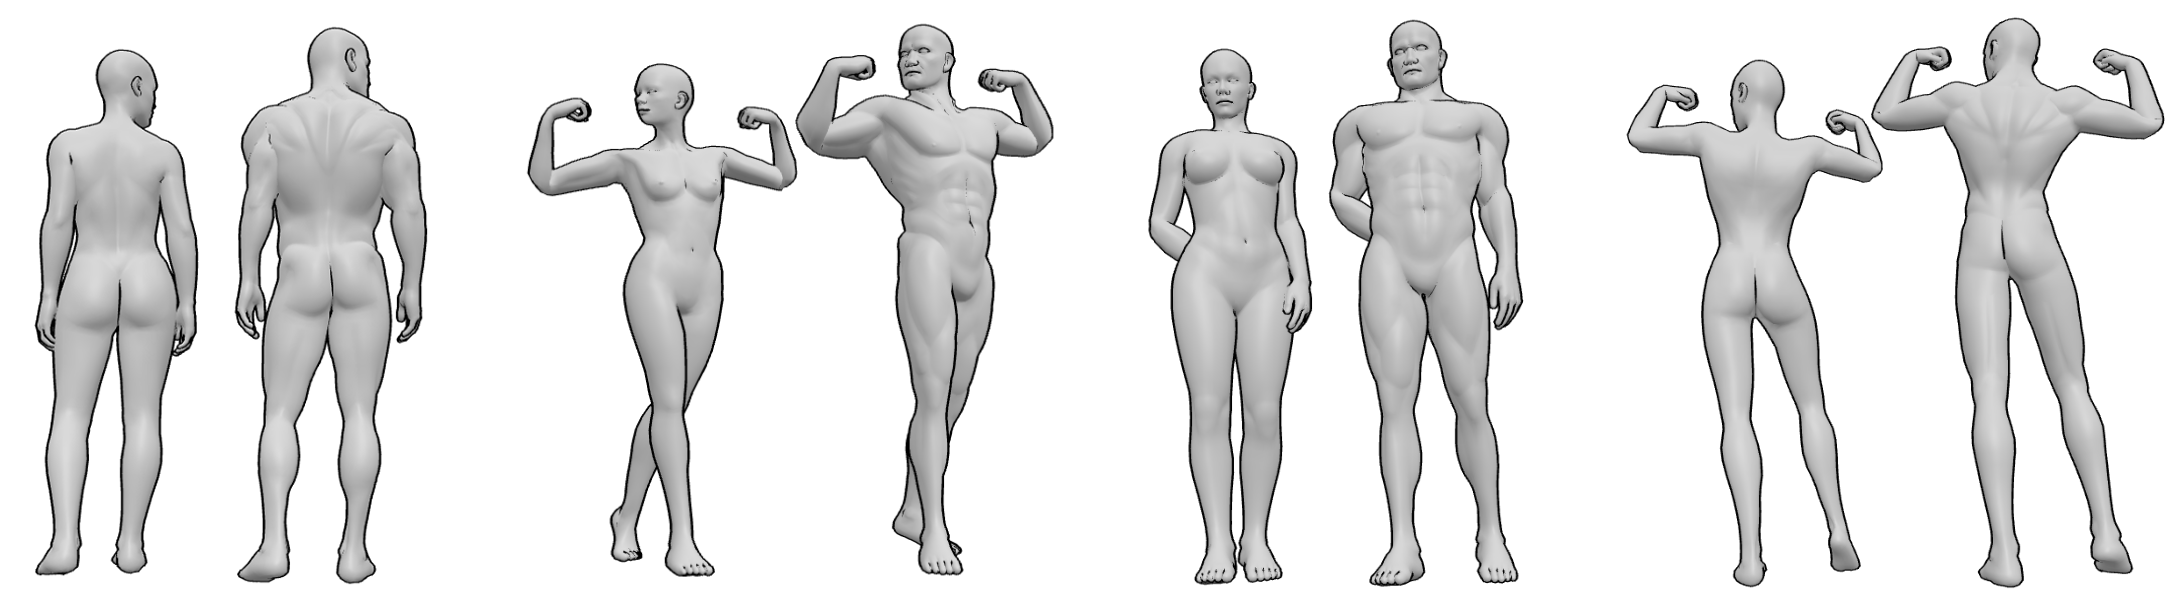
When comparing female vs male anatomy, try placing both figures in the same pose and look past the surface details. Compare the shoulder-to-hip relationship, ribcage depth, pelvic width, limb proportions, and overall mass.
For a closer comparison, see the Female vs Male Body collection, where female and male figures are shown in the same poses, making anatomical differences easier to observe side by side.
Using 3D References to Study Anatomical Differences
Studying anatomical differences becomes much more useful with a 3D anatomy reference, because you can rotate the body and examine the same structures from different angles. A single 2D reference shows you one viewpoint, but it does not always reveal how the underlying forms are positioned in space.
Start by comparing the ribcage and pelvis. Look at their width, depth, tilt, and rotation, then rotate the figure and see how their relationship changes. This is particularly useful for understanding the waist, hips, lower back, and torso depth.
Next, follow the major landmarks through the limbs: shoulder, elbow, wrist, hip, knee, and ankle. This helps separate structural differences from changes caused by perspective or foreshortening.
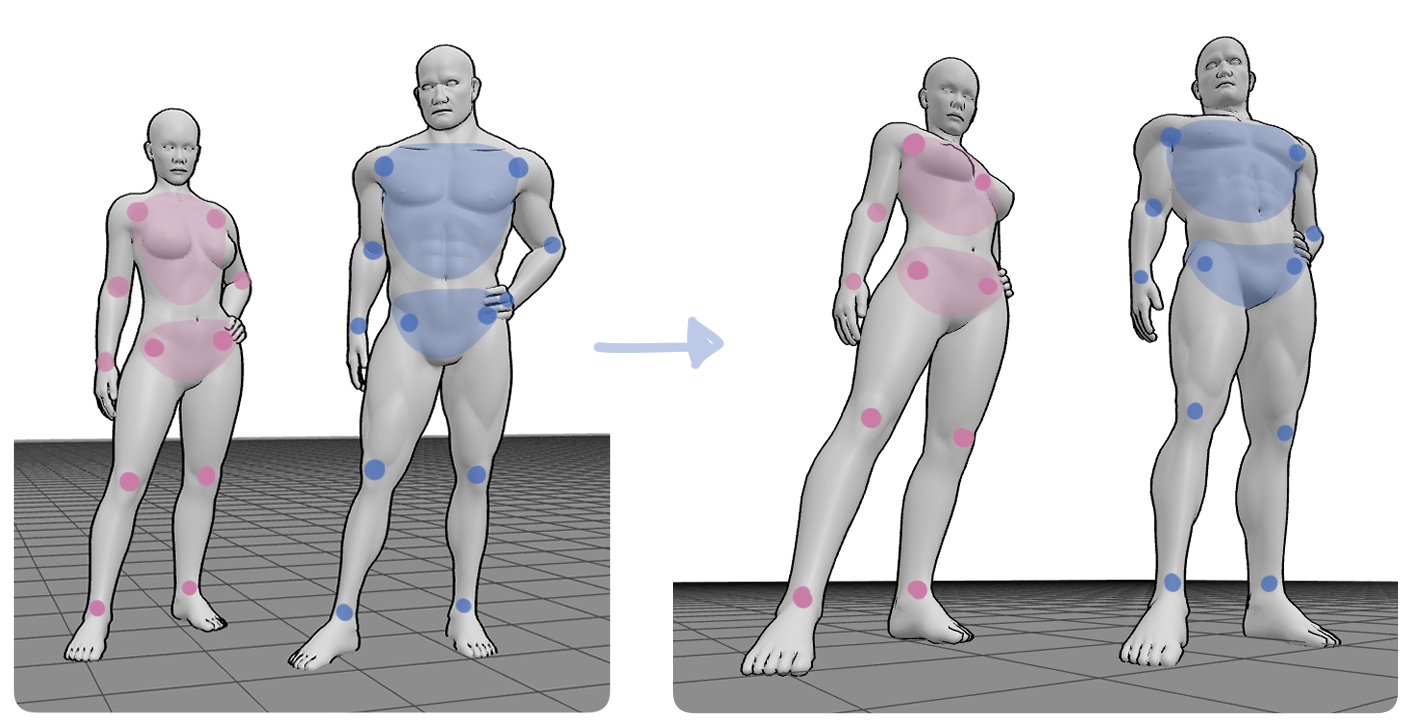
You can also place different body types into the same pose and compare the resulting silhouettes. Keeping the gesture similar makes it much easier to see which changes come from the underlying anatomy.
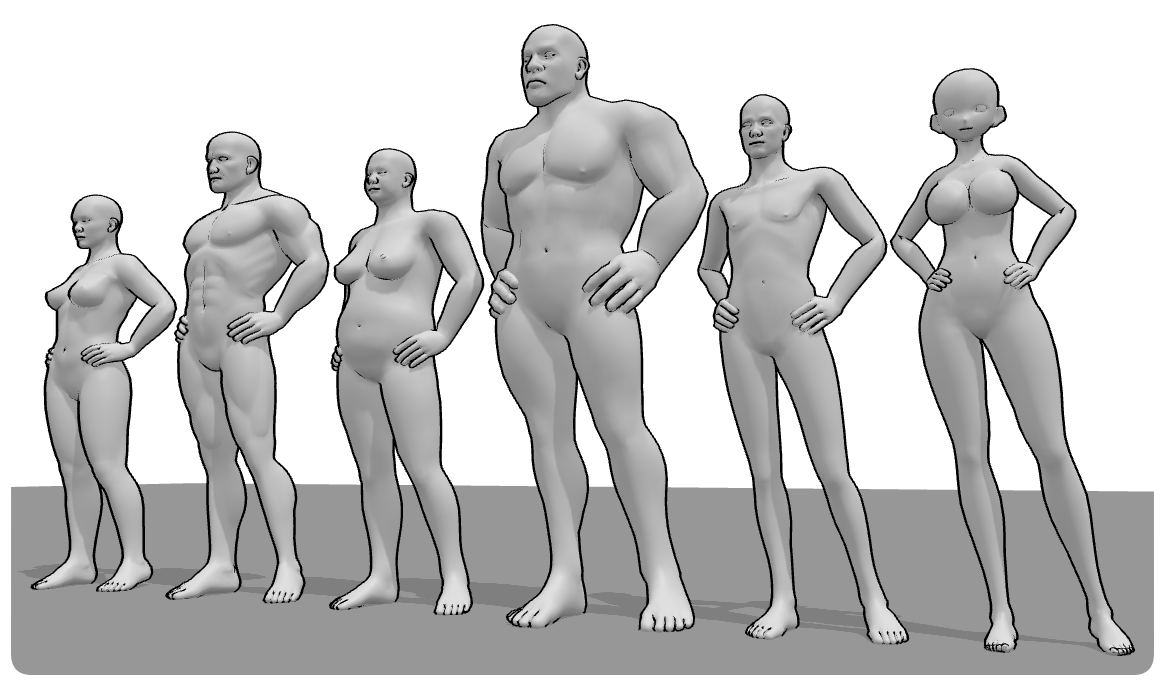
The goal is not to memorize a list of rules for drawing female or male bodies. Use these differences as a framework for observing the figure and understanding how its major forms relate to one another.
Final Thoughts
There is no single set of proportions that defines every female or male body. Real bodies vary in height, width, muscle mass, limb length, and skeletal structure, and those variations are part of what makes figure drawing interesting.
For artists, anatomical knowledge works best as a starting point rather than a template. Establish the ribcage, pelvis, spine, and major joints first, then adjust their proportions according to the person, character, or reference you are drawing.
Once the structure is working, the smaller anatomical details become much easier to place. You are no longer guessing where a curve should go; you are responding to the forms underneath it.
The more you practice this way, the less you need to think of male and female anatomy as completely separate systems. Instead, you can focus on the shared structure of the human body, the variations between individuals, and how those differences change the way a figure moves through space.