You’re in the zone. You’re sketching out a cool, dynamic pose. But then… the moment you try drawing your character’s hands and feet from a not-so-usual angle, everything falls apart.
Dynamic poses often need perspective and foreshortening, but when you’re not entirely sure how to draw that correctly, hands and feet can turn into flat, distorted blobs that look awkward and unrealistic.
Even without having to figure out a complicated angle, hands and feet are still among the hardest body parts to draw convincingly. Years of experience help but don’t completely solve the struggle.
Sometimes, looking at your hands or feet for certain poses is enough, but when the angles become impossible to observe personally unless you’re a contortionist, having a 3D model app like PoseMyArt is a game-changer. 3D reference tools make it much easier to study and understand these more complex views without pulling a muscle.
In this guide, we’ll explore just why hands and feet get so hard to draw from challenging angles and how PoseMyArt can give artists a hand (or a foot) with this problem.
Why Hands and Feet Become Difficult in Perspective
Many artists learn how to draw hands and feet from the usual views: front, side, and back. These angles are definitely useful for understanding anatomy, but actual, real-world poses are rarely so straightforward.
We use basic shapes to help create our hands and feet. But we shouldn’t forget that they are three-dimensional objects. Looking at them from a straight-on perspective, when shapes overlap, can confuse the brain, leading to drawings that feel stiff or “off”.
A hand reaching toward the camera hides most of the fingers behind the palm. Viewing a foot from below shows more of the sole than the usual view. At these angles, familiar shapes and proportions also look somewhat distorted due to foreshortening.
Some of the issues artists can come across because of these are:
- Fingers look too long or too short
- Hands and feet can lose their three-dimensional feel (volume)
- Palms become flat, rectangular shapes
- Toes merge into a strange form
- Confusing overlapping anatomy
- Inconsistent perspective and foreshortening make poses feel unnatural
These issues become even more noticeable when you’re drawing action scenes, comic panels, character illustrations, or dynamic figure drawings that frequently have extremities pointing toward the camera.
Understanding Foreshortening in Extremities
Foreshortening happens when an object extends toward or away from the camera. The closer parts look bigger while those further away appear more compressed.
Hands and feet contain many small forms and shapes that overlap with foreshortening:
- Finger segments stack in front of one another
- Knuckles obscure portions of the fingers
- The arch of the foot changes shape depending on the viewing angle
- Toes overlap and become partially hidden
- The heel becomes the prominent shape when viewing the foot from behind
These forms can be complex and hard to visualize or mentally rotate. Without a solid guide, it’s incredibly difficult to figure out exactly how much a finger should shrink or how the top of a foot curves downward.
This is where a 3D reference model gives you a space to explore a pose from any direction. With the PoseMyArt app, you can visually break down these frustrating angles before your pen even touches the screen or paper.
How PoseMyArt Helps with Challenging Hand and Foot Angles
PoseMyArt was designed to help artists create accurate pose references from virtually any perspective. Here are some features and tools that you can explore on the app to help with your hand and foot posing:
Hand Poses Feature
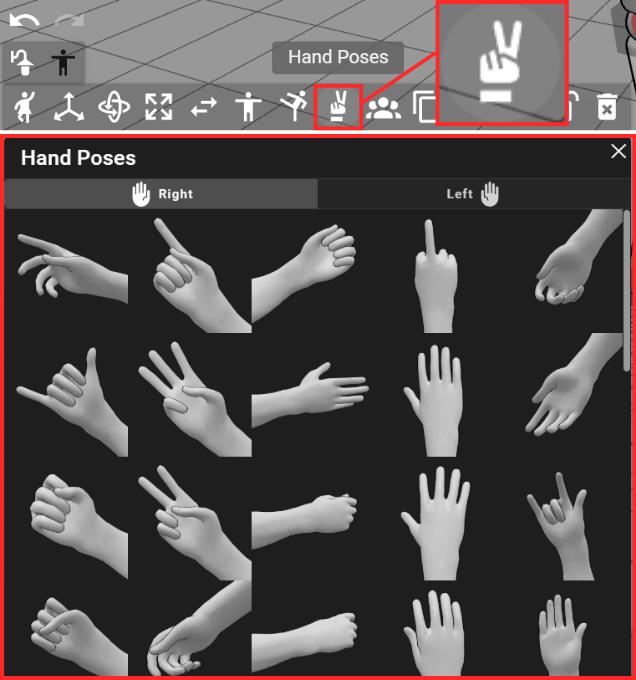
This is one of PoseMyArt’s unique and most useful features. It has an option for you to use pre-made hand poses and apply them to your 3D pose reference. You can find this feature on the Model Toolbar when you’re on the app. Just look for the hand icon posed in a peace sign.
When you click on this, you’ll find a bunch of poses that you can apply specifically to the left or right hand.
Rotate the Camera for Perfect Foreshortening
The camera and its flexibility are your best friend when you want to draw and understand challenging angles.
Instead of settling for a single reference image that might not be exactly right, artists can freely orbit around the model to find the exact angle they need.
Need to draw a foot pointing directly at the viewer? Want to understand how a hand looks when it’s reaching toward the camera?
When you have the pose you want, move the camera into position to study the perspective and breakdown of shapes in real time. When you have the perfect angle and zoom down, you can also:
- save the camera position to make sure to go back to it later
- export the image or
- take a screenshot
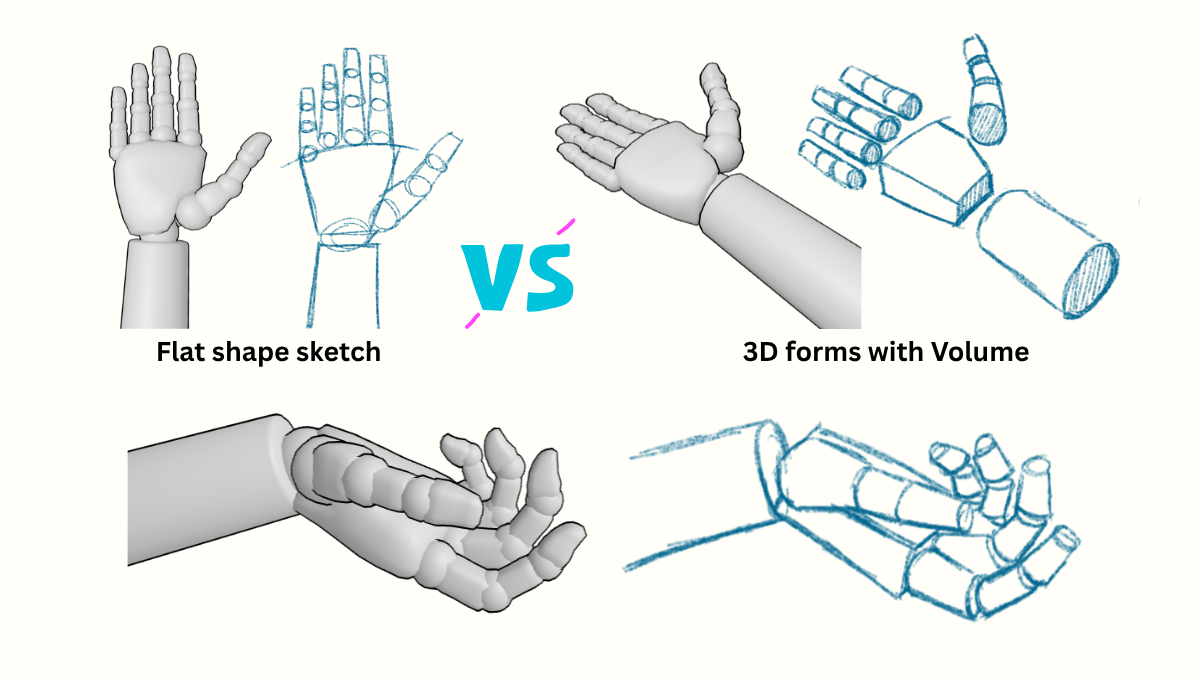
Study Volume Instead of Flat Shapes
A common mistake many artists make is thinking in terms of outlines rather than forms when drawing hands and feet.
When you have a 3D model that you can observe, you can pay more attention to:
- The thickness of the palm
- The cylindrical structure of fingers
- The wedge-like shape of the foot
- Where the round forms of joints and knuckles are apparent
Here is a simple breakdown of shapes for the hand that can help with your anatomy study. The different colored shapes show which fingers usually bend together with different parts of the palm.
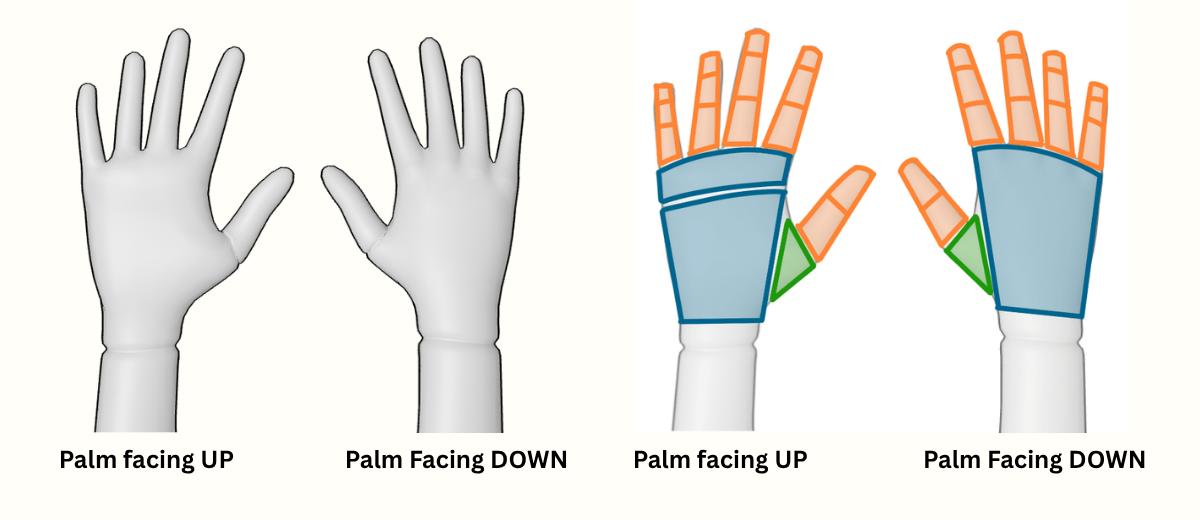
Seeing and studying these forms, with their mass and volume, helps build that notion into an artist’s regular way of thinking. With enough practice and a stronger understanding, you’ll see that it’ll become easier and easier to visualize hands and feet as 3D forms.
Experiment with Dynamic Poses
Many reference libraries focus more on neutral poses. Though these can be a good start, artists usually need more dramatic poses and views.
PoseMyArt allows users to adjust poses and camera placement to create dynamic compositions that would be hard to find in traditional reference packs. Don’t forget the basic features and tools you have in your arsenal:
-
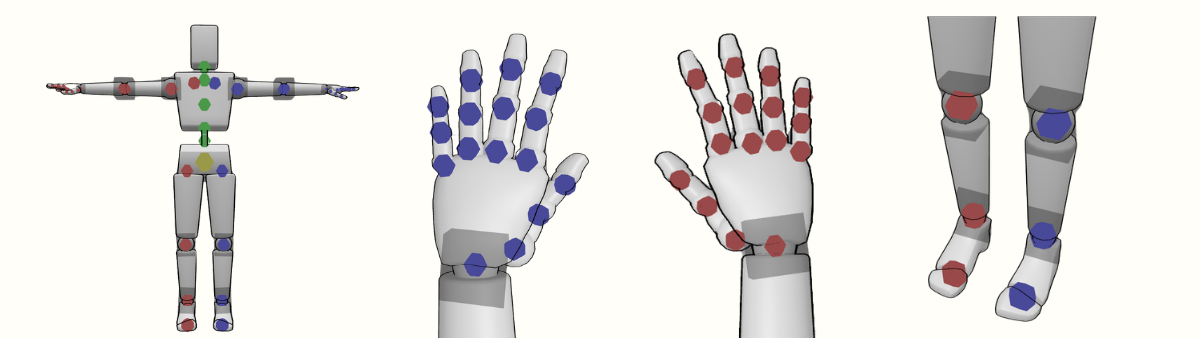
Joint Manipulation Points
For hands, each finger, knuckle, and joint has a manipulation point you can tweak to get the exact hand pose you want.For the feet, the manipulation points are more general and are located at the ankle joint and at the front of the foot near the toes.
-
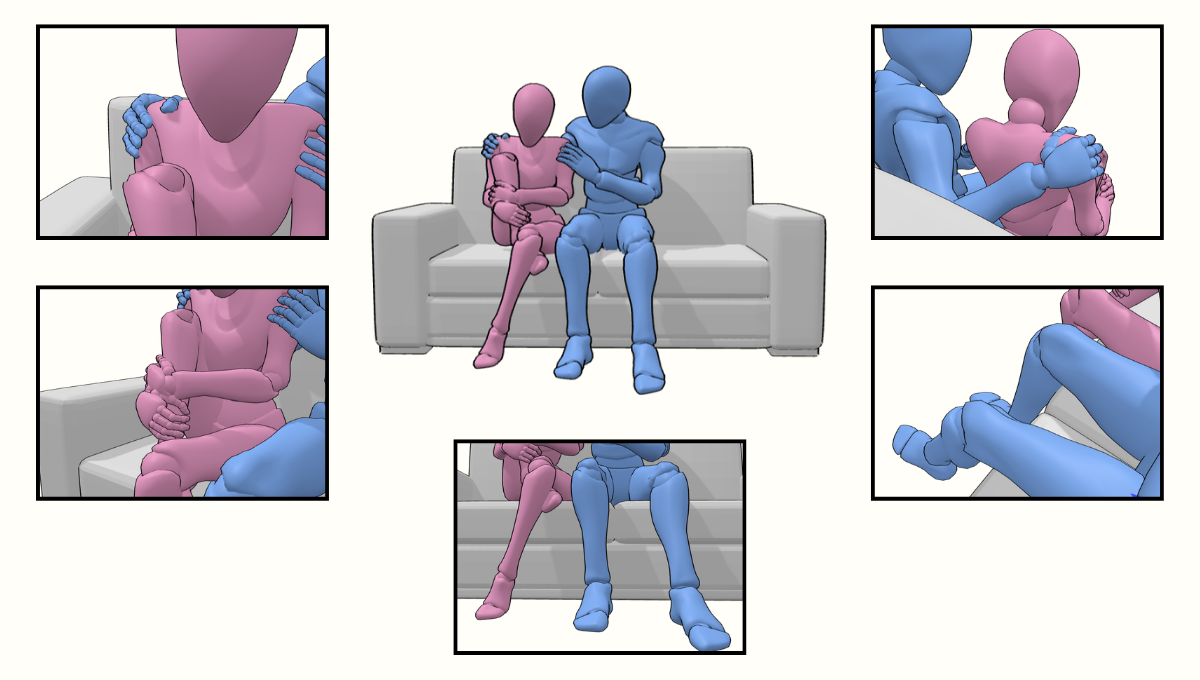
Pre-Made Model Poses
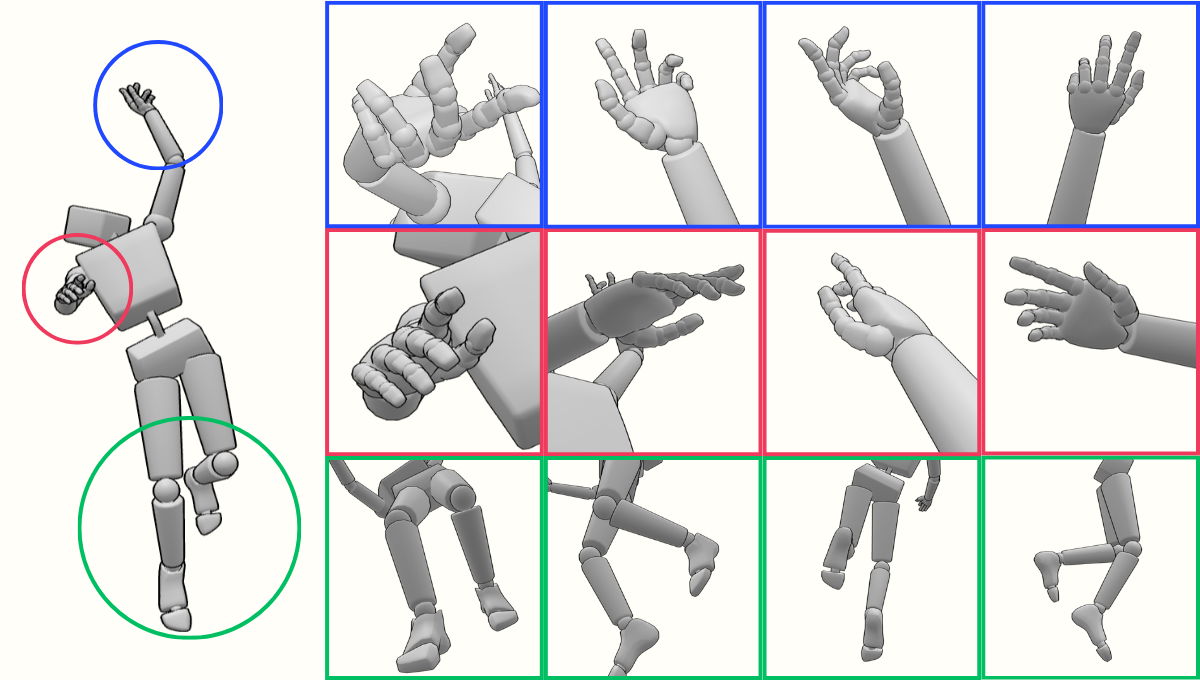
One of PoseMyArt’s main features is its pre-made model poses. It’s the first tool you’ll find in the Model Toolbar. You can apply a certain pose- sitting, punching, dancing, and see what the hands and feet look like.In this example, we have one pose from a pre-made scene. I used the Shadows setting and gave the models different colors to better tell them apart. You can zoom and and rotate around the hands and feet to better understand anatomy and how the extremities of one model interacts with itself and other models.
-
Animations and Animation Playback
Sometimes, static poses still feel off when you are imagining a model in motion. The Animations library has hundreds of motions that you can try, play back, and pause to find that perfect in-motion pose.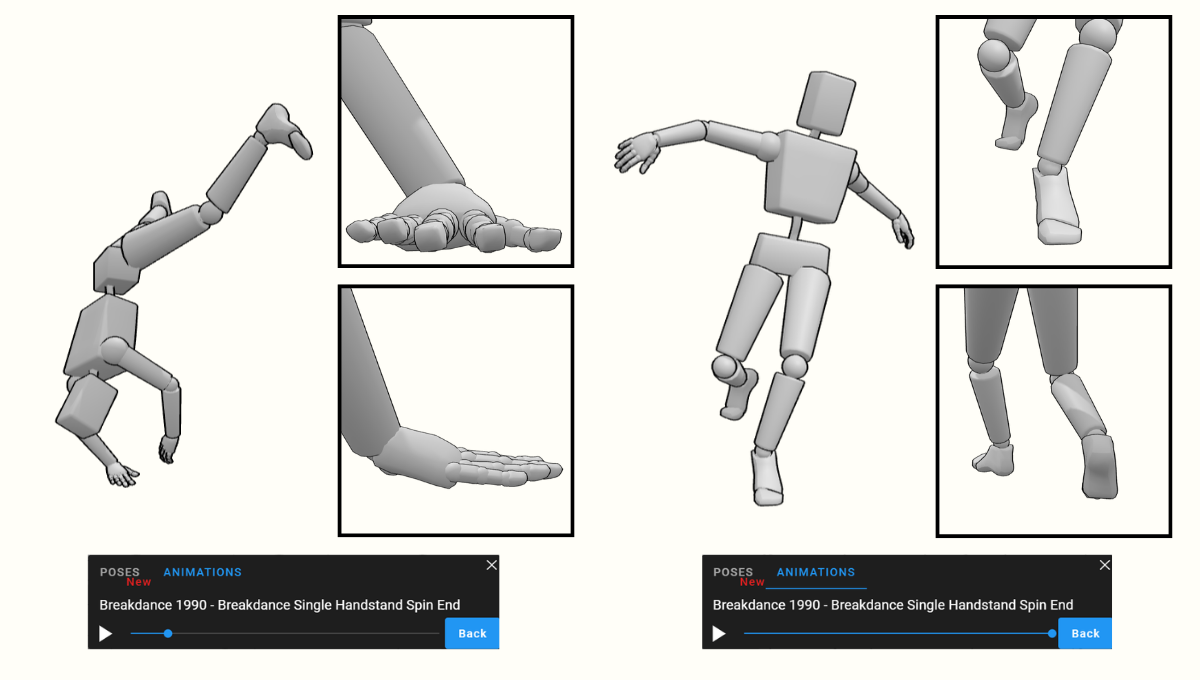
Seeing an asset from multiple viewpoints completely changes how you understand its volume. With the PoseMyArt web application, you aren’t stuck looking at a static reference picture that almost matches your idea.
You can pose and tweak joints and shapes with precision. After getting it just right, you can spin the camera entirely around a hand or foot to see exactly how the shapes stack up against each other from the front, back, and sides.
Zoom In on Critical Details
Usually, when you grab a reference image from the internet, hands and feet usually occupy a small part. It becomes hard to interpret those small details.
With PoseMyArt, artists can zoom in directly on the extremities while keeping the model’s overall pose and structure.
This way, you can take a closer look at:
- Finger positioning
- Thumb placement
- Toe alignment
- Palm curvature
- Foot arches
- Joint relationships
With the ability to zoom in and observe exactly what you need, you’ll be more accurate while you learn to construct more complex forms.
Realistic Extremity Drawing Tips to Try Today
With PoseMyArt at your fingertips, make sure to apply these fundamental principles in your drawing practice so you can improve your results even more.
Think in Three-Dimensional Forms
Avoid drawing fingers and toes as flat shapes. Think of them instead as cylinders, boxes, and forms that occupy and move through space.
Focus on Major Masses First
It may be tempting to try to get those fingers and toes positioned already, but map out the main masses first before drawing any details.
That means your palms and your foot wedges. These are the bases for you to build a strong foundation for your hands and feet.
Look for Overlaps
Overlapping forms can communicate and show depth. Pay attention to which fingers cover others, or how toes stack from your chosen viewpoint.
Compare Relative Sizes
When dealing with perspective and foreshortening, forms closer to the camera will appear bigger than those further away. So, sizes may be somewhat skewed from what we’re used to.
Trust the reference rather than your usual assumptions about normal proportions.
Final Thoughts
Drawing hands and feet is tricky for artists of all levels. More practice won’t help you if you are drawing based on faulty references.
What’s important is having solid references and using them to build a good understanding of drawing hands and feet. PoseMyArt gives you flexible 3D anatomy references that you can tweak, rotate, and zoom in on, letting you explore foreshortening from every angle and analyze those volumes.
Remove the guesswork. Check out PoseMyArt to draw and practice with more confidence.
If you’re new to the app, you might want to check out The Ultimate PoseMyArt Toolkit: Discover Every Feature for Flawless Posing. Browse through PoseMyArt’s Blog. It’s full of articles, guides, and tips and tricks for artists looking to improve their skills and find that perfect 3D pose reference.