The S-Curve Rule: The Secret Behind Natural Character Poses and Posture Drawing
Almost every artist has experienced this: the anatomy is correct, the proportions are fine, the character is standing - and yet the pose feels dead. Flat. Like a mannequin that has seen better days.
This usually isn’t a drawing skill issue. It’s a flow issue.
The human body is rarely straight. Even when we stand still, our weight shifts, our spine curves, and our posture forms subtle opposing angles. This natural flow is what artists refer to as the S-curve - and understanding it is one of the fastest ways to make poses feel alive.
- What Is the S-Curve (and Why It Matters)?
- The Most Common Pose Mistake Artists Make
- How to Spot the S-Curve in a Pose
- Why the S-Curve Is Hard to Apply from Imagination Alone
- How PoseMyArt 3D Reference Poses Help You See the S-Curve
- Drawing Over 3D Poses (Without Tracing)
- The S-Curve in Dynamic Poses
- Stylized vs Realistic: The Same Rule Applies
- How to Fix a Stiff Pose Fast
What Is the S-Curve (and Why It Matters)?
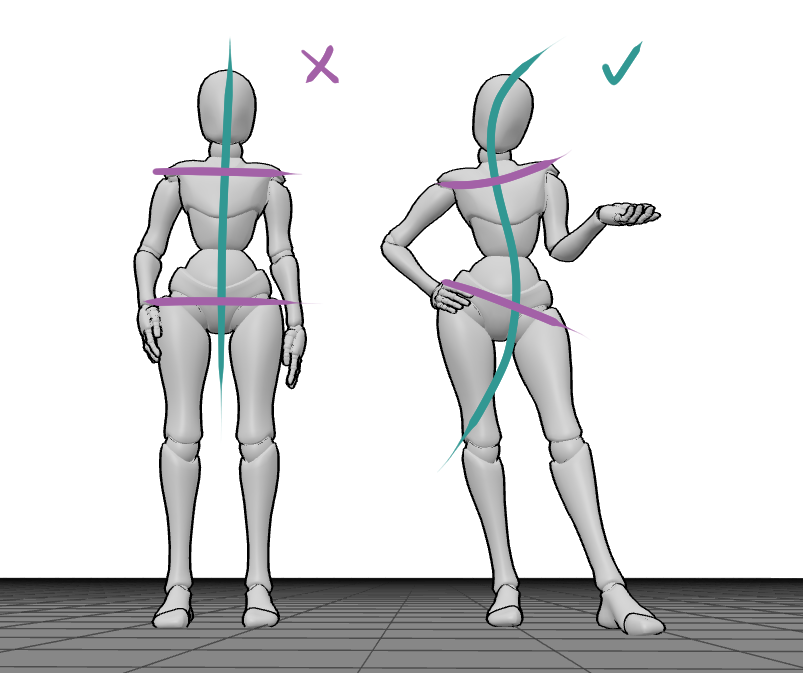
The S-curve describes the natural opposing curves running through the body - usually visible from the head through the spine, hips, and legs. It comes from how humans balance their weight.
When one hip lifts, the shoulders compensate.
When the spine bends one way, the neck often counters it.
This creates a soft, flowing S-shape instead of a rigid vertical line.
When this flow is missing:
- Characters look stiff or robotic
- Poses feel uncomfortable or unnatural
- Even dynamic gestures lose energy
When it’s present, even a simple standing pose feels intentional and alive.
|  |
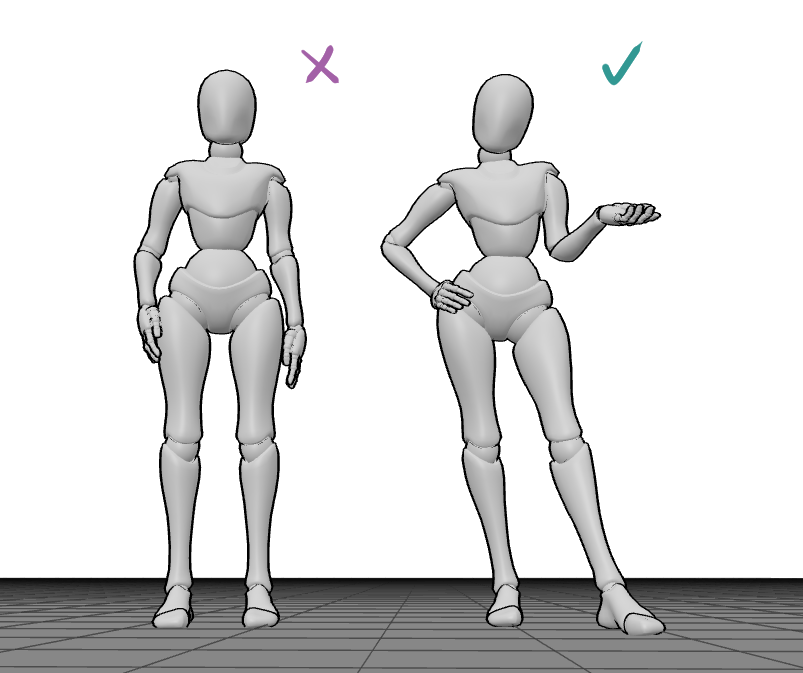
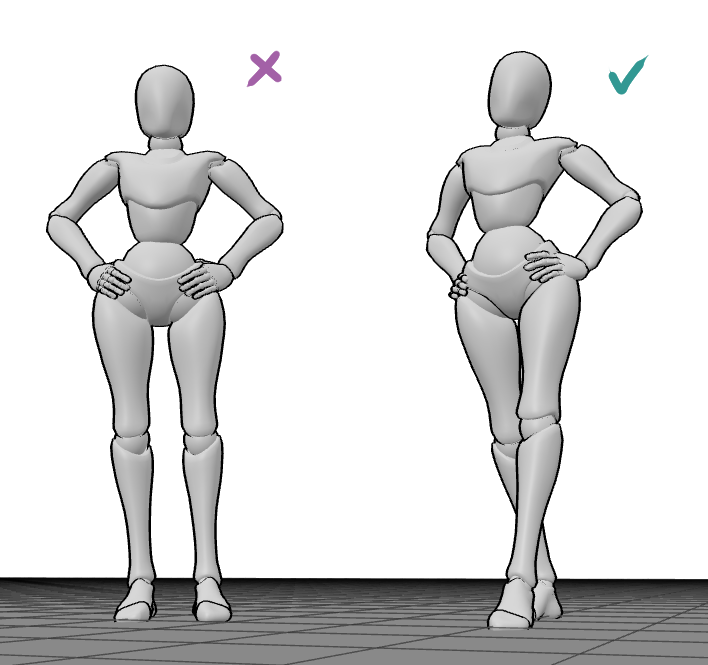
The Most Common Pose Mistake Artists Make
The biggest problem I see - and one I personally struggled with - is drawing the body symmetrically stacked.
- Head centered over shoulders.
- Shoulders centered over hips.
- Hips centered over feet.
Technically correct. Visually boring.
Real people almost never stand like that unless they’re at attention… or waiting awkwardly for a bus. The S-curve breaks this stiffness by introducing asymmetry and balance, without breaking anatomy.
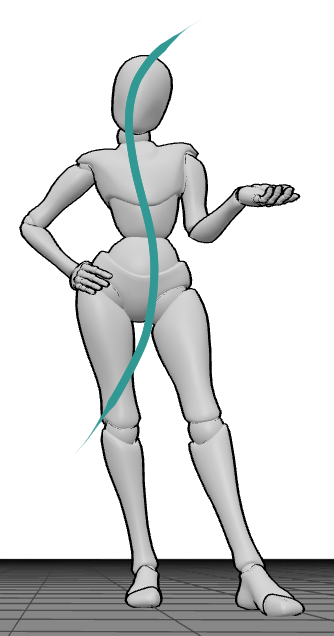
How to Spot the S-Curve in a Pose
A simple trick:
Draw a single flowing line from the head down to the supporting foot.
If that line is perfectly straight, the pose probably lacks energy.
 In a natural pose, you’ll notice:
- The head tilts slightly
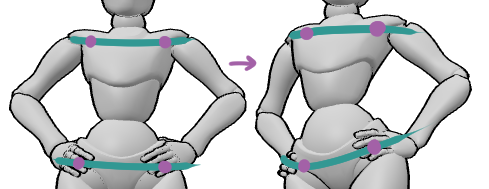
- The shoulders angle opposite the hips
- The spine subtly curves
- One leg carries more weight
This opposing rhythm is what creates visual interest.
Why the S-Curve Is Hard to Apply from Imagination Alone
Understanding the concept is one thing. Applying it consistently is another.
When drawing from imagination, it’s easy to:
- Over-straighten the spine
- Forget weight distribution
- Align shoulders and hips unconsciously
This is where 3D reference poses become incredibly useful - especially when working with tools like PoseMyArt.
How PoseMyArt 3D Reference Poses Help You See the S-Curve
One of the biggest advantages of using 3D models is clarity of structure.
With a poseable model, you can:
- Rotate the character to see weight distribution
- Clearly identify which leg carries the weight
- Observe how the spine curves naturally
- Spot opposing angles between shoulders and hips
You’re no longer guessing where the flow should be - it’s visible.
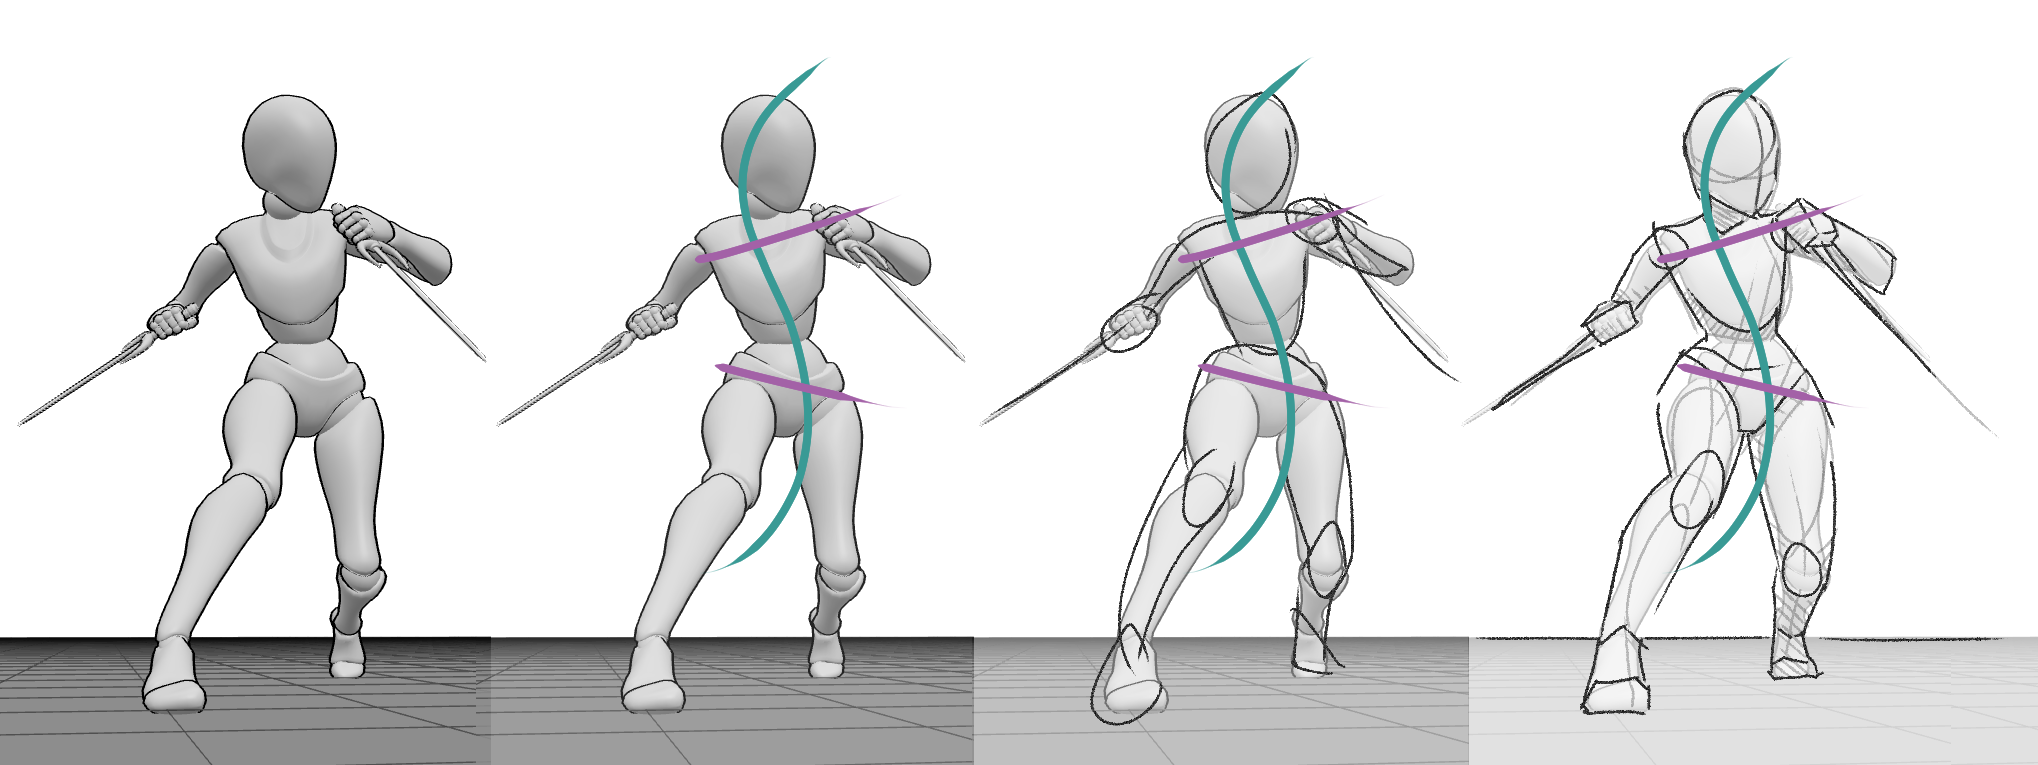
Drawing Over 3D Poses (Without Tracing)
A great exercise is gesture overlay.
Instead of tracing anatomy:
- Draw a single flowing S-curve over the 3D model
- Mark shoulder and hip angles
- Sketch a loose gesture based on that flow
This trains your eye to prioritize movement before detail.
The S-Curve in Dynamic Poses
The S-curve isn’t just for standing characters.
You’ll see it in:
- Walking and running
- Leaning or resting poses
- Action poses (twists, turns, reaches)
- Even seated figures

In motion, the curve often becomes more exaggerated - sometimes closer to a C-curve combined with counter-balancing angles.
The key is opposition. If one part moves, another part responds.
Stylized vs Realistic: The Same Rule Applies
Stylized art often exaggerates the S-curve - and that’s a good thing.
In semi-stylized or cartoon styles:
- Straighter poses look even stiffer
- Flow becomes more important than realism
- The S-curve carries expression and personality
The rule isn’t about realism.
It’s about relationships and balance.
If the flow works, you can simplify everything else.
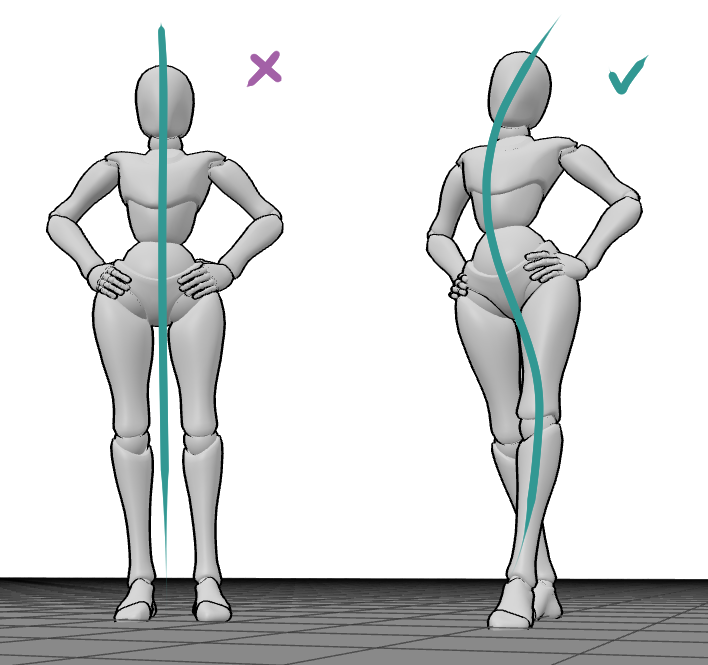
How to Fix a Stiff Pose Fast
When a pose feels wrong, it’s rarely because everything is wrong. In my experience, stiffness usually comes from one missing shift - one decision that was left too neutral.
 Before redrawing the entire figure, pause and look at the pose as a whole. Ask yourself where the weight is. Which leg is actually supporting the body? Once you identify that, small but intentional adjustments often solve the problem immediately.
Try this process:
-
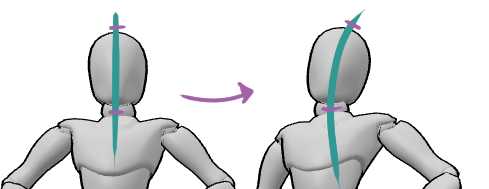
Tilt the head slightly to break vertical symmetry. Even a few degrees can add personality.
-
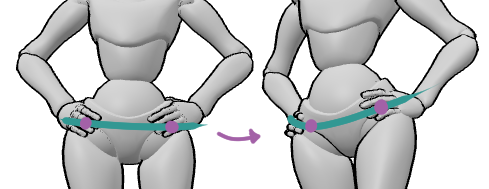
Shift the hips over the supporting leg, instead of keeping them centered. This creates balance, not instability.
-
Counter the shoulders slightly against the hips. If the hips tilt one way, let the shoulders respond in the opposite direction.
-
Redraw the gesture line from head to foot, focusing on flow rather than anatomy.
Pro tip: always include overlapping body parts.
Overlaps instantly add depth, hierarchy, and realism to a pose. When body parts slightly cover each other - an arm crossing the torso, a leg overlapping the other, the head overlapping the shoulder line . the figure immediately feels more three-dimensional and grounded in space. Stiff poses often happen when everything is fully visible and evenly spaced, like a cut-out silhouette. Overlapping breaks that flatness and forces the eye to read the body in layers. It also helps clarify which parts are closer to the viewer, making perspective feel intentional rather than accidental.
|  |
What I’ve learned over time is that stiffness usually comes from playing it too safe. We align things because alignment feels correct - but natural poses are rarely perfectly aligned. The moment you introduce opposition and weight, the pose starts to breathe.
If the pose still feels off, don’t force it. Go back to the reference and study it again - especially the supporting leg and the direction of the spine. Those two elements control almost everything else. Once they’re clear, the rest of the pose tends to fall into place naturally.
Often, fixing a stiff pose isn’t about adding more detail. It’s about making one confident structural decision - and letting the rest follow.
Final Thoughts
The S-curve isn’t a magic trick. It won’t replace anatomy knowledge or practice.
But it will:
- Instantly improve pose flow
- Prevent stiff, lifeless characters
- Help you see balance instead of symmetry
Once you start looking for the S-curve, you’ll see it everywhere - in photos, people on the street, and your own drawings.
And when poses finally start feeling natural, you’ll realize the secret wasn’t more detail…
It was better flow.