How to Draw Weapon Holding Poses for Action Figure Drawing
Weapon holding poses expose weaknesses you can easily get away with in neutral drawings. The moment a character has to interact with an object - especially something heavy, dangerous, or directional - the illusion is either sold instantly or completely collapses. For a long time, I quietly sidestepped weapon poses in my own work. Not because I didn’t like them, but because every attempt felt off. Something was always missing, even when the individual parts seemed fine.
The sword was fine.
The gun looked okay.
The bow was detailed.
And yet the character looked like they were politely borrowing the weapon instead of actually using it.
Arms felt stiff. Hands looked glued on. The body stayed upright and calm while the weapon screamed “action.” I redrew the hands ten times, blamed anatomy, blamed proportions, blamed my lack of talent - everything except the real issue.
The problem wasn’t detail.
It was how the body relates to the weapon.
Weapon poses fail when the object is treated as decoration instead of force.
- Why I Start Weapon Poses in 3D Before Drawing
- Why Weapon Holding Poses Feel So Hard
- Start Thinking in Forces, Not Objects
- Hands: Where Most Weapon Poses Break
- Wrists and Forearms: The Silent Problem Area
- Arms Don’t Pose Alone
- Body Balance: Weapons Demand Asymmetry
- Foreshortening Is Not Optional in Action Poses
- Drawing the Weapon Last
- Why 3D Pose References Change the Game
- How to Practice Weapon Poses Without Burning Out
Why I Start Weapon Poses in 3D Before Drawing
3D references helped me the most in one specific area: figuring out how a character actually holds something.
Placing an object correctly into a hand - in a way that still keeps the entire body and composition balanced - is far from simple. And the tricky part is that mistakes often don’t show themselves immediately. You can go pretty far into a drawing thinking everything is fine, and only near the end you suddenly realize something feels off. At that point, it’s rarely just a small detail anymore - it’s usually the foundation of the pose that’s wrong.
This is where 3D references completely changed the process for me. With PoseMyArt I can build the exact pose I have in my head before I even start drawing. Weapon-holding poses also become much easier to understand, because I can rotate them in space, check how the grip affects the arm and shoulder, and see how the object actually sits in the hand from different angles.
Instead of guessing or fixing problems too late in the drawing, I can study the structure first - and make sure the whole pose already works before I commit to lines.
Why Weapon Holding Poses Feel So Hard
A neutral standing figure forgives mistakes.
A weapon pose does not.
The moment a character holds something meant to cut, shoot, pull, or strike, the body has to react. Weight shifts. Muscles engage. Balance changes. When those reactions are missing, the pose feels wrong immediately - even if you can’t yet explain why.
This is exactly where I used to get stuck. I’d draw a solid-looking character, add a sword or a gun, and suddenly everything fell apart. The pose stopped breathing. The arms felt disconnected. The weapon looked like a separate prop instead of something actively used.
The most common issues I see (and struggled with myself) are:
-
hands gripping without real tension
-
wrists bending in ways the body wouldn’t allow under load
-
weapons visually floating, instead of being integrated into the arm and shoulder structure
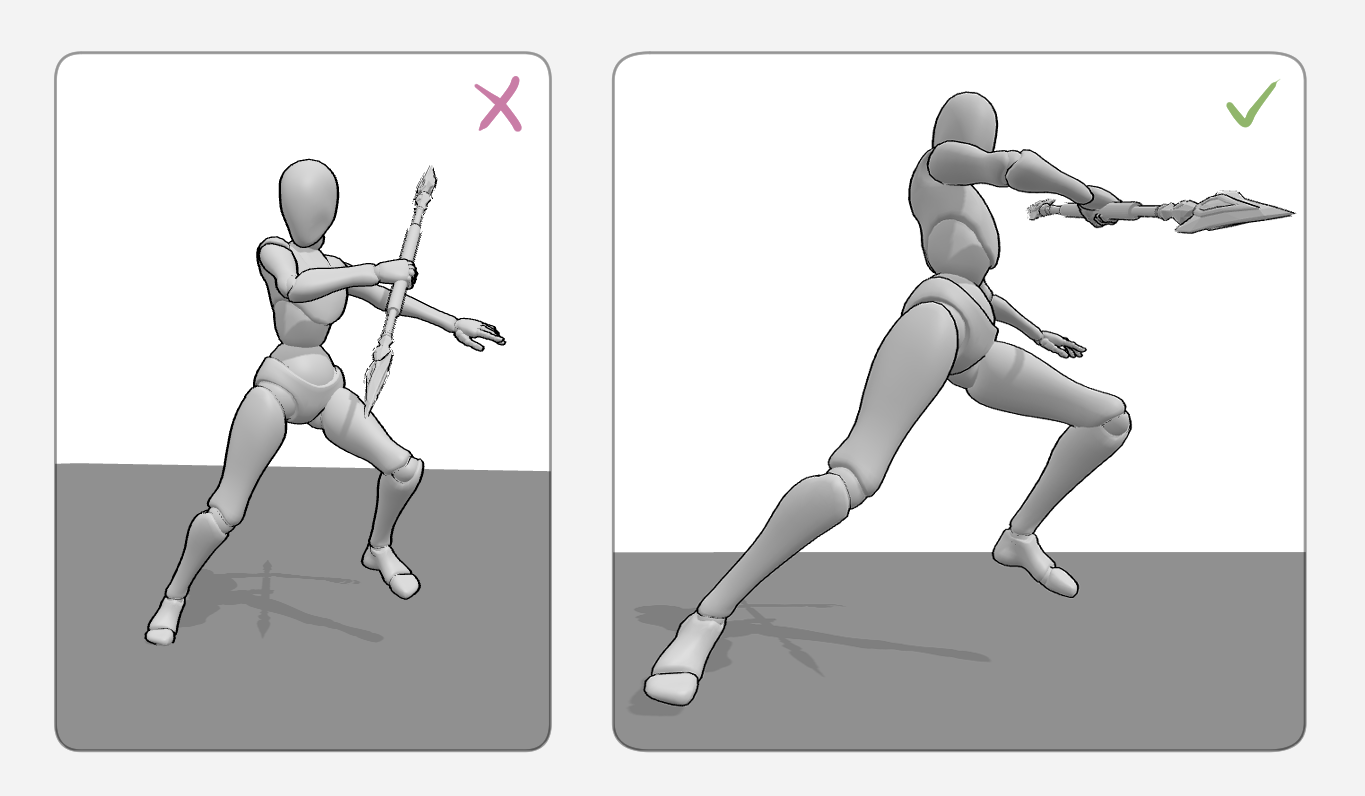
The 3D pose references were what finally made weapon poses click for me. Instead of guessing how a sword, gun, or bow should sit in the hand, I could actually see how the grip affects the wrist, how the arm pulls tension into the shoulder, and how the weapon’s weight changes the character’s balance. In PoseMyArt, having access to a wide range of weapons and weapon-holding poses makes this especially clear - you’re not just placing an object into a hand, you’re studying the relationship between the weapon, the fingers, the arm, and the entire body. That connection is what turns a pose from decorative into believable.
Start Thinking in Forces, Not Objects
When a character is holding a weapon, the drawing is never about the object itself. It’s about tension, resistance, and direction of force.
A sword pulls the arm downward.
A gun pushes backward when firing.
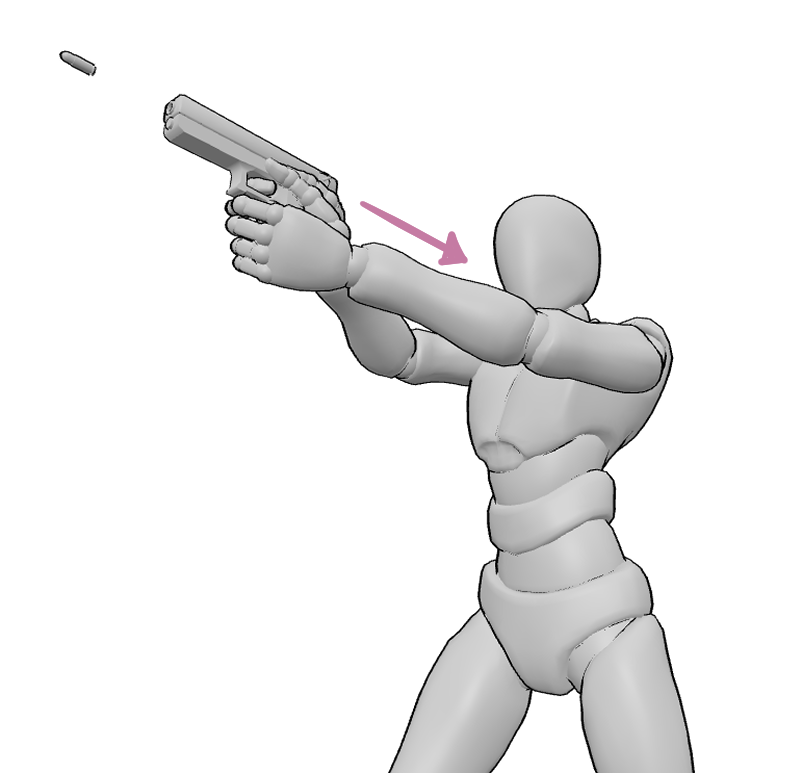
A bow creates opposing tension between both arms and the torso.
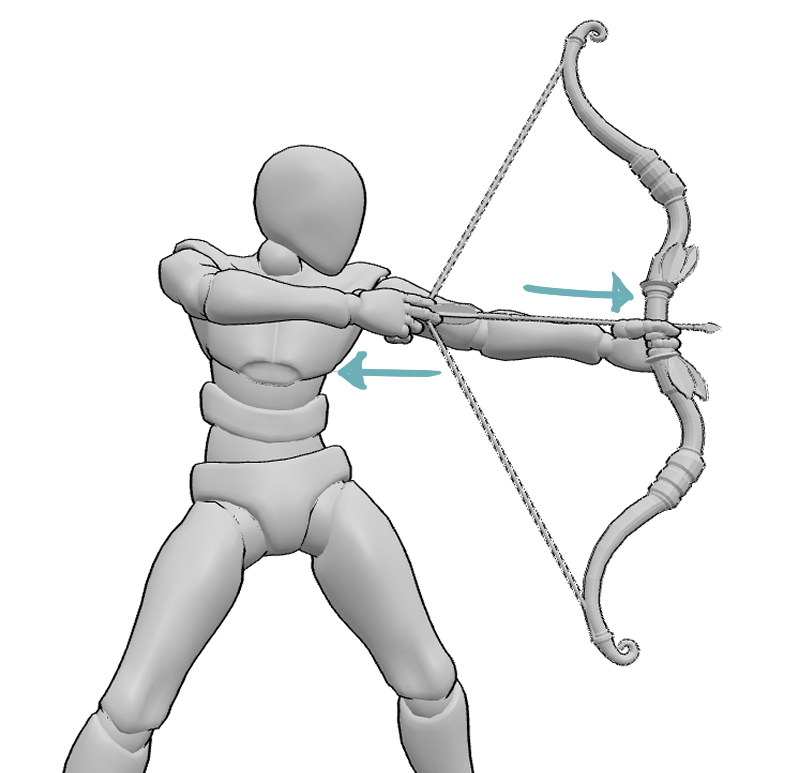
If you focus only on the “hand holding an object” - the pose will look decorative. When you think in forces, the pose becomes physical and believable.
This mindset instantly improves your drawings because it affects everything at once: shoulder rotation, elbow angles, wrist alignment, and even weight distribution in the legs.
Before refining details, ask one simple question:
Where is the force coming from, and where does it go?
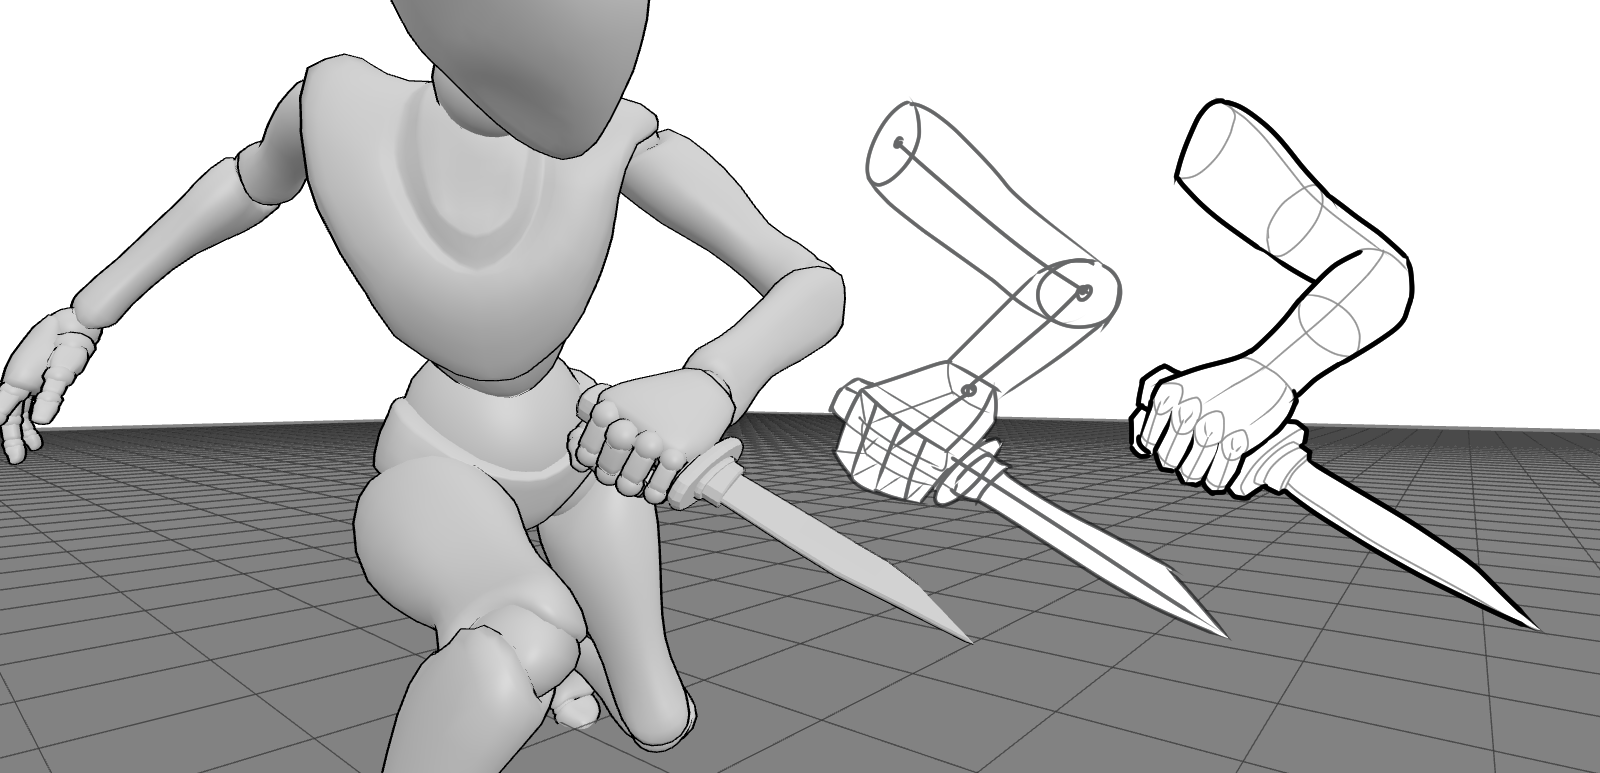
Hands: Where Most Weapon Poses Break
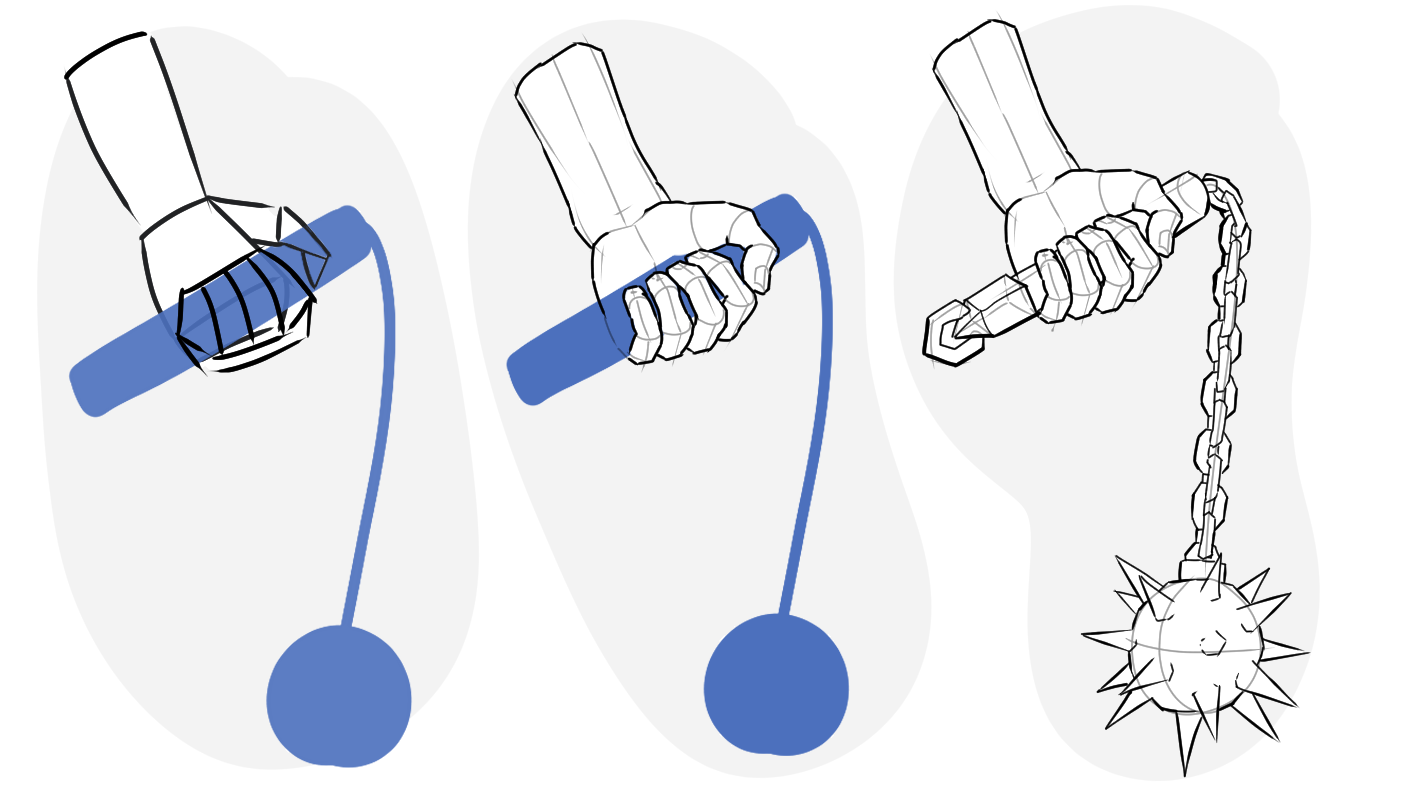
Hands are brutally honest. If the grip is wrong, nothing else matters.
One of the biggest mistakes is drawing hands around weapons instead of because of them. Fingers don’t sit politely - they wrap, press, and lock.
Things I always check:
-
the thumb creates counter-pressure
-
fingers compress more on the inside of the grip
-
knuckles align with force direction
-
grip tightens or loosens depending on action
A relaxed hand holding a heavy weapon instantly reads as wrong.
When drawing gripping hands, don’t start with fingers.
Start with line of action.

After you’ve established the line of action and the sketch of the body, define the presence of the object - its size, position, contact with the hand.
Place the palm as a single, solid mass reacting to the object itself.
Add the fingers only at the very end, shaped by the grip rather than drawn for detail. Add fingers as responses, not decorations. Think in terms of pressure zones: where the hand pushes, where it locks, where it stabilizes.
Practical tips that help immediately:
-
draw the palm as a wedge or block before adding fingers
-
vary finger spacing - gripping fingers are rarely evenly spread
-
compress the flesh where the hand meets the object
-
let fingertips dig in slightly instead of resting on the surface
-
show tension through subtle bends, overlaps, and angle changes
Studying gripping hands from multiple angles is especially effective here. Seeing the same hand–weapon relationship from different views makes it much easier to understand finger wrapping, thumb opposition, and how grip tension travels into the wrist and forearm.
If the grip feels convincing, the entire pose suddenly clicks into place.
Wrists and Forearms: The Silent Problem Area
Wrists are where realism quietly dies.
They don’t bend infinitely, and they never bend randomly. In weapon poses, wrist angle follows intent. A sword swing locks differently than a gun aim. A bow pull creates tension all the way up the forearm.
Wrists rarely fail because artists don’t know anatomy. They fail because they’re drawn too neutral - or bent in ways that don’t match the force of the pose.
In action poses, the wrist is almost never straight. It bends, twists, compresses, or stretches depending on the weapon and grip.
Forearms should show subtle rotation, not parallel cylinders. Once you start exaggerating that twist just slightly, weapon poses suddenly feel alive instead of stiff.
Arms Don’t Pose Alone
An arm holding a weapon pulls the shoulder, rotates the torso, and often shifts the spine. If the arm is active but the torso stays neutral, the pose collapses.
I like to think of it like this:
If you removed the weapon, would the pose still feel dynamic?
If the answer is no, the body isn’t doing enough work.
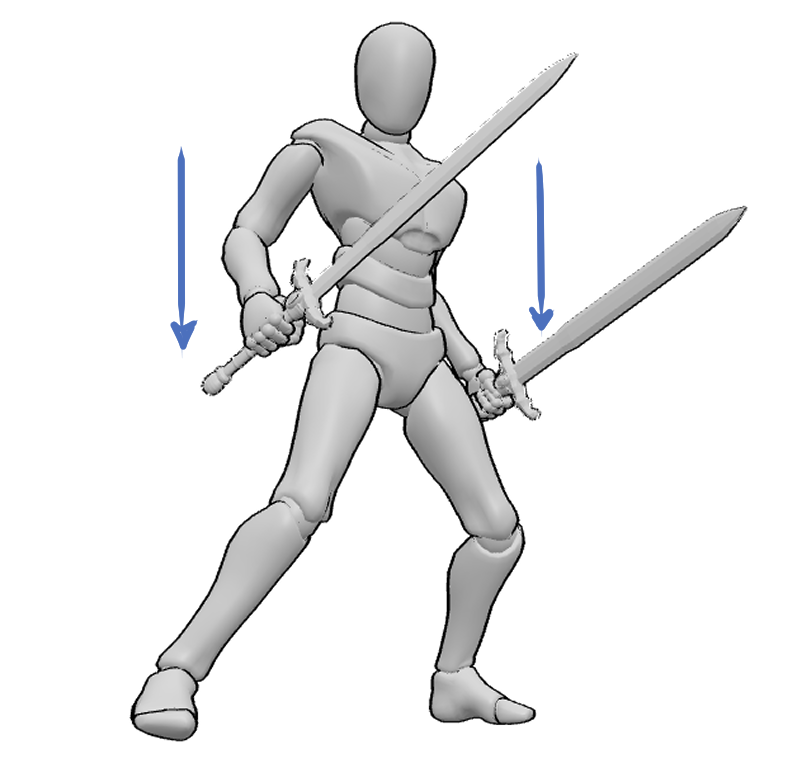
Body Balance: Weapons Demand Asymmetry
Weapon poses almost always create imbalance - and that’s a good thing.
Weight shifts into one leg. Hips tilt. Shoulders counterbalance. Perfect symmetry kills action instantly.
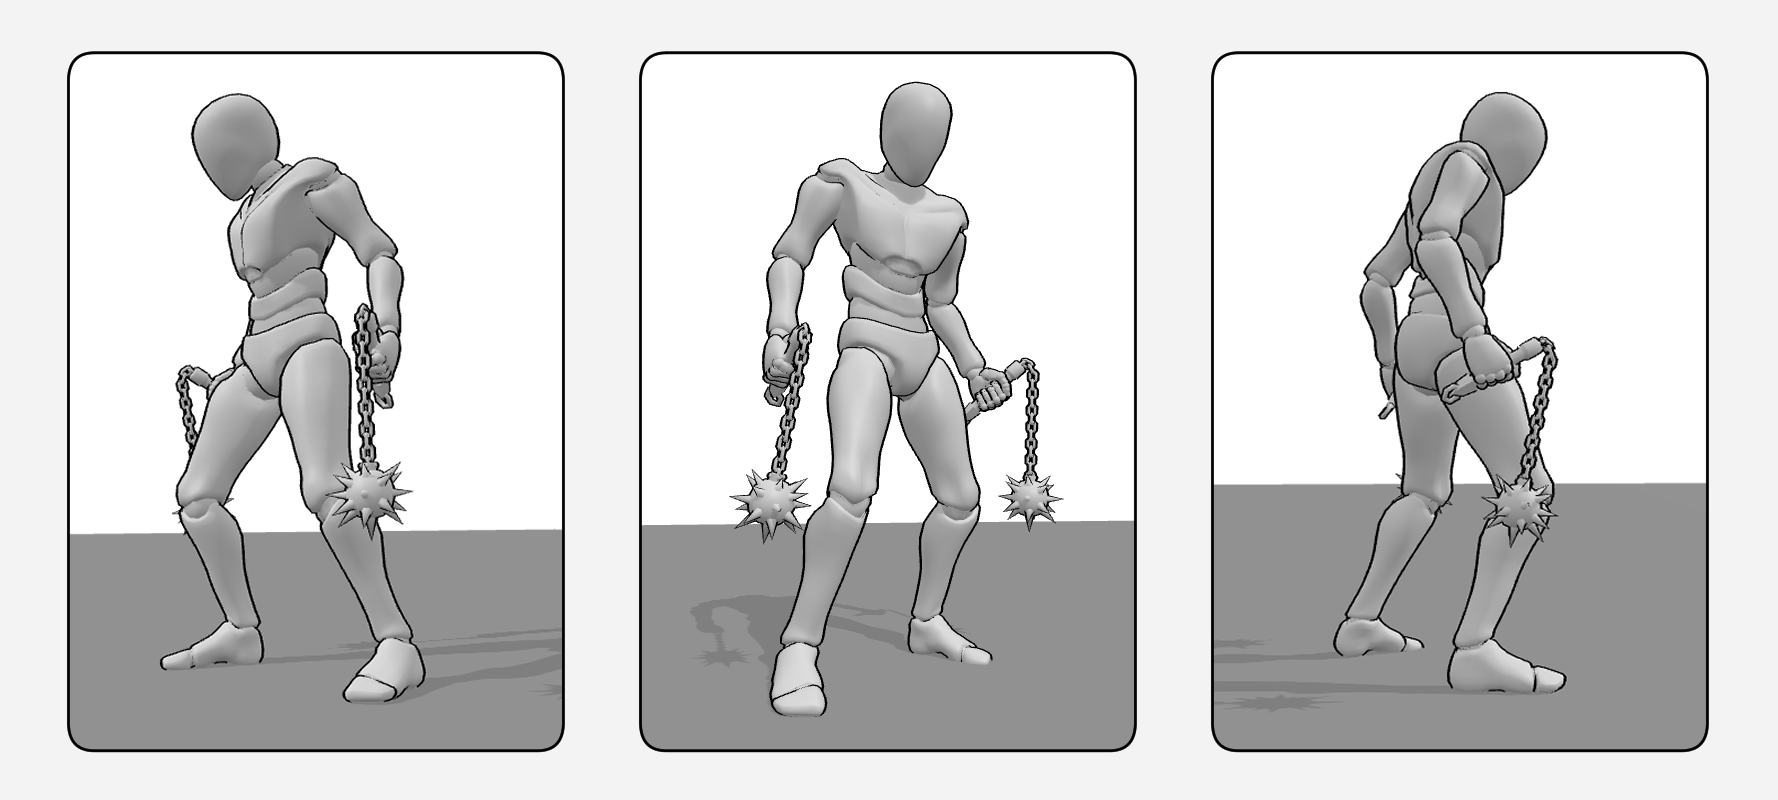
Heavy weapons like axes or hammers exaggerate weight shifts even more, which is why dedicated axe and hammer holding poses are especially useful for studying balance.
A mistake I made for years was keeping the feet evenly planted “to be safe.”
Real bodies don’t do that.
Foreshortening Is Not Optional in Action Poses
Most action poses fail not because of anatomy, but because everything is drawn at a safe distance.
Weapons are often pointed toward or away from the viewer.
That automatically creates foreshortening in the arms, hands, and weapon itself.
Avoiding this flattens the entire pose.
3D pose references make this much easier because you can rotate the camera freely and commit to extreme angles without guessing.
Once you see how short the forearm actually becomes in perspective, you stop correcting it “back to normal” in your drawing.
Foreshortening adds impact, speed, and threat - especially in combat-focused illustrations.
Drawing the Weapon Last
This sounds backwards, but it works.
Build the pose first as a loose structure:
-
spine / line of action
-
shoulders
-
arms
-
hand blocks (no fingers yet)
At this stage, you’re only solving balance, direction, and force - not details.
Once the body works, place the weapon as a solid object in space.
Only after that do you define the fingers and grip, shaping them around the weapon based on pressure and action. The weapon details come last.
If the pose works at the structural level, the weapon and hands will naturally fall into place. If the pose works without the weapon, it will shine with it. If it doesn’t, no amount of weapon detail will save it.
Why 3D Pose References Change the Game
Here’s the honest part:
Weapon poses are hard to imagine correctly.
That’s where PoseMyArt becomes genuinely useful - not as a shortcut, but as a thinking aid.
Being able to rotate a pose, adjust the grip, change the camera, or test a different stance before drawing removes guesswork. You’re no longer inventing anatomy - you’re observing cause and effect.
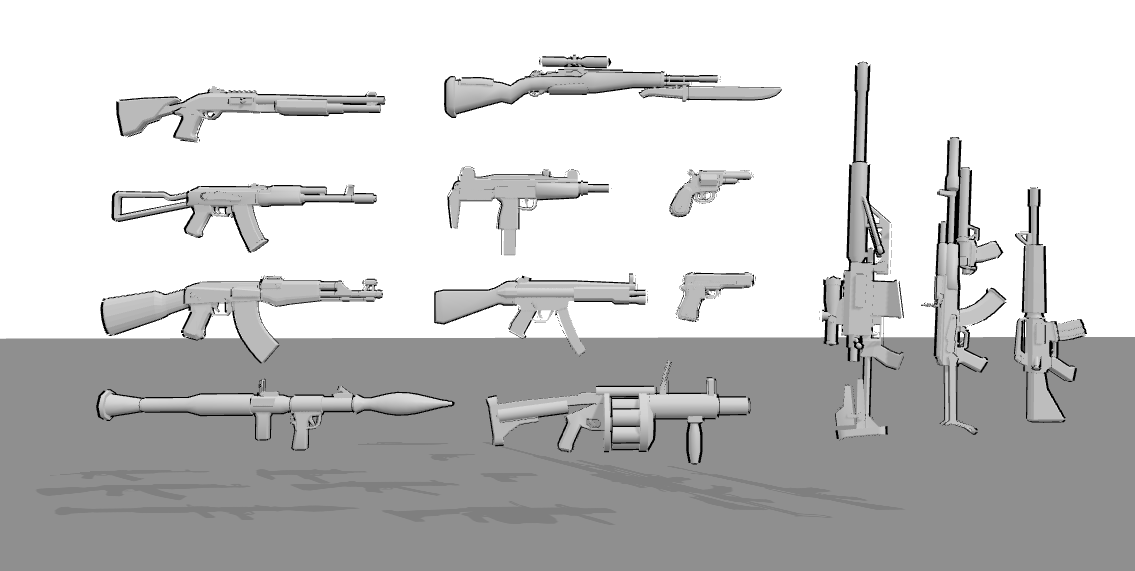
PoseMyArt includes a wide range of weapon props and ready-to-use pose collections, which removes a lot of setup friction when practicing.
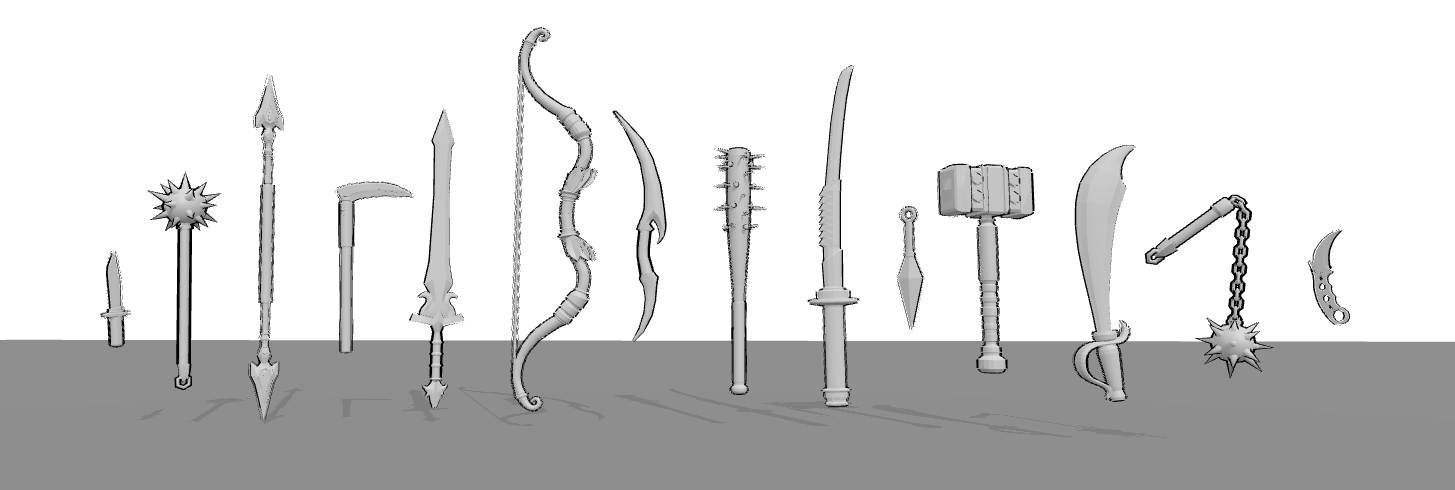
You’ll find swords, guns, bows, staffs and other handheld weapons, and There are also focused pose collections designed for illustration practice:
- Sword holding poses
- Gun holding poses
- Magic staff holding poses
- Dagger holding poses
- Katana holding poses
- Weapon holding poses
- Spear holding poses
- Shotgun holding poses
- Pistol holding poses
- Knife holding poses
Beyond basic handheld weapons, there is an especially large and varied gun library, making it easy to study different firearm types, grips, and shooting stances.
Because these poses are already structured, you can spend your time adjusting camera angle, force, and gesture instead of building everything from scratch.
How to Practice Weapon Poses Without Burning Out
Don’t chase perfection. Chase clarity.
Try this instead:
-
one pose, three weapons
-
one weapon, three grips
-
same pose, different camera angles
Short studies. Clear intent. Move on.
This kind of practice helped me a lot over time, especially in understanding how small changes in grip, angle, or weapon choice can completely change the feel of a pose.
Progress comes from variation, not polishing one drawing into exhaustion.
For this type of practice, using structured 3D references can make a huge difference - especially when you can quickly switch weapons, adjust grips, and explore the same pose from different viewpoints without rebuilding everything from scratch.
Here I’ve put together premade references for this exercise, so you can jump straight into it and start practicing right away:
One pose, three weapons
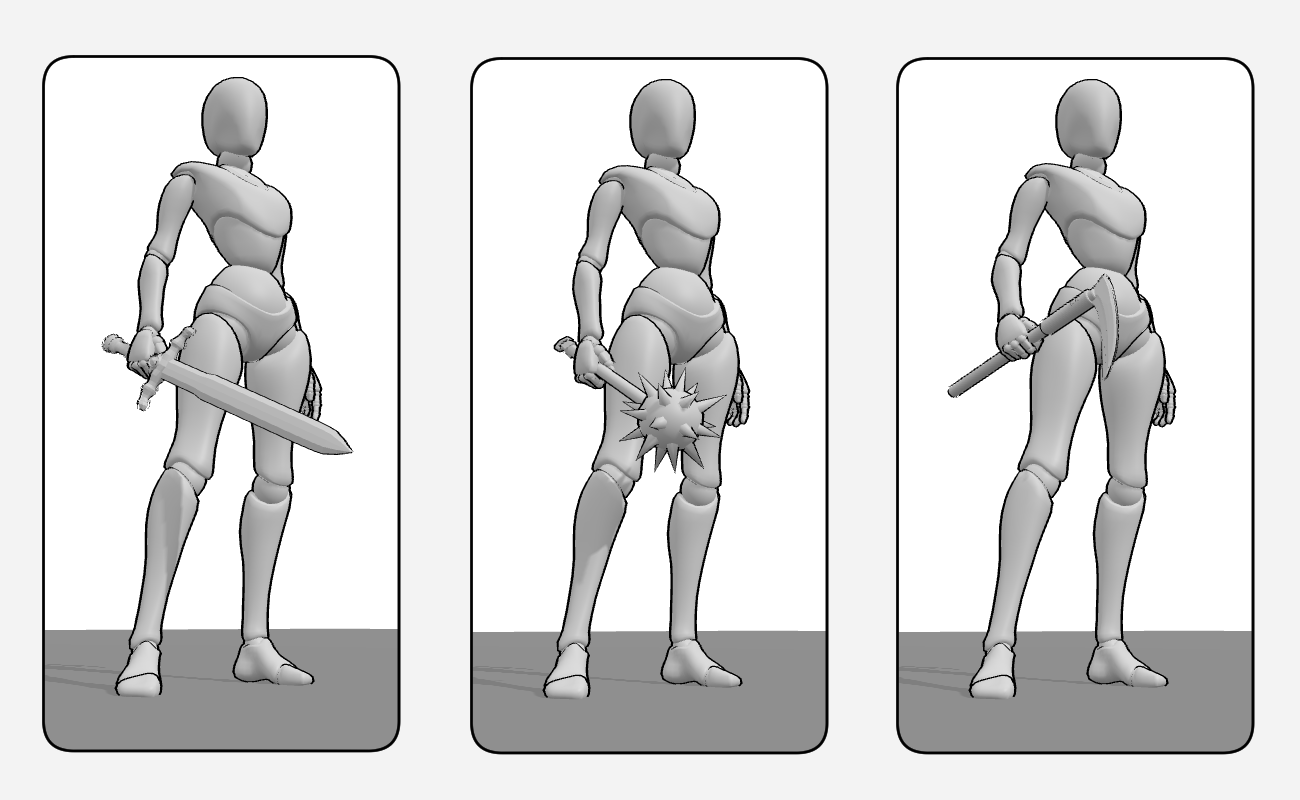
One weapon, three grips
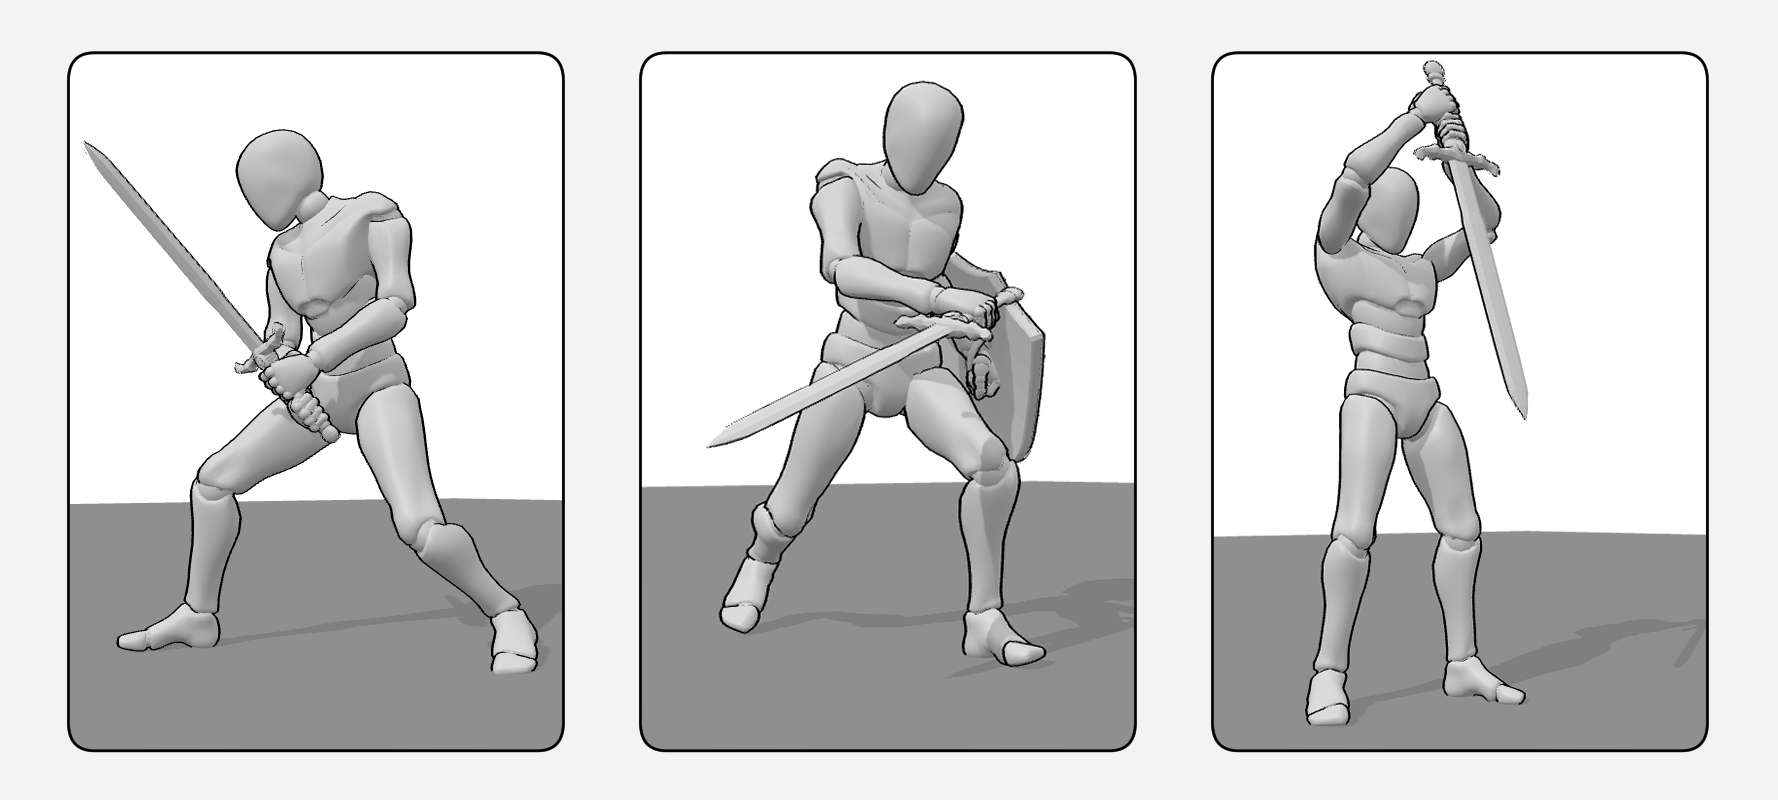
Same pose, different camera angles
Final Thoughts
Weapon holding poses are not about drawing cooler weapons. They’re about understanding how action travels through the body.
Once you start thinking in force, balance, and intent, everything clicks. Hands make sense. Arms feel alive. The body supports the action instead of fighting it.
3D pose references don’t replace your creativity. They remove friction - so your ideas can actually show up on the page. And when that happens, weapon poses stop being intimidating… and start making sense visually and structurally.