How to Draw Walking Poses: A Guide to Movement, Balance, and Weight
A walking pose can be surprisingly difficult to draw. You put one foot forward, swing the opposite arm, give the body a little lean - and somehow the character still looks like they have stopped mid-stride to pose for a photo.
The problem is that walking isn’t really a pose. It’s a sequence of constant adjustments: the weight moves from one leg to the other, the pelvis shifts over the supporting leg, the spine responds, the shoulders counterbalance, and the arms and legs fall into an alternating rhythm. When you freeze all of that into a single drawing, you have to communicate the movement without actually showing it.
That is why walking references are worth studying beyond their silhouette. The real story of a walk is never in the feet alone - it’s in how the entire body coordinates to keep balance while constantly falling forward and catching itself again.
Understand the Walking Cycle First
A useful place to start is the walking cycle itself. You don’t need to memorize every technical stage of human locomotion, but understanding the basic sequence makes individual poses much easier to read. For drawing purposes, we can simplify it into five key moments: Contact → Loading → Support → Push-Off → Swing.
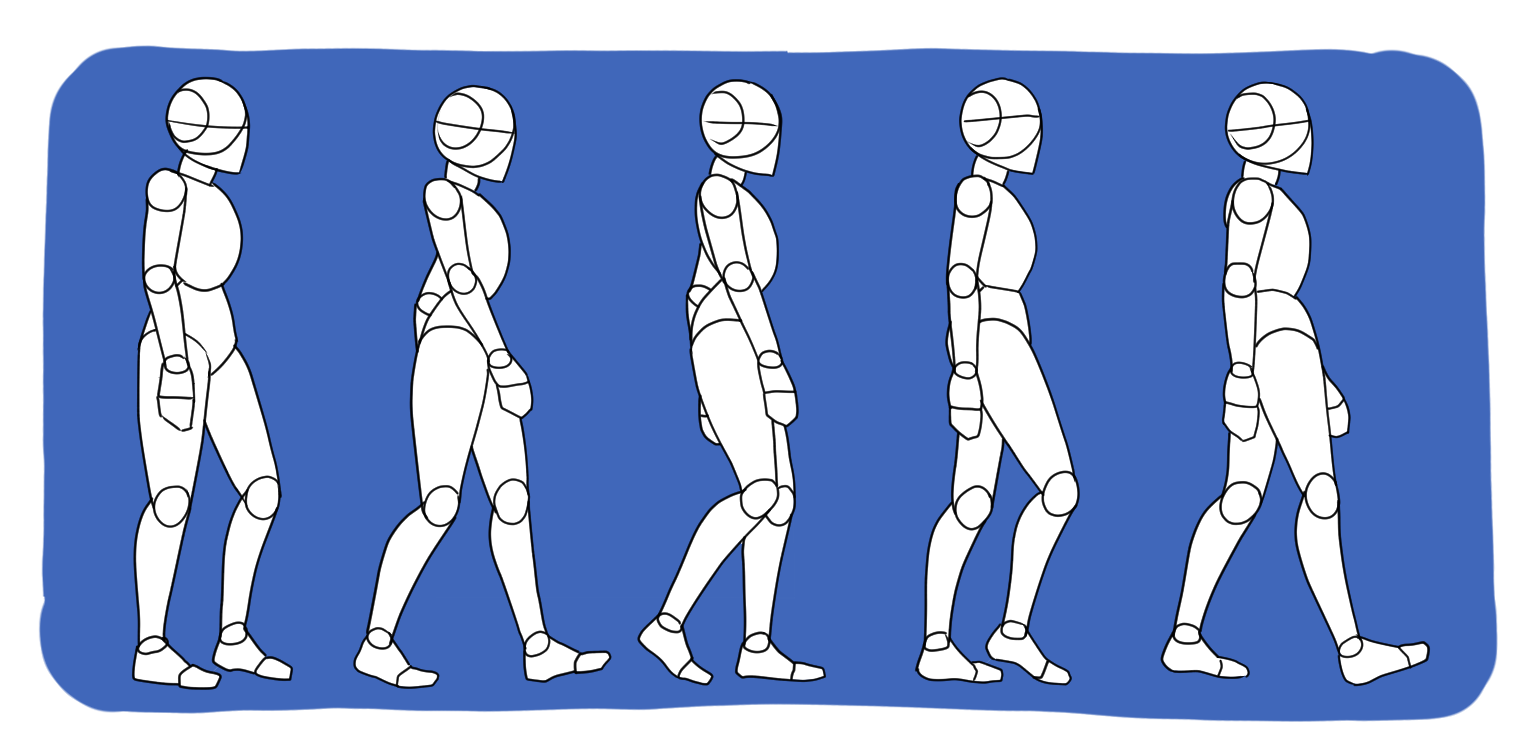
At contact, one foot reaches the ground while the other is still behind the body. During support, the body passes over the supporting leg and the majority of the weight is carried by it. During push-off, the back foot leaves the ground and helps propel the body forward. Then, during swing, the free leg travels forward to prepare for the next contact.
Look at these five figures as a sequence rather than as separate poses. The feet are changing position, but so is everything above them. The pelvis moves with the transfer of weight, the torso adjusts to stay balanced, and the arms swing in opposition to the legs.
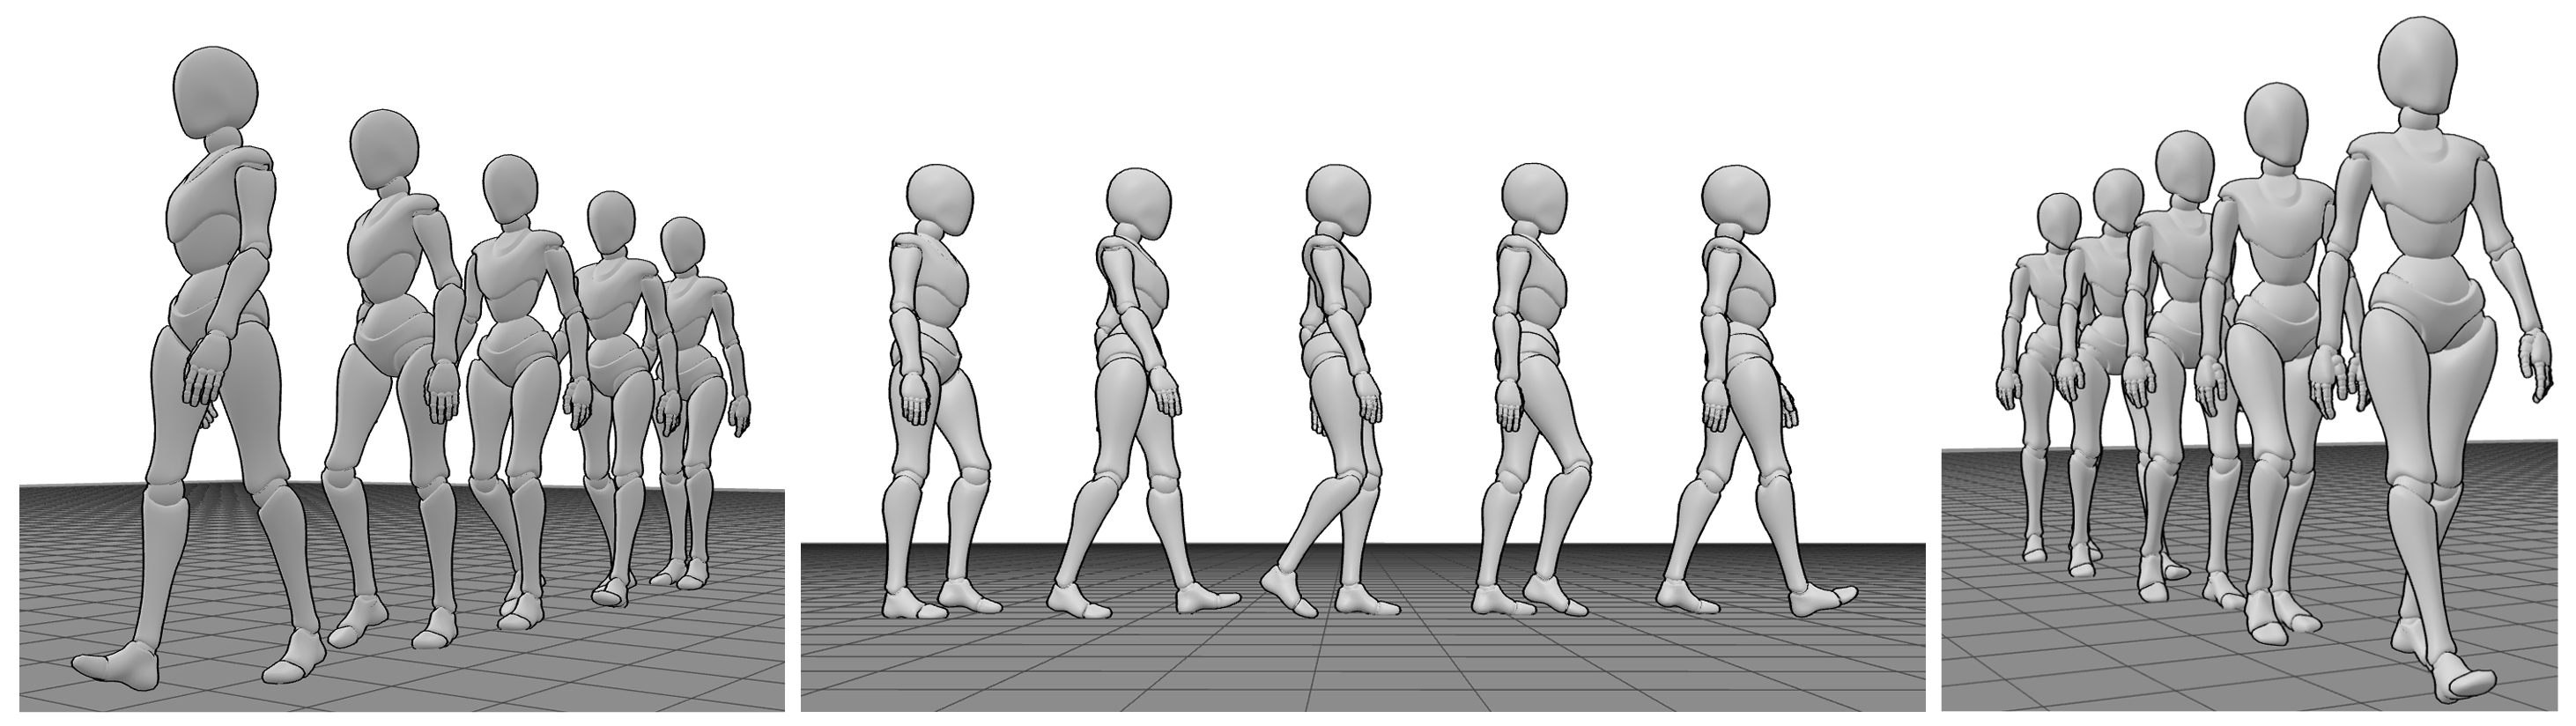
This is one reason walking poses can be difficult to reconstruct from a single 2D reference. You can see where the body ended up, but not necessarily how it got there.
This is where 3D references can make the process much easier. Instead of trying to mentally reconstruct the missing information, you can study the figure from different angles and watch how its position changes through the movement. You are no longer looking at a mysterious arrangement of limbs - you can actually follow the structure that produced it.
Find the Supporting Leg Before You Place the Feet
When drawing a walking figure, it is tempting to start with the legs. They seem to contain most of the action, after all. But before deciding exactly where the feet go, ask a more useful question: Which leg is carrying the body?
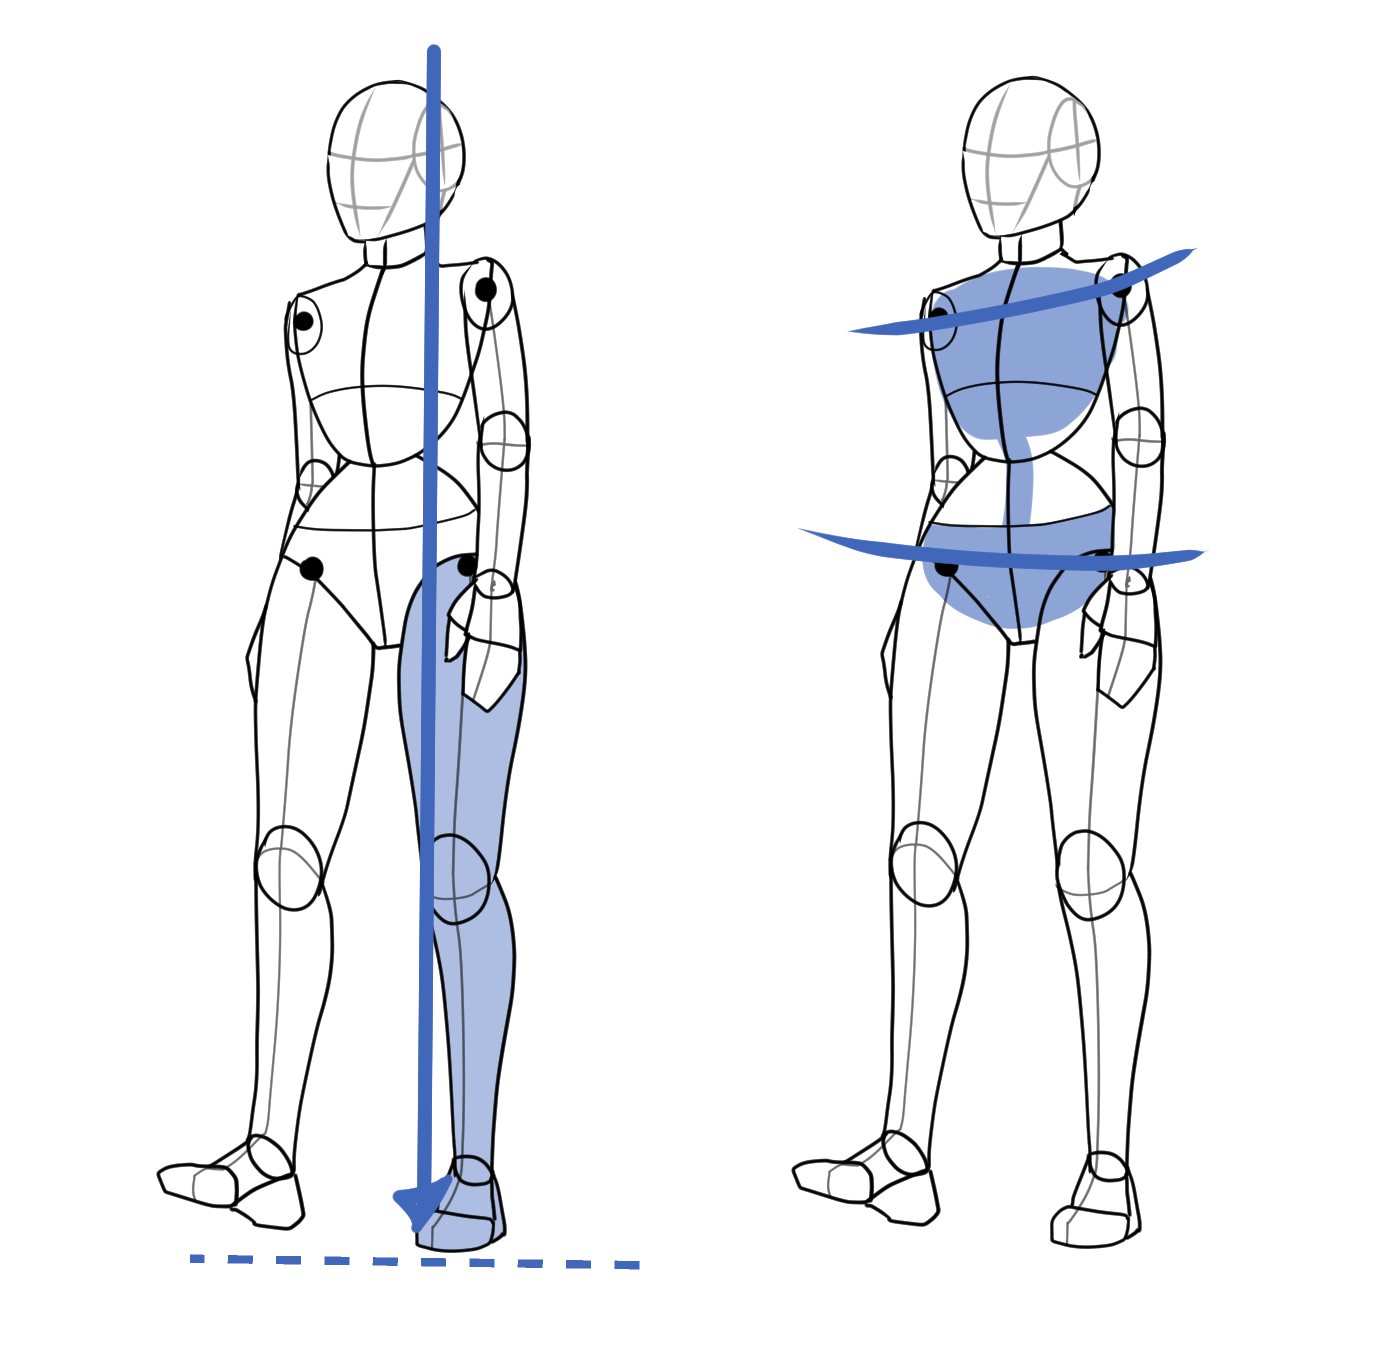
The supporting leg gives the pose its balance. The body’s center of gravity needs to relate to that foot, and the rest of the figure has to organize itself around it. Once you identify the supporting leg, the position of the pelvis becomes easier to understand, and the rest of the pose starts to fall into place.
In a 2D image, however, the relationship between the supporting foot, pelvis, and torso can be partially hidden by perspective. A 3D figure lets you rotate around the pose and check exactly where the weight-bearing leg sits beneath the body.
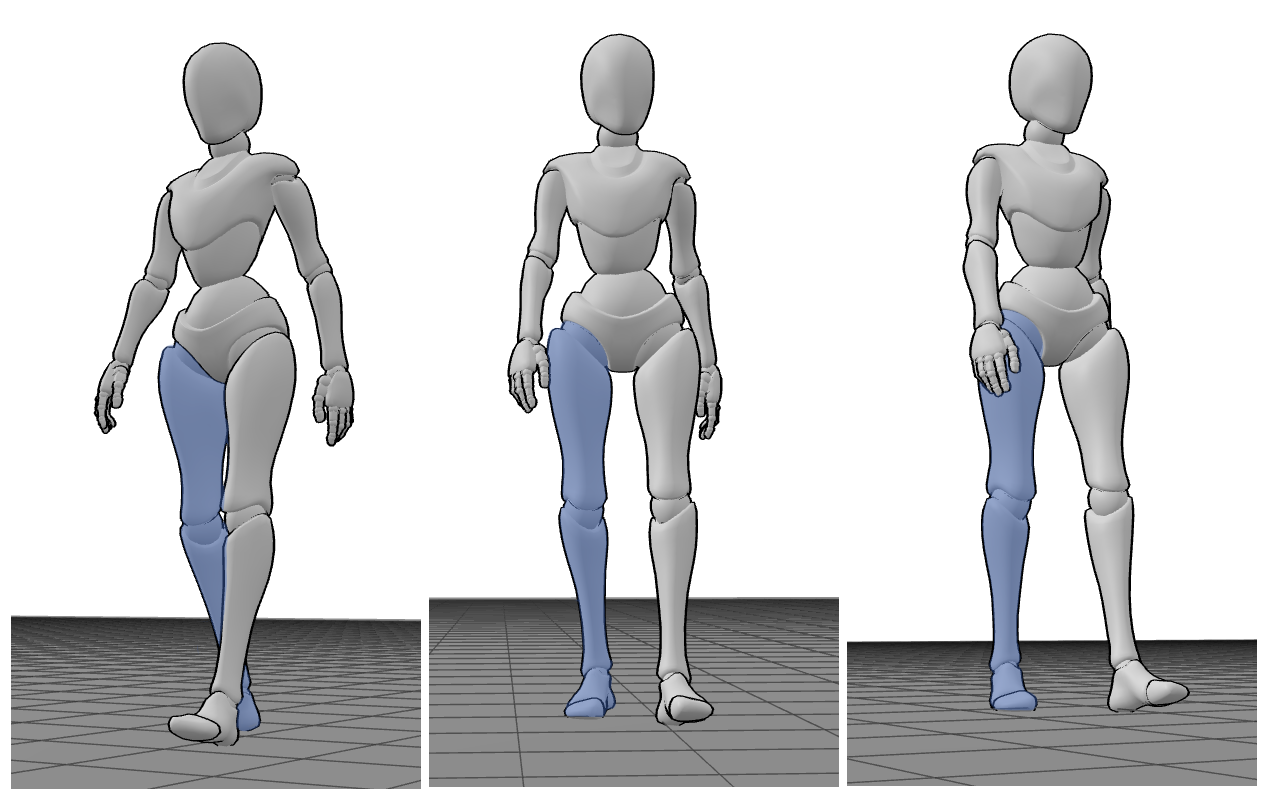
That extra view can answer questions that are surprisingly difficult to answer from a photograph alone: Is the pelvis actually above the supporting foot? How much is the torso leaning? Which parts of the body are moving toward or away from the camera?
Find the Line of Action
Once you’ve identified the supporting leg, look at how the rest of the body moves in relation to it. The line of action helps you capture that larger flow - the direction that connects the weight-bearing leg with the pelvis, torso, and head.
In a walking pose, this line is often subtle. The body may lean slightly forward as it moves over the supporting leg, while the pelvis and torso create their own opposing shifts. Rather than thinking of the figure as a stack of separate body parts, use the line of action to see how those parts belong to the same movement.
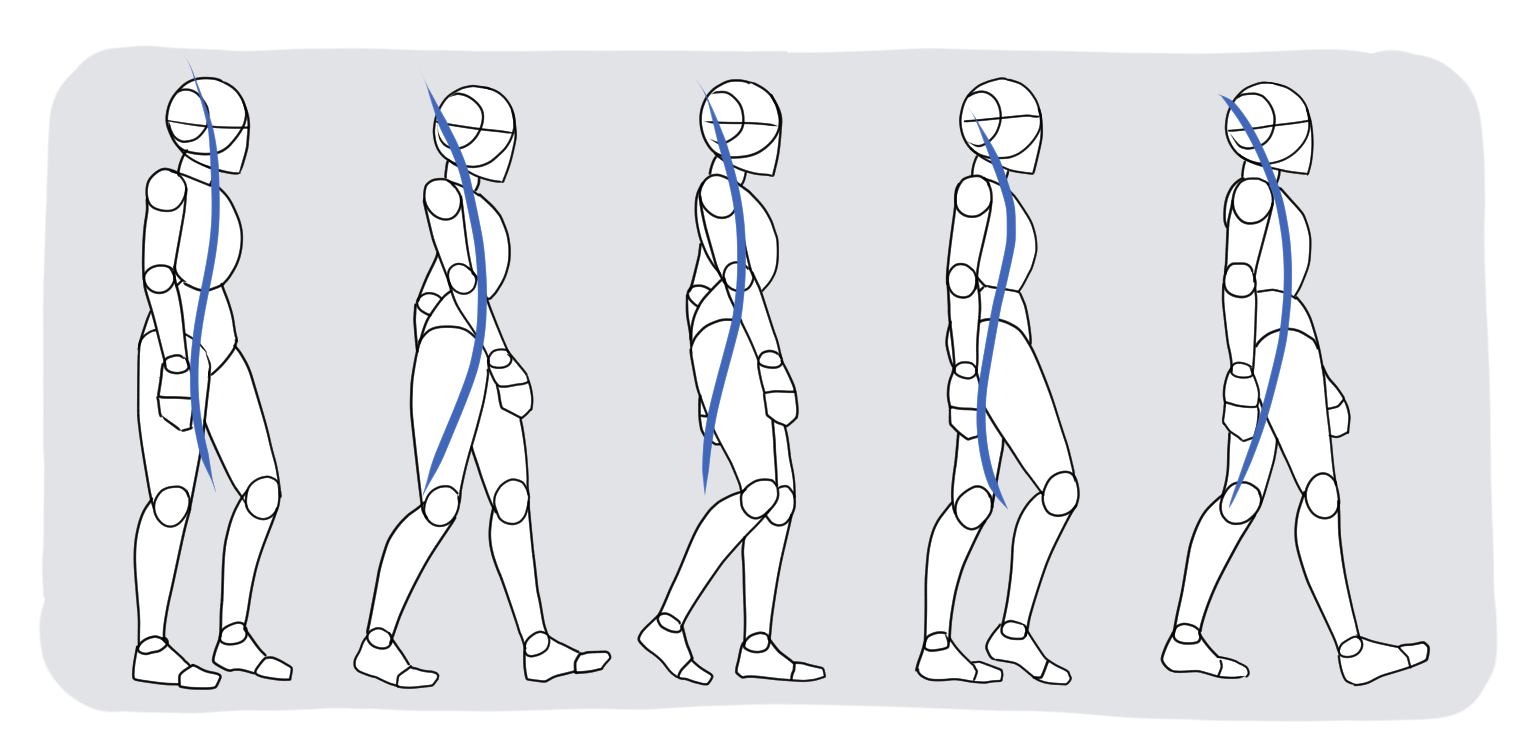
Once you have the supporting leg and the overall direction of the pose, you can use the line of action as a guide while placing the pelvis, rib cage, and limbs. It doesn’t need to be a dramatic curve, and it doesn’t have to literally pass through every part of the body. Its job is simply to keep the pose moving in one clear direction instead of letting the individual parts become disconnected.
For a more expressive character, you can push that direction further. A stronger forward lean, a longer stride, or a more pronounced curve can make the same basic walking mechanics feel confident, energetic, cautious, or exaggerated.
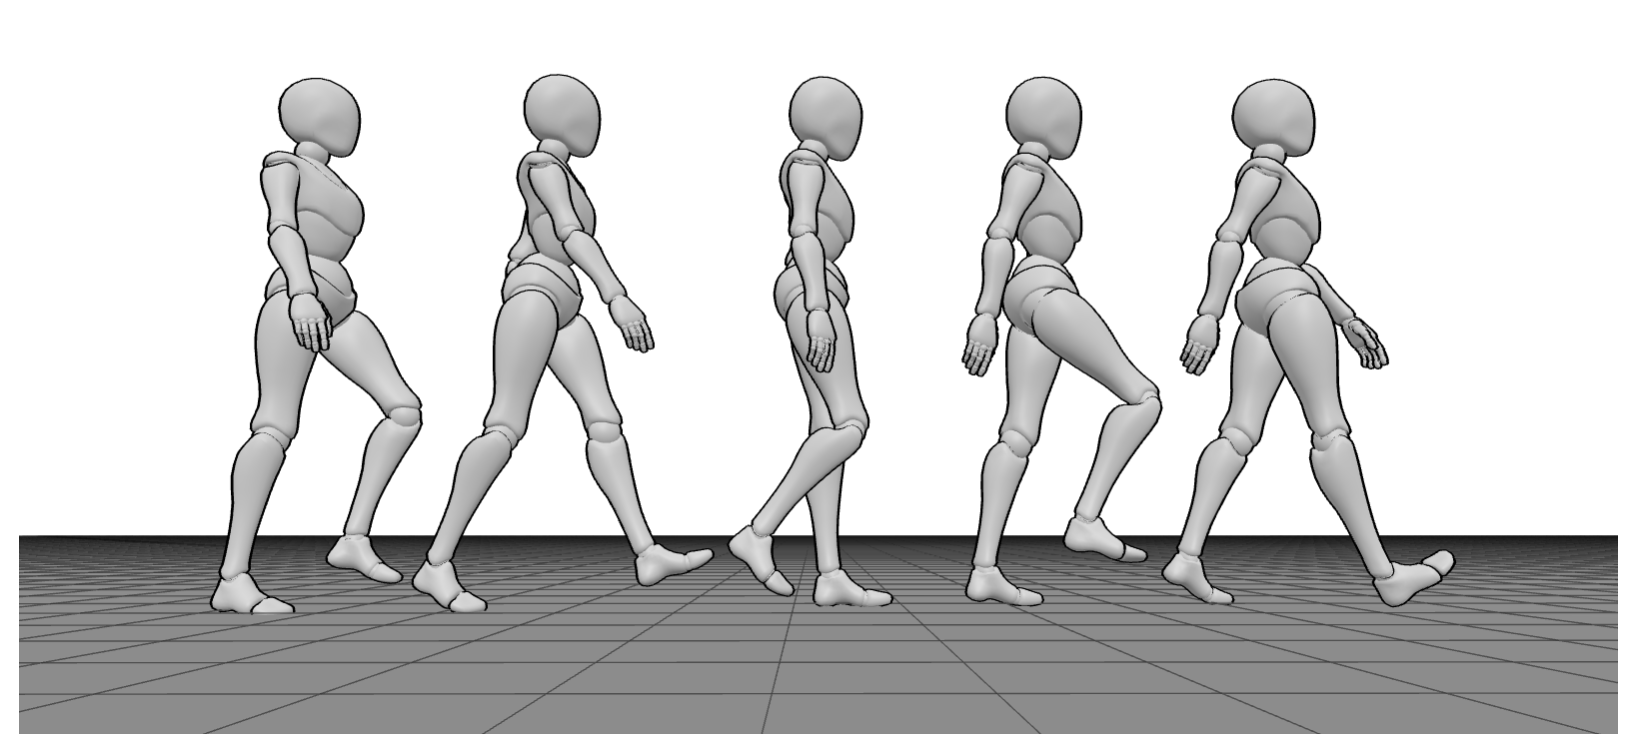
Let the Pelvis and Torso Follow the Weight
Once you know which leg is supporting the figure, follow that movement upward. The pelvis doesn’t remain perfectly level as the body moves from one leg to the other. It shifts and rotates, while the torso responds to the movement below.
For a drawing, you can simplify this into two major masses: the pelvis and the ribcage. Think of them as solid forms rather than flat shapes. Look at the direction each one is facing, how they relate to each other, and how the spine connects them.
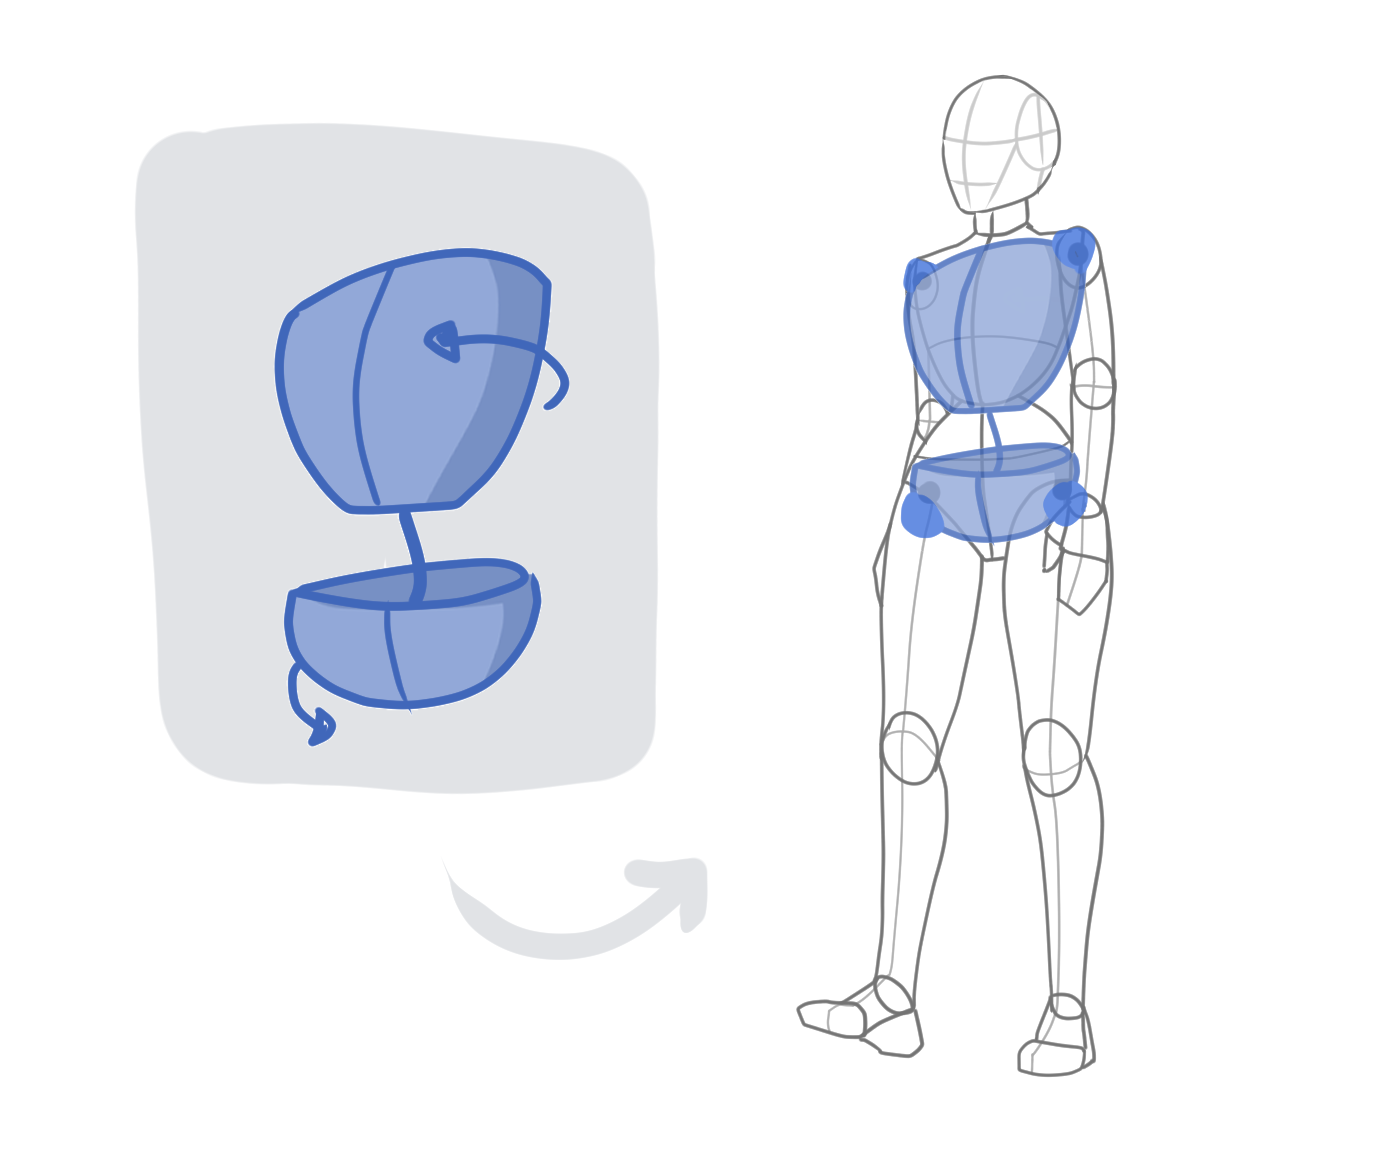
Before adding the limbs, reduce the pelvis and rib cage to simple solid forms. Mark the direction of each mass and pay attention to the space between them. If these two masses already suggest the movement of the walk, the rest of the figure becomes much easier to construct.
This is also where perspective can make a walking pose tricky. A reference might show the figure in profile, while your drawing calls for a three-quarter view. The pelvis and ribcage can change dramatically in appearance as they turn through space, so make sure you understand their orientation before building the limbs around them. With a 3D reference, you can simply rotate the figure to the angle you need, making it much easier to understand how the pelvis, ribcage, and limbs relate to one another in space.
The Upper Body Creates the Rhythm
Walking movement doesn’t stop at the hips. The spine, rib cage, shoulders, and arms all respond to the shifting weight below them.
One of the easiest ways to study this is to look at the relationship between the pelvis and shoulders. They don’t simply remain parallel while the legs move underneath. Their opposing movement helps the figure maintain balance and gives the walk its characteristic rhythm.
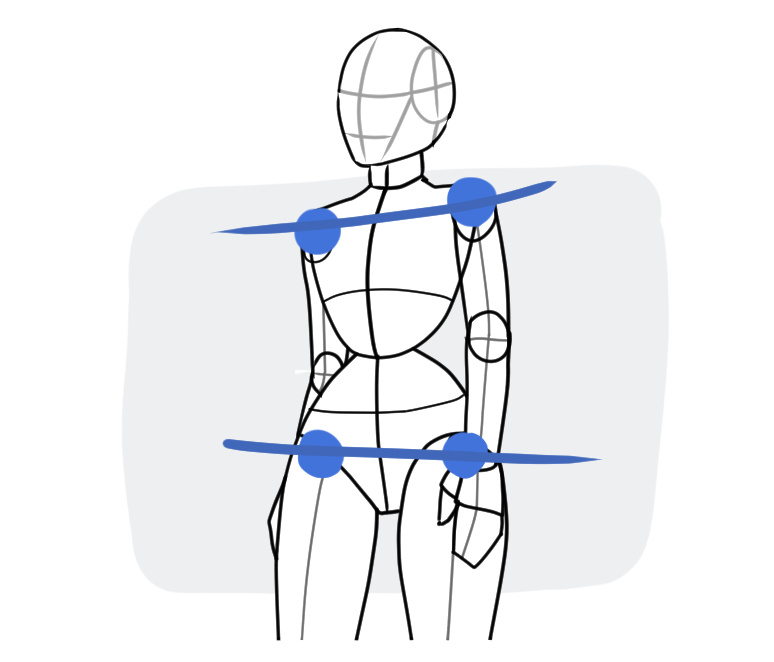
The arms reinforce that rhythm. As the right leg moves forward, the left arm generally swings forward as well, and the opposite happens on the other side. Watching a walking sequence makes this relationship much easier to understand than trying to memorize it as a rule - you can actually see how one movement flows into the next.
And walking doesn’t have to mean the same ordinary stride every time. PoseMyArt has more than a hundred 3D walking animations, from natural everyday walks and walking backwards to stairs, crouched walks, catwalks, drunk walks, and plenty of other variations. After all, people don’t always walk like they’re simply getting from A to B. Each variation changes the way the body handles balance, weight, and momentum, giving you a different movement to study. Having this kind of variety is also useful for storytelling, since the way a character walks can say a lot about their mood, personality, or situation.
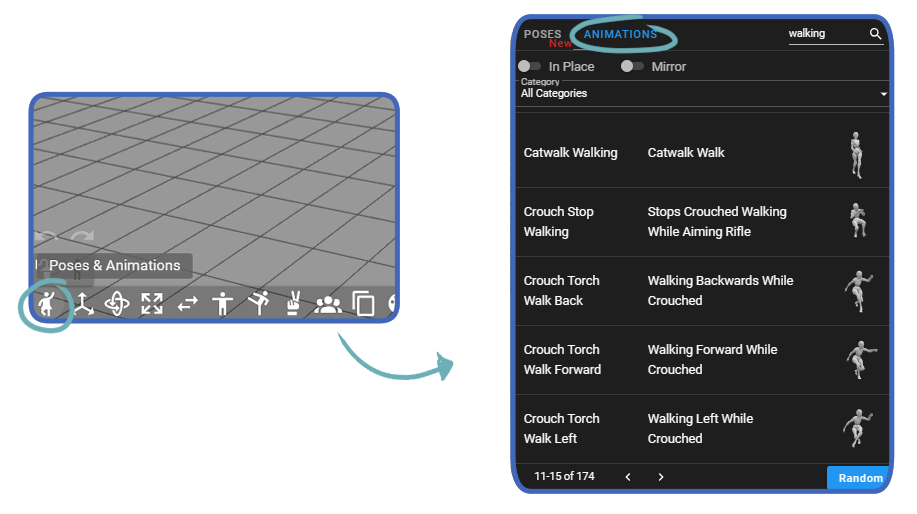
Start with the kind of movement you want to draw. Pause an animation at a moment that catches your eye, then look at the frames before and after it. Seeing how the body moves into and out of the position can reveal details that a single image would leave out, from the shift of the pelvis to the changing position of the arms and legs.
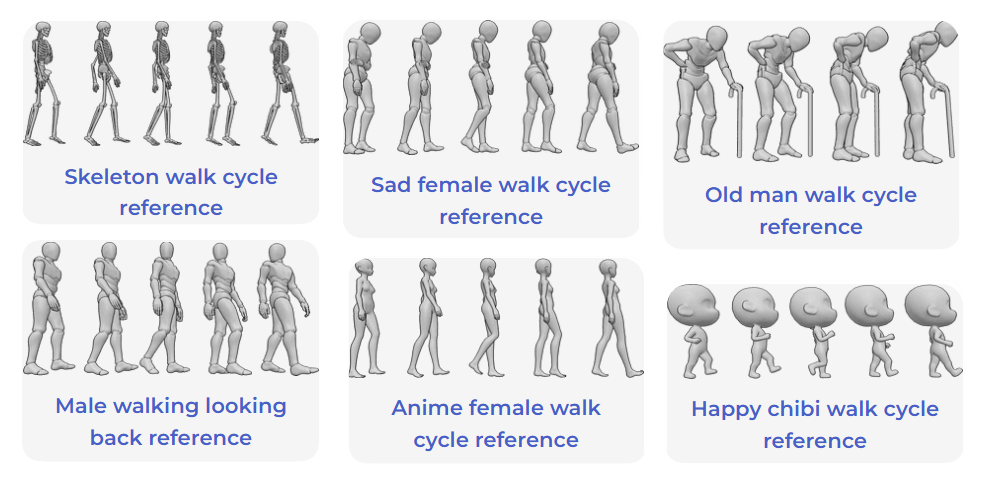
When you already know the kind of walk you want, static references can be useful for exploring character, mood and attitude. The Walk Cycle References collection includes different models and variations, from happy walks to more character-specific poses, giving you plenty of options when the movement needs to say something about the person doing it.
Final Thoughts
A convincing walking pose doesn’t need to show every detail of the walking cycle. It needs to make the viewer believe there is a moment before and after the drawing.
That is what makes walking such a useful movement to study. Once you start noticing the weight shift, the changing rhythm of the limbs, and the subtle adjustments that keep the body moving forward, even a simple step becomes much more expressive.
And you don’t have to limit yourself to ordinary walks. Study a different stride, exaggerate the movement, change the character, or stop an animation at the frame that catches your eye. The more kinds of movement you study, the more freedom you have when you create your own.