The Fastest Ways to Fix Face Proportion Errors
Drawing faces is one of the most rewarding - but also most challenging - parts of creating characters. Even if you have a strong concept, the right color palette, and solid technical skills, a small misalignment of the eyes, nose, or mouth can make your character feel “off.” The face may look stiff, unnatural, or simply lack personality.
The good news? Fixing these proportion errors doesn’t have to be slow or frustrating. By combining simple measurement techniques, reference points, and smart tools, you can correct mistakes quickly and confidently, giving your characters life and balance.
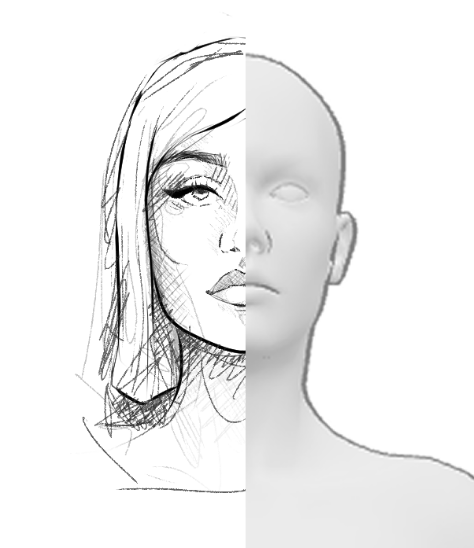
This is where reliable references make a real difference. Tools like PoseMyArt provide clear, adjustable 3D models that remove guesswork from the process. Instead of relying on memory or flat images, you can study facial proportions from any angle, compare them directly to your sketch, and make confident corrections early on. Using references this way doesn’t limit creativity - it strengthens your foundation, so your characters feel believable, expressive, and intentionally designed from the start.
Why face proportions matter
When proportions are off, even a well-executed drawing can feel hollow. A nose slightly too high, eyes too wide apart, or a mouth too low can completely change a character’s expression and personality. Understanding the natural layout of the face is the first step to spotting and fixing errors.
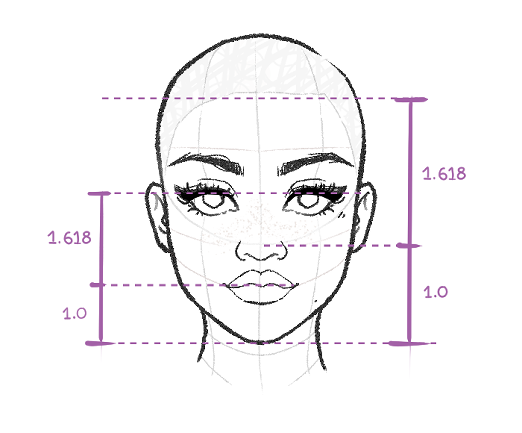
The Golden Ratio
The Golden Ratio (approximately 1:1.618) can be a helpful visual reference when thinking about balance and harmony in the face. It’s not meant to dictate exact feature placement, but it can support your judgment when comparing relative distances - such as how the face is divided between the forehead, nose, and chin, or how features relate to each other overall. Used flexibly, the Golden Ratio can reinforce a sense of natural balance, especially when combined with anatomical knowledge, observational drawing, and style awareness. Treat it as one of many tools that inform your eye, not a formula that replaces it.
Proportions Are About the Relationships of Facial Features - Especially in Stylized Art
The examples shown here use a stylized approach, with larger and simplified features. Proportion issues most often appear when drawing in non-realistic or semi-stylized styles, where exaggeration can easily throw off spacing and alignment. Even in cartoonish or anime-influenced characters, these guidelines still apply. The key is that proportional principles focus on the relationships between facial features, not strict realism. Maintaining consistent spacing, alignment, and balance keeps your faces believable and expressive, while still allowing you to intentionally exaggerate features for your own style.
Even in highly stylized or simplified designs, proportion guidelines remain essential. They don’t enforce realism, but help maintain clear relationships between features, making exaggeration intentional rather than accidental.
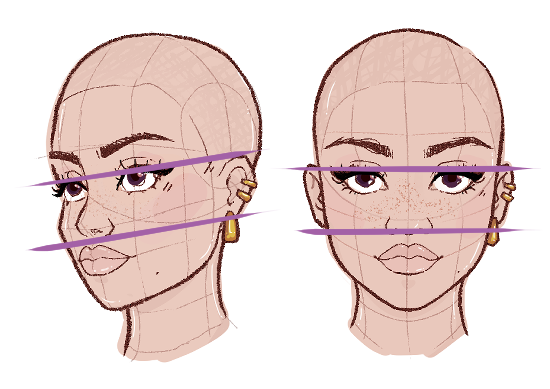
The eyes sit roughly halfway between the top of the head and the chin.
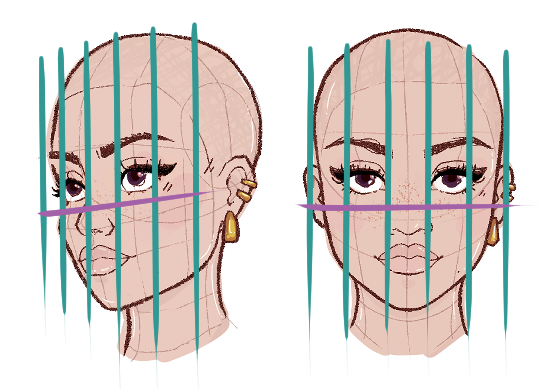
The distance between the eyes is about the width of one eye.
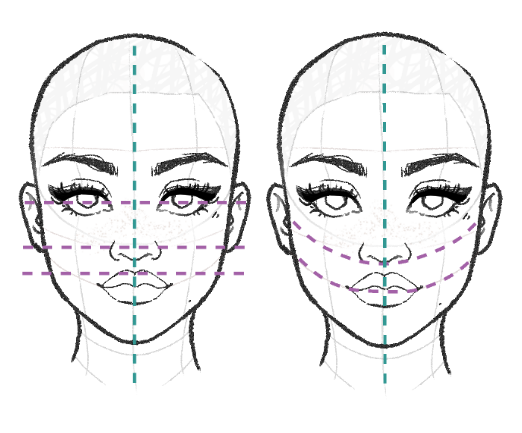
The bottom of the nose sits about halfway between the eyes and the chin.
The mouth is usually one-third of the way down from the nose to the chin.

Ears generally align with the eyes and the bottom of the nose.
The overall width of the head is roughly five eye-widths.
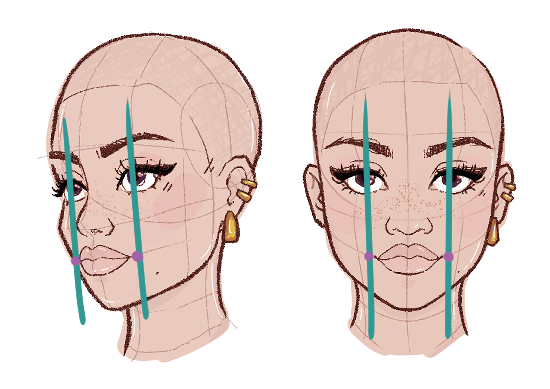
The corners of the mouth typically line up vertically with the centers of the eyes.
 These guidelines are flexible depending on style, but knowing them gives you a foundation for quick corrections.
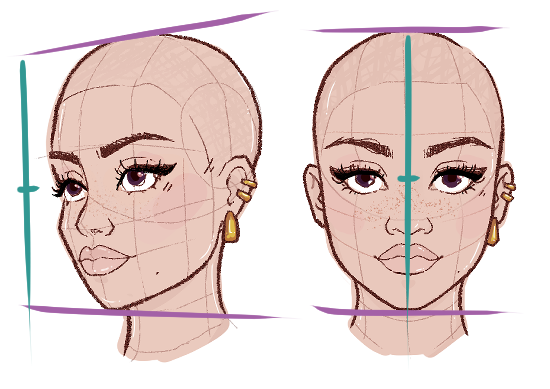
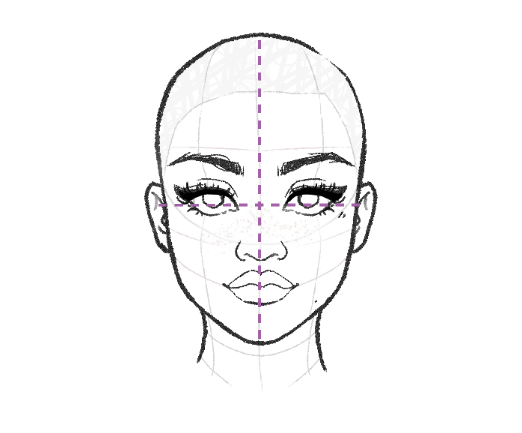
Step 1: Use guidelines to check alignment
One of the fastest ways to spot mistakes is by drawing light guidelines on your drawing of the face:
- Vertical centerline - ensures symmetry.
- Horizontal lines - for eyes, nose, and mouth.
- Angle check - a slight tilt or uneven spacing can make the face look off.
Even rough guidelines immediately reveal whether the features sit correctly, so you don’t have to guess.
 Tip for your drawings: Include the guidelines in your sketch, but keep them light. They can later become part of your reference for shading and detailing.
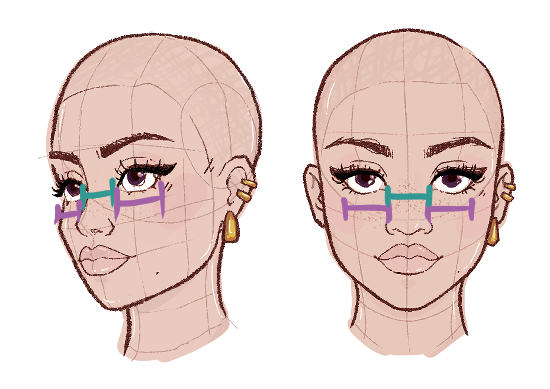
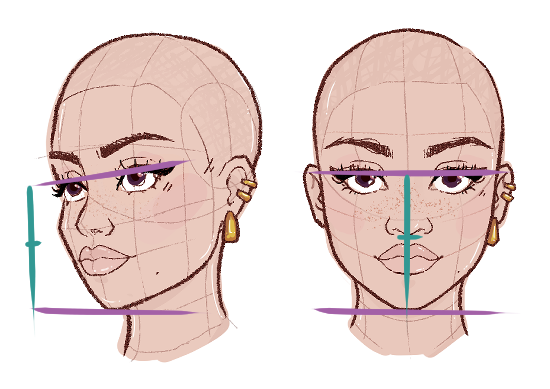
Step 2: Measure and compare
Artists often use measurement techniques to speed up corrections:
Eye-width spacing: Use the width of one eye as a unit to check distances between eyes, nose, and mouth.
 Head units: Divide the face into halves or thirds to verify feature placement.
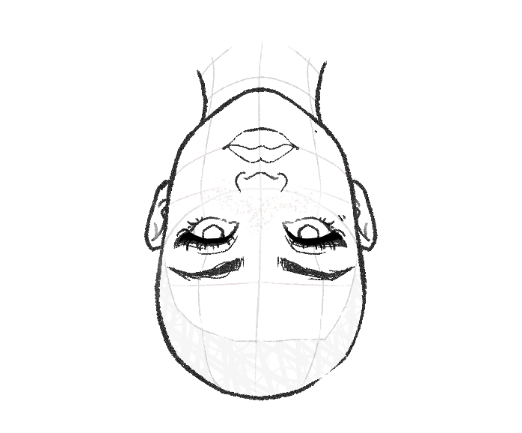
 Flip/mirror/upside down check: Flipping the canvas (or holding your paper up to a mirror) and checking it upside down instantly highlights misalignments.
These techniques train your eye to catch errors fast, before they become bigger problems later.
At first, using measurements may feel slow or restrictive, but this phase is temporary. The more you apply these checks, the more they become instinctive. Over time, you’ll start seeing proportional mistakes before you even measure them.
Many artists skip this step because they want to jump straight into details - but accurate proportions are what make details look convincing. Spending a few seconds measuring can save you hours of fixing later.
Step 3: Build accuracy with PoseMyArt 3D references
Accurate proportions aren’t about talent - they’re about having reliable visual information. This is where 3D references become essential.
PoseMyArt provides poseable 3D models that let you study facial proportions in a controlled, repeatable way, instead of guessing from memory or relying on flat images.
Here’s how PoseMyArt supports proportion training:
Rotate the model to examine the face from any angle.
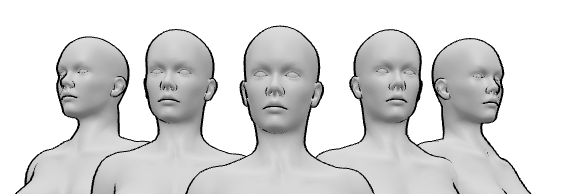
Compare your drawing directly to the reference to see exactly where features sit in space.
Practice with intention by isolating one feature at a time, such as the eyes, nose, or mouth.
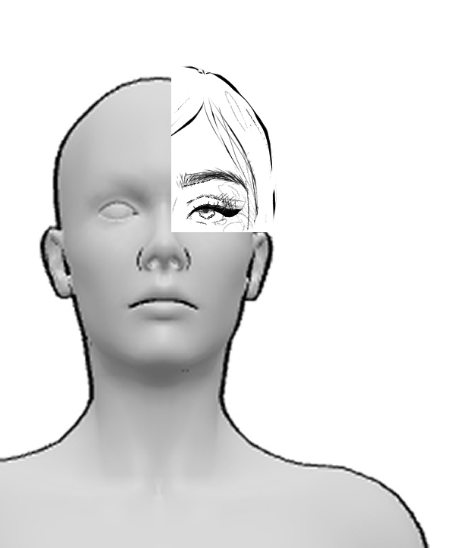
Check the proportions on different models.
 Tip for your sketches: Don’t just trace the model. Observe proportions, angles, and distances, then translate that knowledge into your style. Over time, your eye will automatically recognize correct proportions.
Step 4: Focus on one feature at a time
A common mistake is trying to fix the entire face at once. Instead:
- Start with the eyes - check spacing, size, and alignment.
- Move to the nose - ensure it sits proportionally below the eyes.
- Finish with the mouth - check placement and width.
Breaking the face into parts allows for faster, more precise corrections. By isolating one feature at a time, you reduce visual noise and make clearer decisions. This approach allows for faster, more precise corrections and helps you understand how each facial element relates to the whole.
Step 5: Practice smart and often
Consistent practice beats hours of random sketching. A few minutes daily focused on proportions will build intuition faster than doing dozens of rushed full-face sketches. Try:
- Quick 5-minute head studies - help you notice proportion mistakes before they become habits.
- Practicing different expressions while keeping proportions consistent - this strengthens your understanding of how features shift naturally.
- Rotate 3D models - to study subtle changes in angles, spacing, and alignment.
With repetition, correct facial proportions will become instinctive, reducing the need for constant correction.
The key is mindful repetition: observe, adjust, and internalize. Over time, your brain begins to recognize correct proportions automatically, letting you spend less time correcting mistakes and more time adding character, expression, and style to your drawings.
Remember: it’s not about volume alone, but the quality of attention in each sketch. Even a few deliberate minutes every day compound into noticeable improvement, often faster than marathon sketching sessions.
Exercise idea: Keep a small sketchbook dedicated solely to head studies. Set a timer for 5–10 minutes and focus on a single element, such as eye spacing or mouth width. After each session, compare with references or your previous sketches to track improvement. Over weeks, this habit builds muscle memory for correct proportions and sharpens your observational skills, making larger, more detailed portraits faster and more accurate.
Common mistakes to watch for
Even experienced artists can fall into these traps:
- Eyes too high or too low - makes the character look surprised or tired.
- Mouth too wide or narrow - changes the expression drastically.
- Nose placement off-center - breaks symmetry.
- Overly stiff jawline - makes the face feel unnatural.
Spotting these early with guidelines and references is key. Of course, these “mistakes” can also be used intentionally to convey emotion, personality or drawing style - but the important thing is to make that choice consciously.
For example, slightly raising the eyes can make a character appear surprised or curious, while lowering them might give a tired or sad expression. A wider mouth can suggest confidence, joy, or even mischief, whereas a narrow one might read as reserved or tense. Off-center noses, exaggerated jawlines, or asymmetrical features can all add unique character traits, making a face memorable and full of personality.
The key is awareness: don’t let these deviations happen by accident. Observe, understand, and then deliberately bend the rules to enhance the emotion or character you want to convey. Over time, your eye will learn to spot when a slight exaggeration will make a drawing more expressive, turning what might initially seem like a “mistake” into a powerful storytelling tool.
Final thoughts
Face proportion errors don’t have to be frustrating. By combining guidelines, measurement techniques, and tools like PoseMyArt, you can quickly identify and fix mistakes, giving your characters balance and personality. Even small adjustments - like moving the eyes slightly closer or adjusting the nose - can completely transform a drawing, making it feel alive.
The fastest way to master face proportions is to practice with purpose, study your references, and keep iterating. With consistent effort, proportion mistakes become easier to spot, easier to fix, and your characters will look more natural and expressive than ever.