Anatomical Landmarks for Drawing: How to Understand the Body in 3D
You can know the proportions of the human body, understand basic anatomy, and still struggle to place a character convincingly in a pose. The problem is often not a lack of anatomical knowledge. It is that you are trying to construct the figure without enough reliable reference points.
This is where anatomical landmarks become useful - a few key points on the body can tell you where the major forms are, how they connect, and how the whole figure is oriented in space. Instead of trying to reproduce a complicated silhouette, you can use these landmarks to build the body from the inside out.
And there is another reason they matter: landmarks become especially valuable when you stop looking at the body from one fixed angle. A pose that seems easy to copy from the front can suddenly become surprisingly difficult from a three-quarter or side view. Landmarks help you keep track of the body’s structure when you view the pose from different angles.
What Are Anatomical Landmarks?
Anatomical landmarks are recognizable points or structures on the body that help you locate its underlying anatomy. For artists, many of the most useful landmarks are connected to bones: the clavicles, shoulder joints, elbows, wrists, pelvis, knees, and ankles.
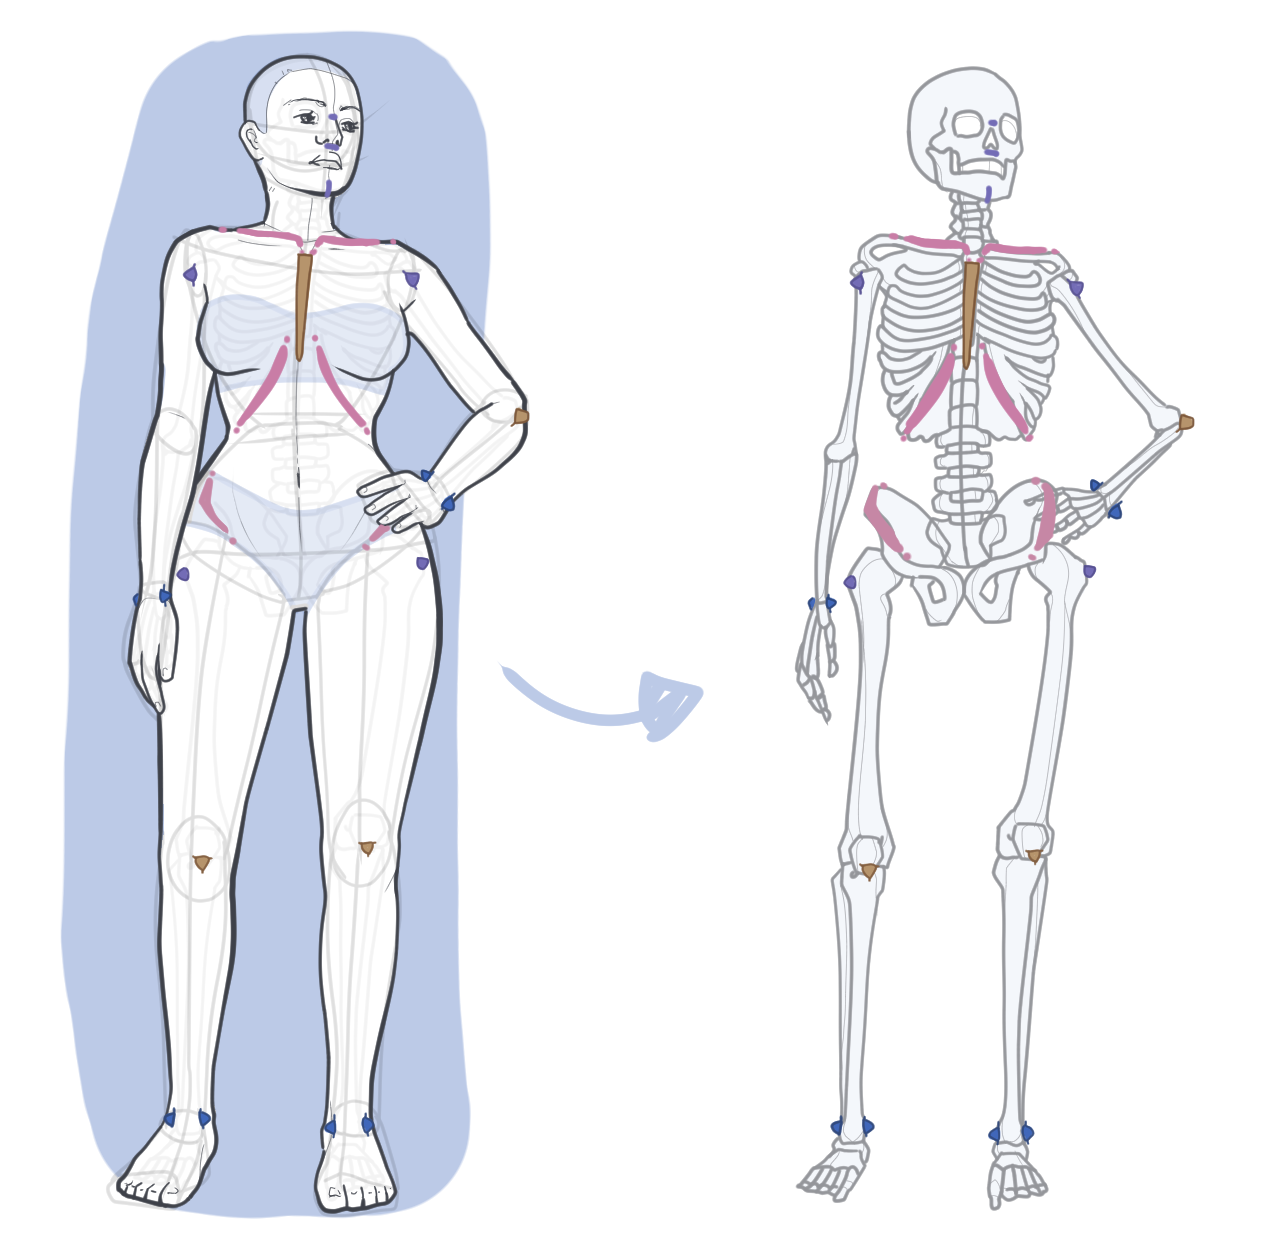
You do not need to memorize every bone or muscle to use anatomical landmarks effectively. The goal is to identify a few reliable points that help you understand the position and orientation of the larger forms around them.
Think of them as points you can use to measure relationships. Where is the elbow compared to the shoulder? How far is the knee from the pelvis? Are the shoulders and hips tilted in the same direction, or are they counter-tilted?
These relationships are often more useful for constructing a pose than the exact outline of the body.
The Most Useful Landmarks for Artists
You do not need to mark every anatomical structure in a reference. Start with the points that help you understand the major masses and the position of the limbs.
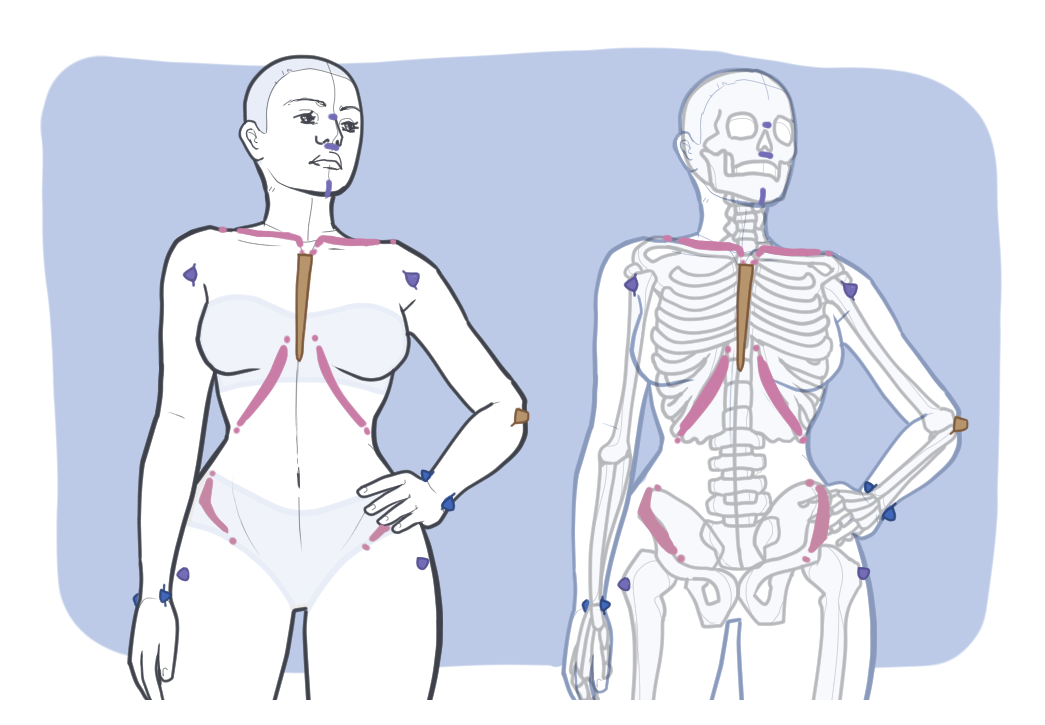
Clavicles and shoulder joints
The clavicles can help you see the angle of the shoulders, while the shoulder joints show where the arms actually connect to the torso.
Elbows and wrists
These give you clear points along the arms. Connecting the shoulder, elbow, and wrist makes the direction of the arm much easier to judge, especially when it is bent or foreshortened.
Ribcage
The ribcage is not a single point, but its overall shape and orientation are important. Think of it as a 3D volume: is it tilted, rotated, or leaning in a particular direction?
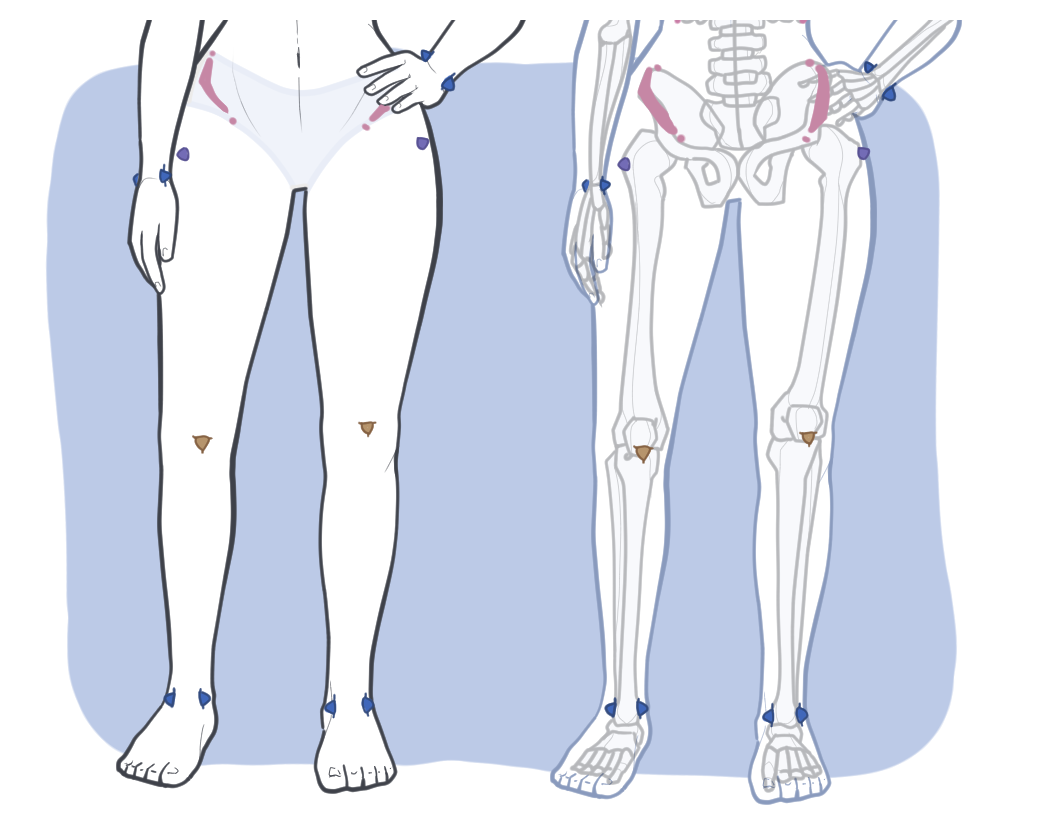
Pelvis
The pelvis is one of the most important structures to establish. Its tilt and rotation affect the position of both legs and contribute strongly to the overall balance of the pose.
Knees
The knees help define the direction of the legs. Their position becomes particularly useful when one leg is bent, crossing the other, or pointing toward the viewer.
Ankles and feet
These show where the figure meets the ground. Their position helps you understand the direction of the lower legs and, in standing poses, how the body is supported.
How to Use Landmarks to Construct a Pose
Once you identify the landmarks, you can use them to construct the figure before adding detailed anatomy.
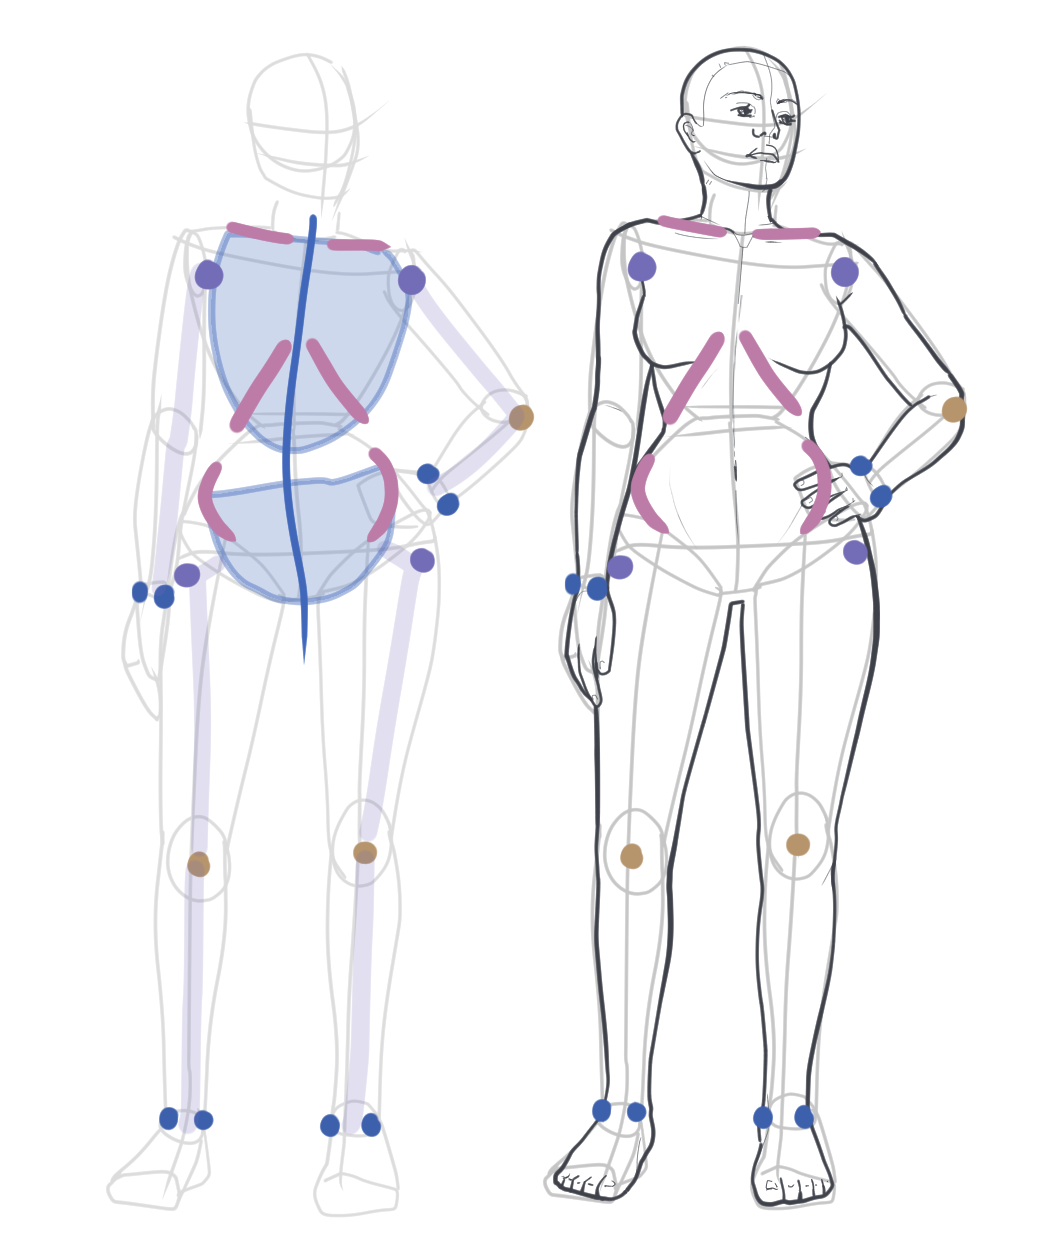
Start with the ribcage and pelvis. Think about each one as a simple 3D form and determine its tilt and rotation. They do not always face the same direction.
Then place the major joints.
For an arm, you can establish a simple chain:
shoulder → elbow → wrist
For a leg:
pelvis → knee → ankle
These points give you the basic direction of each limb before you worry about its thickness or surface contours.
This is especially useful for foreshortened poses. If an arm is pointing toward the viewer, for example, the distance between the shoulder and elbow may appear much smaller than you expect. Rather than correcting the arm based on how long it “should” look, locate the shoulder and elbow in space first.
The same applies to the legs. If the knee is moving toward the viewer, it may appear unusually large while the lower leg seems very short. The landmarks help you understand that this is a result of perspective rather than incorrect proportions.
Why Different Angles Make Poses Difficult
A major challenge in figure drawing appears when you try to draw the same pose from another angle.
From the front, you might clearly see both shoulders and the full width of the pelvis. Rotate the figure into a three-quarter view, and one shoulder moves in front of the other. Part of the pelvis disappears. The limbs begin to overlap.
The proportions of the person have not changed. The way those proportions are projected onto the page has changed.
This is why copying the silhouette can become unreliable. The visible contour tells you what the body looks like from one particular viewpoint, but it does not necessarily tell you how the underlying forms are positioned.
Landmarks give you a way to check that structure.
If you know where the shoulder joint, pelvis, knee, and ankle are, you can compare their positions and angles even when the surrounding shapes become difficult to read.
This kind of comparison is particularly useful for studying anatomy in 3D. Instead of memorizing a single appearance, you begin to notice how the same structures behave as the viewpoint changes.
How 3D Pose References Help
This is where 3D pose references can become a practical tool for studying anatomical landmarks.
A photograph gives you one fixed view of a pose. A 3D reference allows you to rotate the figure and inspect the same pose from different angles. That makes it much easier to study relationships that may be hidden in a single image.
For example, you might see a character’s shoulder and pelvis from the front and assume they are relatively level. Rotate the 3D figure to the side, and the tilt becomes much easier to understand. The same can happen with a bent arm, a twisted torso, or a leg crossing behind the other.
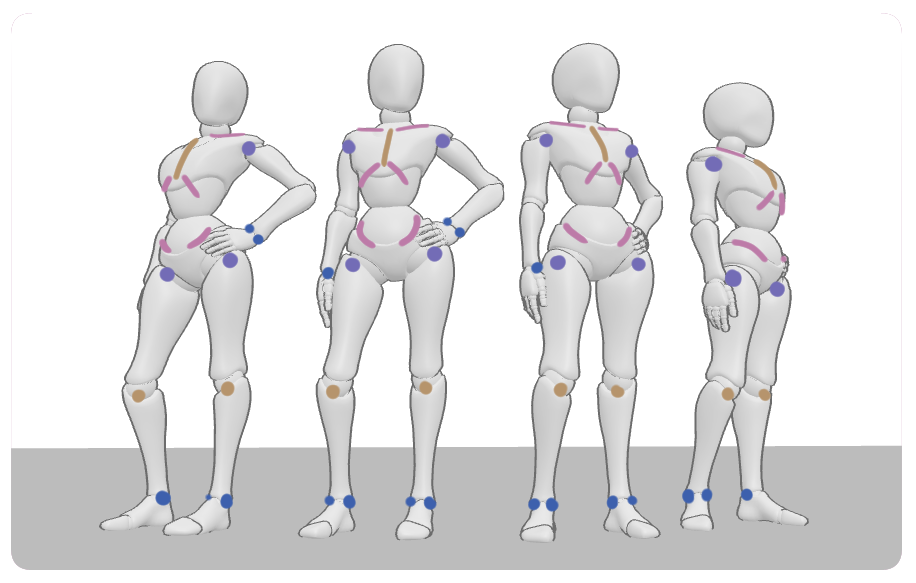
You can also use this as an active drawing exercise.
Choose a pose, identify the main landmarks, and draw the figure from one angle. Then rotate the 3D reference and try to redraw the same pose from the new view.
Do not start by copying the silhouette. First estimate where the ribcage, pelvis, and major joints have moved. Then construct the limbs between those points.
This forces you to think about the figure as a 3D structure rather than a flat image.
Final Thoughts
Anatomical landmarks give you a practical way to simplify figure construction. Instead of trying to solve every contour, muscle, and anatomical detail at once, you can start with a small number of reliable points and build the larger forms around them.
The most important step is to pay attention to relationships: the angle between the ribcage and pelvis, the position of the joints, the direction of the limbs, and how these elements change when the viewpoint changes.
And this is exactly where 3D pose references can be valuable. They let you rotate a pose, inspect those relationships from different angles, and practice constructing the figure instead of simply copying its appearance.
The goal is not to memorize how the body looks from every possible angle. It is to understand where its major structures are in space - so you can draw the body even when the angle changes.